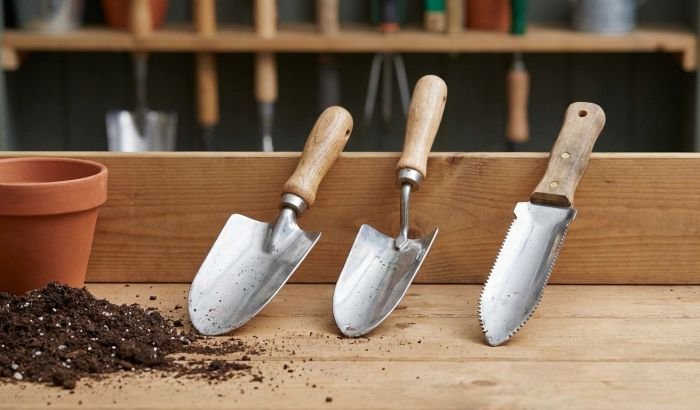
The best materials for composting decide whether your bin turns into dark, crumbly soil food or a cold, slimy heap you dread lifting the lid on.
Many gardeners see the same scene each week – a flat pile of slick peels, clumped grass, and a center that never quite warms, even while beds are hungry for organic matter. When you learn which scraps lift the pile into a loose, breathing mass and which ones pin it down, every bucket from the kitchen or yard starts to feel like a boost rather than a burden.
The right mix brings that damp, forest floor smell, a surface that moves under the fork, and a finish that spreads easily through beds without clods or sour pockets.
Key Takeaways
- Choose scraps that build a loose, lively, sweet smelling pile
- Match greens and browns so beds see faster growth
- Turn kitchen waste into rich compost without extra tools
- Use quick touch and smell checks to catch trouble early
- Avoid dumping thick layers of one material that suffocate heat
Table of Contents
Core compost materials for reliable results
A compost pile built from the right raw materials heats up quickly, holds a springy texture, and finishes as dark, crumbly soil food. When you focus on plant based inputs with the right structure, you get the best materials for composting without constant fixes or add ons. Choose ingredients that feed microbes while still leaving enough gaps for air and drainage.
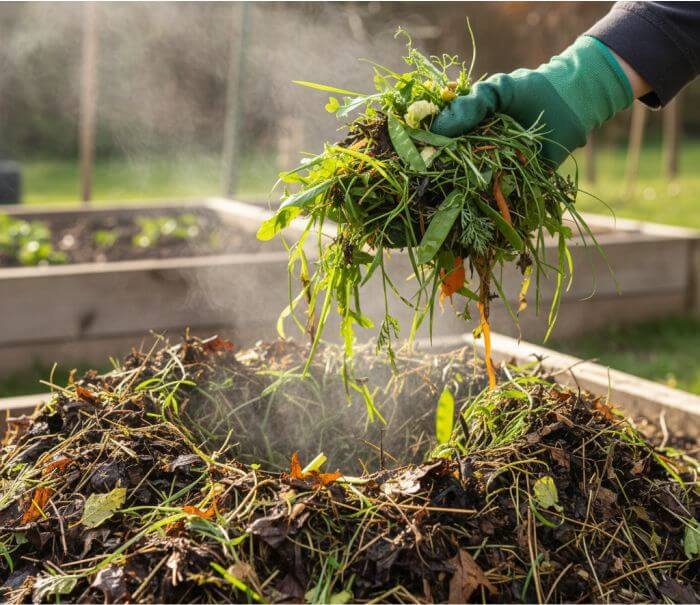
Greens that activate early microbial heat
Greens are the moist, nitrogen rich ingredients that kick off activity in a new pile. Good greens feel cool and damp in the hand rather than slimy or sticky, and they break apart easily when squeezed. That texture allows microbes to move through the pile while still holding enough water for quick colonization.
Soft yard growth works very well for this role, especially fresh grass clippings, thin prunings from herbaceous plants, and pulled weeds without seed heads. Kitchen preparation scraps from vegetables and fruit add more variety, yet they should be mixed in thin layers so they do not collapse into a dense mat. Aim for pieces no longer than a few inches, because shorter fragments heat faster and blend more evenly with supporting materials.
Browns that keep piles open and well aerated
Browns supply carbon and shape the skeleton of the pile. Their main job is to keep the mass loose enough for air to move through even after several rounds of moisture and settling. Dry, fibrous ingredients that bend once before snapping tend to work best, since they resist crushing while still breaking down over time.
Dry autumn leaves, straw, and coarse plant stems are reliable sources of this structure. Shredded cardboard or paper can help when yard browns are in short supply, though they perform better when torn into narrow strips rather than small squares. I often notice that piles built with a clear layer of long, dry browns between every load of greens hold their shape far longer after heavy rain.
Simple additions that stabilize texture
Some materials are there mainly to tune the feel of the pile rather than feed microbes. These additions help absorb excess moisture, fill gaps, or soften sharp changes in structure. They are very useful when you work with a lot of one type of waste, such as grass or kitchen peelings.
Sawdust from untreated wood, chopped corn stalks, and dry ornamental grass clippings all act as stabilizers. They soak up free water and add fine channels for air to move through a dense mix. Coarse wood chips and small twigs belong more on the outside layers, where they brace the pile and prevent side slump as the middle settles. When these stabilizers are on hand near the working area, it becomes easy to correct texture every time a new load of material arrives.
| Material type | Function in pile | Prep detail |
|---|---|---|
| Soft yard growth | Heat and moisture | Cut to short lengths before adding |
| Dry leafy material | Structure and airflow | Crush lightly to reduce mats |
| Shredded paper/card | Absorbency | Tear into strips rather than small squares |
| Coarse stems and twigs | Outer support | Place on sides and top of active piles |
| Fine dry stabilizers | Texture control | Sprinkle in thin layers over wet inputs |
Choosing materials with clear roles like these lets you shape every new pile for fast activity and predictable handling. Once these categories are in place near the compost area, daily loading turns into a simple habit instead of a constant search for extra ingredients.
Material traits that speed up compost breakdown
A cool, compact pile can sit for weeks without changing much, while a loose, warm one can shrink by several inches in a few days. The difference usually comes from how the raw materials handle water, air, and contact with microbes, not from how long the pile has been there. Material traits tell you more about compost progress than time alone.
Moisture level and early heat
Fast breakdown starts when materials carry enough moisture for microbes to move, yet still leave air gaps. A core that climbs into the 120-150°F range within the first week almost always comes from ingredients that feel damp to the touch without leaving water on your fingers. If the starting mix feels dry or powdery, heat rise will lag no matter how much nitrogen is in the pile.
Materials that hold water inside fine plant tissue tend to drive early activity better than ones that shed water off the surface. Thick, waxy skins repel moisture and stay cool for a long time, while soft tissue lets water move in and out as microbes work. If the pile cools below body temperature and stays there for several days, treat that as a signal that the materials are either too dry or too compact and adjust moisture rather than adding more volume.
Surface area and particle size
Microbes work on surface, not weight, so shape and cut size matter as much as what the material came from. Long, fibrous pieces create channels for air but break down slowly because only the outer skin is exposed. Shorter fragments share the same mass across more exposed edges, which gives microbes more entry points and speeds the whole cycle.
Aim for most soft material to sit in the 1-3 inch range, with only a small share of long stems or stalks. Very fine pieces, like dust or meal, can pack tight and slow air flow, so they need to be blended into coarser ingredients rather than dumped in a thick layer. When you see a pile that shrinks evenly across the surface instead of in isolated pockets, that usually tells you that particle size is well balanced.
- If pieces feel spongy and clump together, mix in coarser items before piling.
- If the surface looks packed like a mat, break it up and remix before turning.
- If you see many stiff, unbroken strands after two or three turns, cut future loads shorter.
Fiber softness and structural openness
Plant fibers vary from soft and flexible to tough and woody, and that texture controls how quickly the pile relaxes after you build it. Soft fibers collapse around air pockets as they decay, which can reduce airflow if there is nothing stiff to hold open the structure. Tough fibers resist bending, so they keep voids open longer but take more time to disappear into finished compost. A good blend uses soft material for food and stronger pieces for internal framing.
Very hard fibers slow the process most when they sit in the center of the pile, since they shed water and remain cool. Keeping them nearer the outer third of the heap lets them support shape without blocking the warmest zone. When materials of mixed firmness are layered, microbial activity can move through the softer bands first, then gradually work into the tougher strands as the pile settles.
A section that warms quickly, settles gradually, and still feels springy underfoot after several weeks usually points to the right balance of moisture, particle size, and fiber strength. When you tune traits at the material level, you rarely need to worry about the clock, because the pile will show progress in its own texture and temperature.
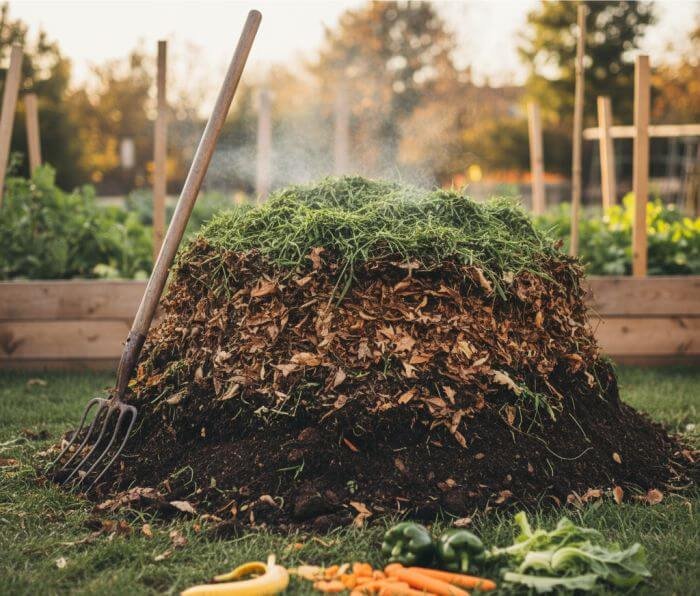
Practical ratios that keep heat, moisture, and airflow stable
A compost pile that swings from soggy to brittle never builds the consistent warmth needed for smooth breakdown. Most issues trace back to how the greens and browns sit together, controlling the critical C:N ratio rather than what they are. When the mix holds a loose, springy feel from top to base, heat builds on its own and stays within a workable band day and night.
How to read moisture and texture in the pile
Moisture is the first indicator of balance because it controls both heat rise and airflow. A well-mixed load feels damp when squeezed but does not drip, and the surface shows a dull sheen rather than a glossy film. If the blend feels heavy and clumps into balls, the mix leans too wet and needs more dry structure. If it feels dusty or brittle, moisture has dropped too low for sustained microbial activity.
Color changes offer another clue. A mix that turns uniformly darker within a week usually signals that breakdown is underway and moisture is in the right range. Pale streaks or dry islands often appear when pockets of browns sit untouched, which means the mix has not been folded evenly. Stir those pockets into the central zone rather than piling more material on top.
Pro tip – When loading the bin during warm months, make a quick squeeze test on a handful from the latest layer. If it sticks to your palm, sprinkle a thin veil of dry material over the surface before adding the next load. This prevents the early layers from collapsing under the weight of fresh scraps.
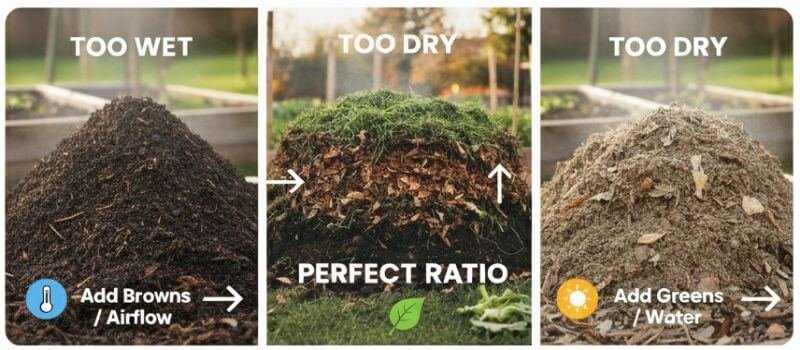
Adjustments when piles run too wet or too dry
Wet piles cool quickly because the water displaces air, and heat drops once the core temperature falls below the 100°F mark. When the surface feels slick, fold in dry material in narrow lanes instead of dumping a large batch in one spot. This approach spreads the absorbency across the core and keeps airflow open without forcing a full rebuild.
Dry piles struggle from the opposite issue. Materials fall apart too easily and leave wide gaps, so the heat escapes faster than microbes can produce it. If the outer layer looks pale and crisp, use a watering can with a fine rose to moisten the top foot of the material. A slow pass around the edges helps the pile settle into a more cohesive shape without creating wet pockets in the center.
Any adjustment should happen gradually. Sudden shifts can push the mix from one extreme to the other, so small corrections every few days work better than a single heavy fix. When handled that way, the core often stabilizes within 48-72 hours.
Seasonal balancing and weather effects
Weather swings create the biggest surprises in compost behavior. Summer heat pulls water from the pile far faster than most gardeners expect, especially in open bins where wind exposure is high. In those conditions, light watering every two or three days keeps the core above the key activity range and prevents collapse. A slightly wetter mix handles heat better than a dry one because it maintains microbial contact.
Cold months slow moisture loss but tighten airflow as fibers stiffen. When temperatures fall below freezing at night, add a small share of dry structure to maintain fluff as the pile contracts. If the outer crust becomes firm, break it gently before turning so that warm air can reach the outer layers. I often notice that winter piles with a loose top layer rebound faster during the first warm spell of spring, which shortens the overall cycle.
A balanced mix gives steady warmth and predictable texture changes across the season. Small, regular corrections based on moisture feel and surface cues keep the pile in its working band without high effort.
Kitchen scraps that fit smoothly into a balanced compost
A pile built with the right household scraps settles into a firm but springy mass that heats well without turning slimy. The key is to think about how each type of kitchen waste behaves once mixed, because moisture release, particle size, and acidity vary widely. When scraps are managed in thin layers and paired with enough dry structure, they move through the system without forming stubborn pockets.
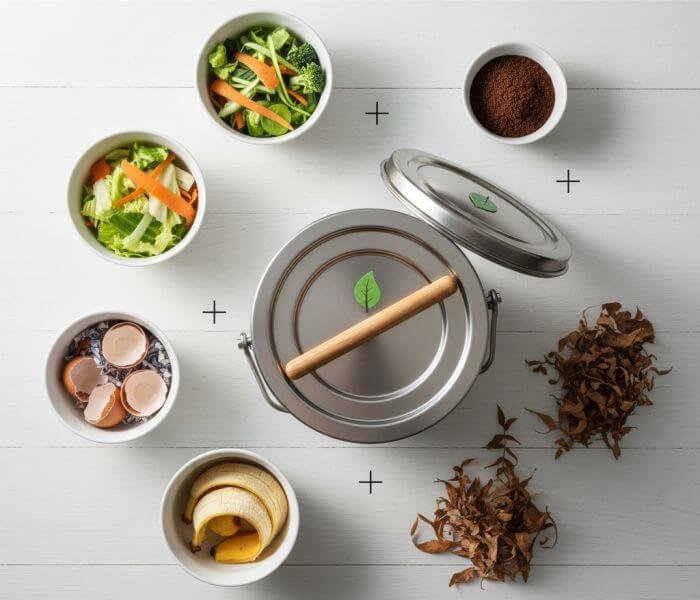
Fruit and vegetable scraps with stable moisture output
Most plant based kitchen waste carries a moderate water load that fuels early activity. Soft produce trims break down fast when mixed thinly across the working surface, because moisture spreads evenly rather than pooling in one place. A handful of cut pieces about 1-2 inches long usually blends well and keeps the pile loose.
Very juicy scraps can settle into a dense layer if dumped in bulk. Spread those items across a broader area, then sweep a fine cover of dry structure over the top. This prevents the weight of new additions from squeezing the layer flat. When the surface shows an even, matte finish after mixing, moisture is likely in a good place for steady activity.
Coffee, tea, and processed leftovers
Coffee grounds behave like fine soil particles. They hold water well but can compact if added as a thick band. A light scattering across the top of the pile blends best, especially when paired with chopped browns. Brewed tea leaves offer a similar effect but break apart more easily, so they rarely need as much structure to stay loose.
Cooked grains and small bits of pasta break down quickly but should be handled carefully during warm months. Their high starch content draws moisture rapidly and can form a gluey patch if buried too deep. Keeping them near the upper third of the bin works better, as the surrounding airflow lowers the chance of compression.
Household scraps and how they behave in the pile
Many gardeners ask whether everyday scraps behave well once added, and most plant based items work with minor adjustments. Soft fruit peels, including banana skins, break down smoothly when cut into shorter pieces and mixed with dry browns. Moldy produce breaks down normally as long as it is folded into the center rather than left near the surface. Scraps with seeds or skins should be chopped so the breakdown stays even across each turn.
When household waste is blended thinly and paired with dry structure, the pile keeps its shape and stays warm without extra handling. Adjustments from one load to the next make far more difference than chasing new inputs or tools.
How material choice shapes final compost texture and nutrient feel
A well built compost pile settles into a dark, springy material that crumbles between the fingers without turning dusty. The outcome depends on how the original inputs behaved during heating and curing. When the mix contains a good spread of textures and moisture levels, the finished product carries a balanced nutrient feel that works across most garden beds.
Heat patterns that influence curing
Early temperature swings tell you a lot about how the pile will finish. A core that rises above the 120°F range during the first week usually cures into a uniform mass, because the heat wave breaks cell walls and blends fibers. When heat gain stalls or stays low, the untouched bands hold their shape deeper into the cycle and slow the move toward a fine, crumbly texture.
A pile that drops temperature too quickly after turning often needs more internal contact between materials. Small voids or dry pockets reduce the warming effect, so the curing stage lasts longer. If temperature readings fall below the mid 90s and refuse to climb after mixing, work more soft material into the center before closing the pile.
Airflow patterns that shape final crumble
The internal frame built by coarse fibers is what sets up the eventual crumble. These pieces resist compression long enough for microbes to hollow them out, which creates tiny channels that remain after the rest of the material settles. Those channels help the compost fall apart easily during use, whether you spread it across beds or mix it into soil.

Too many fine particles early in the process can make the final batch dense. When the pile packs tight, the remaining fibers collapse into narrow layers instead of open pockets. Turning helps, but the best fix is to mix coarse structure into future loads so the center holds its form through the warmest period.
I often notice that finished compost with a firm but flexible feel came from piles with a steady backbone of tougher fibers. That structure sets up the crumbly finish even if the soft material varied from week to week.
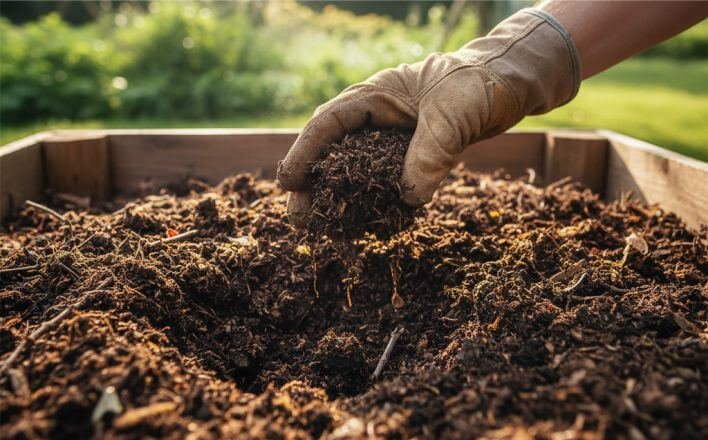
What finished compost looks and feels like
Mature compost carries an even, dark color with no visible patches of raw tissue. The material feels cool and loose, and it falls through your fingers with only small clumps. If the mass stays sticky or holds a glossy surface, it needs more time because moisture is still trapped inside partially broken fibers.
Weight is another indicator. A batch that feels light for its volume is usually ready for use, since most of the internal water has evaporated and the fibers have collapsed into a stable form. When scooped from the bin, the pile should release easily from the shovel and show minimal sticking along the edges.
Finished compost that reaches this texture spreads uniformly across beds and integrates quickly with garden soil. When the inputs were mixed with an eye for airflow and heat behavior, the final product stays workable season after season.
Practical Wrap-Up
A compost pile behaves predictably once you set a cadence for adding and adjusting materials. A quick surface check every 2-3 days during warm months keeps moisture in the working range, and a deeper turn every 10-14 days keeps airflow open. When heat dips below the mid 90s for more than a couple of days, treat that as a prompt to blend in fresh soft material rather than adding more bulk. Small, regular actions stabilize temperature far better than large weekend corrections.
The first signs of imbalance show up in texture. A top layer that feels slick signals the need for more dry structure, while a pale, brittle surface points to moisture loss. Folding new loads in thin bands helps the core maintain contact between soft and firm pieces. That contact shapes the final feel of the compost and shortens the curing stage by several weeks.
A simple routine keeps the system reliable through the seasons. Once you see how different materials behave under your local conditions, decisions become quicker and the pile works with minimal handling.
- Keep new scraps in thin, well spread bands
- Check surface moisture every 2-3 days
- Turn deeper layers every 10-14 days
- Add dry structure when the surface feels slick
- Moisten the outer foot when the pile turns brittle
Can you compost only kitchen scraps without adding yard waste?
You can, but the pile will compact and stay wet unless you bring in a dry partner material. When kitchen waste piles up on its own, it tends to mat and cool, even if the bin is full. Keep a container of torn cardboard, paper egg cartons, or bagged fall leaves near the bin and mix in a similar volume of dry material each time you tip in a pail of scraps. If the surface starts to shine or feel slick, that is a sign you need more structure before the next load.
What happens if a compost pile has too many greens?
A mix heavy on soft material usually turns dense and cools down, even though it started with strong heat. You may see shiny, compacted layers and smell a sour note when you lift the lid. The fix is to fork narrow lanes through the mass and fold in dry structure until the pile feels springy again. If the core temperature stays below the mid 90s for several days after that adjustment, repeat a lighter round of dry additions rather than adding more fresh waste.
How much dry material should I keep on hand near the bin?
A simple rule is to store at least one full bag or bin of browns for every two containers of kitchen waste you expect to add in a week. That buffer lets you dress each fresh layer and still have reserve for wet spells or heavy harvest days. In practice, most home piles run well when there is a bale of straw or two large bags of shredded leaves stacked within a few feet of the compost area so you never skip the dry cover step.
Is moldy or slightly rotten food still safe to use as compost materials?
Yes, as long as it is plant based and handled correctly. Mold tells you microbes are already working, so that material will usually disappear quickly once it reaches the warmer center of the pile. Fold it into the middle rather than leaving it near the surface, and pair it with extra dry structure to keep texture open. If you see large clumps of moldy scraps in later turns, cut them smaller before the next batch goes in.
Are shredded mail and cardboard safe to use as browns?
Plain cardboard, kraft paper, and non-glossy mail generally make good dry inputs. Avoid pieces with heavy plastic coatings, foil printing, or thick, waxy color because those layers break down slowly and can leave fragments in the finished compost. Tear mail and boxes into narrow strips rather than small squares so the strips hold channels for air. If you notice a papery layer forming near the top, mix it deeper and add more coarse material on the next round.
Which compost materials are best for small urban setups?
Limited space calls for ingredients that break down cleanly and do not pack the container wall to wall. Chopped vegetable scraps, crushed eggshells, coffee grounds blended with a light cover of shredded paper, and small amounts of dry leaves work well in compact bins. Avoid long stems or bulky stalks that wedge against the sides, since they make turning hard. When space is tight, think in terms of thin, mixed layers rather than large single-material dumps, and your best materials for composting will be the ones that fit that pattern.
How often should I change the mix of compost materials through the year?
The base pattern stays similar all year, but the ratio shifts with the season. In hot, dry weather you can lean slightly higher on moist scraps because evaporation is faster, and a quick hand check every 2-3 days keeps you on track. In cool, wet stretches, favor more dry inputs and smaller batches of greens so the core does not collapse. Any time you see either a crust forming on top or a soggy layer in the middle, treat that week as a prompt to adjust the mix rather than adding new material in the same way.
Do I need to pre-cut all compost materials for faster results?
Pre-cutting helps, but the benefit depends on texture. Soft items respond well to being reduced to 1-3 inch pieces, since that size balances airflow with exposure. Very woody stems gain less from cutting, because microbial access is limited more by hardness than by length. Focus your effort on trimming the soft, bulky pieces that tend to form clumps, and leave minor twig trimming for times when you are already turning the heap.