Updated April 16, 2026
Garden lighting starts not with the fixture, but with understanding the three jobs any outdoor lighting plan needs to do. Most beginners buy a starter kit, line path lights along the driveway, and then wonder why the result feels functional but flat. The problem is rarely the hardware. Ground-level lighting on its own creates no depth, no focal point, and no real reason to stay outside after dark. One well-placed spotlight on a tree or a soft wash across a stone wall changes the whole garden after sunset.
The first decisions are practical: which light types belong in the space, when solar is enough, when low voltage is the better system, and what needs to be planned before a single fixture is bought.
Key Takeaways:
- Plan lighting in three zones – safety, accent, atmosphere – before choosing any fixture
- Use 2700K-3000K warm white LEDs on foliage; cooler temperatures wash green tones grey
- Size your transformer at 25% above total fixture wattage to prevent overload and allow for expansion
- Space path lights 8-10 feet apart – closer creates a runway effect that reads as industrial, not garden
- Set timers to switch off after midnight to reduce impact on moths, bats, and night-flying insects
Table of Contents
Garden Lighting Basics – The Three Goals That Organize Everything
Before you think about a specific fixture, think about what that light needs to accomplish. Every well-lit garden balances three distinct goals: safety, accent, and atmosphere. Most beginner setups address only one.
Safety lighting handles steps, path edges, and level changes – anything that could cause a fall after dark. It does not need to be bright. The Illuminating Engineering Society recommends 50-100 lux for residential path lighting, which is roughly the brightness of a well-lit hallway. That is enough for safe footing without washing out everything else around it.
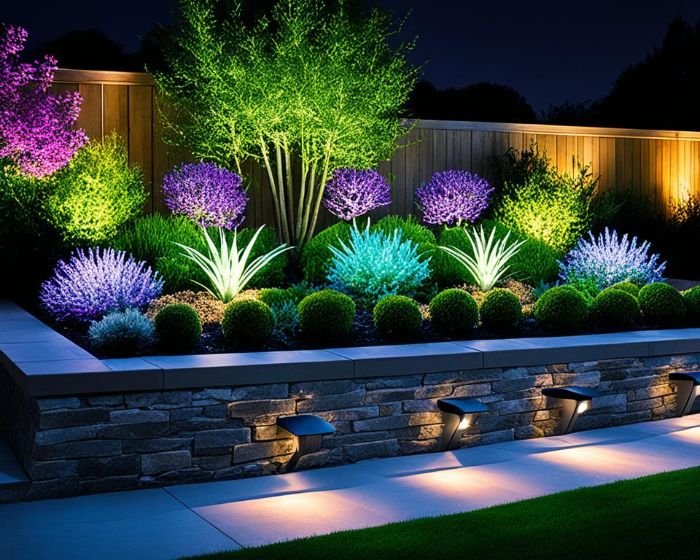
Accent lighting draws attention to something worth seeing – a mature tree, a stone wall, a gate, a sculpture. This is where most of the visual interest in a garden photograph comes from, and it is the layer most beginner setups skip entirely. Without it, the garden at night reads as a dark mass with some dots of light at ground level.
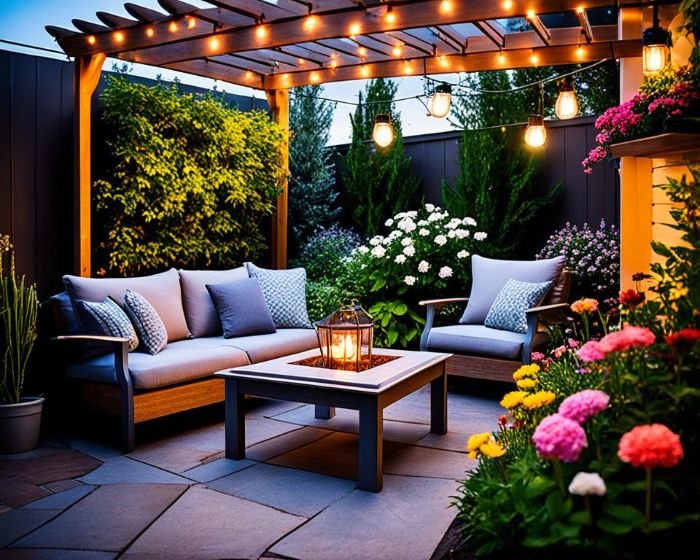
Atmosphere lighting is the softest layer: string lights across a patio, a subtle glow behind a planting border, a warm pool of light in a seating area. It creates the feeling of warmth that makes people actually want to stay outside. On its own it is not enough. Combined with safety and accent, it is what makes the difference between a garden you walk through and one you linger in.
When you sketch your first lighting plan, label every planned fixture with its zone. If every label says “safety,” you already know what is missing. The question worth sitting with before your first purchase: what do you actually want to see from the back door, standing there at nine on a Tuesday evening in October?
Types of Garden Lights – What Each Fixture Actually Does
Garden lighting catalogues can be genuinely overwhelming. Most fixtures fall into five categories, each suited to a specific job.
Path and Stake Lights
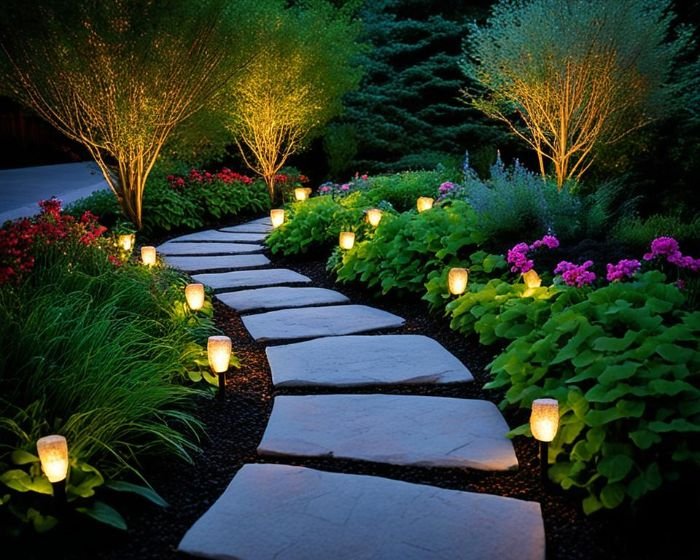
These sit at ankle height and cast light downward onto the ground. They mark edges, define walkways, and handle most safety lighting. A common mistake is spacing them too close together – 6 feet apart feels thorough but produces what installers call the runway effect, a sequence of evenly-spaced lights that reads more like an airport taxiway than a garden path. The University of Georgia Cooperative Extension recommends 8-10 feet between path fixtures as a baseline, with shielded downward-facing designs rather than open globe styles, so the light lands on the ground rather than glaring at eye level.
Spotlights and Uplights
Spotlights are directional – you aim them at a target. Placed at the base of a tree or wall and angled upward (uplighting), they create the shadows and depth that make a space feel designed. Beam angle matters more than wattage here: a 12-15 degree narrow spot creates a tight, theatrical effect on a trunk or column; a 30-45 degree wide flood is better for hedges or broad wall surfaces. For most garden trees, a 25-watt LED with a 24-degree beam placed 2-3 feet from the base produces clean, proportional uplighting without spilling light onto neighboring properties.
Floodlights
Broad coverage over a large area. Useful for driveways, rear lawns used at night, and entrances. Floodlights have the highest potential for light spill – onto a neighbor’s fence or upward into the sky – so directing and shielding them carefully matters more than with any other type. A motion-activated flood for security is a different conversation from an ambient flood for evening use; they need different brightness levels and positioning.
String and Festoon Lights
Entirely about atmosphere. Festoon bulbs on catenaries above a patio, Edison bulbs through a pergola – these create warmth that no task light can replicate. Because they are low-wattage and strung from existing structures, they are also the easiest place for any beginner to start without installing a full low voltage system. A single strand of 2700K festoon lights above a seating area changes how the space feels before you have committed to a single buried cable.
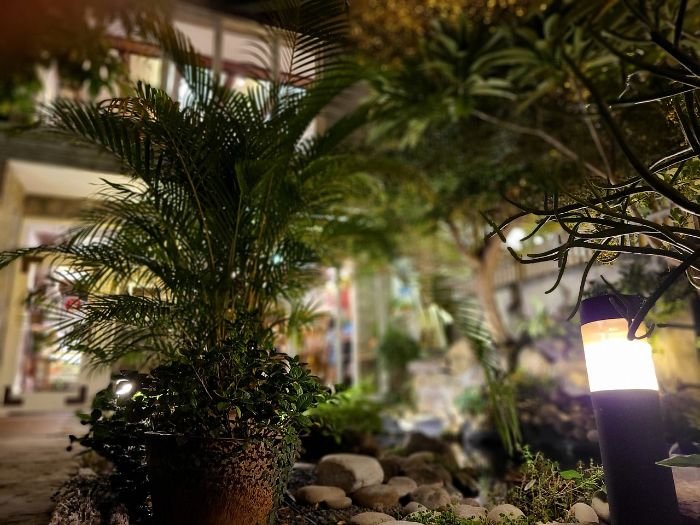
Step and Wall Lights
Recessed into risers or mounted flush to retaining walls, these handle the safety layer without adding fixture clutter above ground. They work well in formal gardens or contemporary hard landscaping where stake lights would look out of place. Color temperature matters here too – 2700K warm white blends with warm stone and brick; anything above 4000K starts to read as clinical against organic materials.
Solar vs. Low Voltage Garden Lights – Which System to Choose
The first real decision most people face is whether to go solar or install a wired low voltage system. Both work. The choice comes down to what the light needs to do, where it sits, and how much consistency you need through winter.
| Factor | Solar | Low Voltage (12V wired) |
|---|---|---|
| Installation | Stake and position, no wiring | Cable burial, transformer required |
| Running cost | Free after purchase | Low – LED draw is minimal |
| Performance in overcast conditions | Reduced, sometimes off | Consistent regardless of weather |
| Best use | Path marking, accent in sunny positions | Spotlights, entry lighting, reliable accent |
| Winter reliability | Lower – shorter days mean less charge | Unaffected by season |
| Flexibility | Easy to reposition | Fixed once cable is buried |
A practical split that works in most gardens: solar fixtures for path edges and decorative ambient lighting in sunny spots, wired low voltage for any fixture where consistent, reliable output is the point. For consistent output on an entrance spotlight or gate light, wired low voltage outperforms even premium solar garden lighting on the short, grey days of a northern winter.
Modern solar has improved significantly – lithium-battery solar path lights now run through the night reliably in summer. The failure point is winter and prolonged overcast periods. If you are in the US Pacific Northwest or anywhere that loses direct sun for weeks at a time, treat solar as supplemental and plan wired low voltage for anything that needs to perform year-round.
Garden Lighting Installation Basics – What to Plan Before You Buy
The most expensive mistake in garden lighting is buying fixtures first and planning second. What you discover after installation – that a cable run is too long, the transformer ended up behind a shed, or there is no GFCI outlet near where you need it – costs more to fix than it would have cost to think through beforehand.
Start With a Sketch
Draw your garden to rough scale. Mark the GFCI-protected outdoor outlet (your power source), then draw a line to each planned fixture location. Those lines are your cable runs. Note the length of each run. Runs over 100 feet on thin 16-gauge wire lose voltage before reaching the end fixture, resulting in dim output. For runs over 100 feet, use 12-gauge cable or divide the run by adding a second connection point physically closer to the furthest fixtures.
Transformer Placement
The transformer mounts near the outdoor outlet and steps household 120V current down to the safe 12V used by landscape fixtures. VOLT Lighting and most professional installation guides recommend positioning it 12-18 inches off the ground to keep it clear of soil splash and lawn equipment, within 6 feet of the GFCI outlet, and shielded from direct sprinkler spray.
Cable Burial Depth and Layout
Low voltage landscape cable runs 6 inches below ground in most garden areas. In areas with regular digging – vegetable borders, annual beds – go to 8 inches. Under driveways or anywhere with vehicle weight, use conduit rather than direct burial. Mark cable routes with small flags after laying. It sounds unnecessary until the following spring when you are planting bulbs.
Pro Tip: Before burying anything, lay all cable on the surface, connect every fixture, and run the entire system for one full evening. Adjust positions while everything is still moveable. A single test run like this typically reveals that one spotlight is aimed at the wrong angle, or a path light lands six inches from where it should – details that cost nothing to fix before burial and a full afternoon after it.
Spacing, angles, and fixture heights for path setups specifically – the difference between a path that guides and one that glares – is covered in detail in the pathway lighting design guide.
Transformer Sizing – The One Calculation That Prevents Problems
Every low voltage system runs through a transformer, and getting the sizing wrong is the single most common technical error beginners make. An underpowered transformer dims your fixtures, trips the overload protection, and shortens the unit’s working life.
The calculation takes two minutes. Add up the wattage of every fixture you plan to install. Then multiply that total by 1.25. The result is the minimum transformer capacity you need. The 25% buffer accounts for slight variance between fixtures, cable resistance, and room to add a fixture later without starting over.
A worked example: four path lights at 4W each (16W) plus two spotlights at 7W each (14W) totals 30W. Multiply by 1.25 and you need a transformer rated at least 37.5W – so you choose a 50W or 75W model. The U.S. Department of Energy notes that modern LED landscape fixtures use 75% less energy than the halogen equivalents that older installation guides were written around, which means the total wattage numbers for a full LED system are much lower than you might expect from reading older advice.
| Setup Size | Typical Total Fixture Wattage | Transformer to Select |
|---|---|---|
| Small path + 1 spotlight | 20-25W | 50W |
| Medium garden, mixed fixtures | 40-60W | 75-100W |
| Larger property, full system | 80-120W | 150-200W |
Choose a transformer with multiple output zones if you want to control front and rear gardens independently, or to run different timer schedules for different parts of the garden. Most mid-range models include a built-in timer. Set the off time at midnight rather than dawn. The Royal Horticultural Society has documented that continuous overnight garden lighting disrupts the navigation and behavior of moths, bats, and migratory birds passing through residential areas. Cutting the schedule after midnight costs nothing and removes most of that impact.
I often notice that brightness loss after the first season is a wiring issue, not a failing bulb. Connectors that are not fully waterproofed oxidize quietly over winter and reduce the voltage reaching the fixture. Using gel-filled waterproof connectors at every splice point from the start essentially eliminates this problem.
For gardens where trees and architectural features are the main event, and the choice of spotlight – beam width, fixture housing, lumen output by canopy shape – becomes more specific, the garden spotlights and uplighting guide covers that in detail.
Conclusion
The most common first garden lighting setup is a row of path lights, a solar stake near the patio, and a persistent feeling that something is still missing. What is usually missing is the accent layer – one well-placed spotlight on a tree, a wash of warm light across a wall, the moment of depth that gives the space a focal point. You do not need a complex system to get there. A single 25W spotlight on a well-chosen tree, combined with simple path marking at 8-10 foot intervals, changes how a garden reads at night more than doubling the number of ground fixtures would.
Start with a sketch before a purchase. Calculate wattage before sizing a transformer. Test the layout on the surface before burial. Those three steps – in that order – are what prevent most of the problems beginners encounter when the first evening switch-on does not match the picture they had in mind. Get the zones right and the fixtures almost choose themselves.
FAQ
What type of lighting is best for a garden?
No single type is best – the most effective garden lighting combines at least two fixture types serving different purposes. Path lights handle safety at ground level; spotlights or uplights create depth by illuminating trees, walls, or focal points above ground level. A garden lit only with path lights looks flat. A garden with at least one accent spotlight and path marking at 8-10 foot intervals looks designed. Start with those two layers before adding string lights or any decorative accent.
What happens if my transformer is too small for my lighting system?
An undersized transformer shows up in two ways: fixtures at the far end of a cable run appear noticeably dimmer than those close to the transformer, and the unit may trip its overload protection and shut down entirely if the total wattage exceeds its rated capacity. Running a transformer at or near its maximum load also shortens its working life. The fix is to calculate your total fixture wattage accurately before purchasing, then add 25% to that number when selecting transformer capacity.
Can you mix solar and low voltage wired lights in the same garden?
Yes, and it often makes practical sense to do so. Solar fixtures work well for path edges, border accents, and anywhere a long cable run would be awkward or expensive. Wired low voltage fixtures are better for spotlights, entry lights, and any position where consistent output matters regardless of recent weather. The two systems operate independently – solar fixtures need no connection to the transformer circuit at all – so you can add them wherever they suit the application without affecting the wired side of the system.
What color temperature should garden lights be?
2700K to 3000K warm white is the right choice for almost all garden applications. At that range, green foliage looks rich and saturated rather than washed out, warm stone and brick read naturally, and the overall effect feels inviting rather than clinical. Fixtures above 4000K (the neutral-to-cool white range) tend to make plant material look grey and flatten the visual quality of the garden at night. The one exception is contemporary hardscaping with pale concrete or white render, where a slightly cooler 3000K can complement the material tone.
How do I prevent voltage drop in a long garden lighting run?
Voltage drop becomes noticeable on runs over 100 feet when using standard 16-gauge wire – the fixtures at the far end receive less than 10.8V and appear visibly dimmer. Two approaches work: switch to 12-gauge cable for any run over 100 feet, which has lower resistance and maintains voltage over longer distances; or use a hub-and-spoke connection layout where a central connection point sits physically in the middle of a cluster of fixtures rather than daisy-chaining them end to end. Most professional installers keep individual runs under 150 feet on 12-gauge cable as a working rule.
How deep should I bury low voltage landscape cable?
Six inches is the standard burial depth for low voltage (12V) landscape cable in garden beds and lawn areas, and it meets NEC guidelines for systems under 30V. In areas you dig regularly – vegetable gardens, annual borders – go to 8 inches to give yourself a margin. Under driveways or anywhere with vehicle weight, direct burial is not the right approach; run the cable through PVC conduit instead. Unlike higher-voltage systems, 12V cable does not present a shock hazard if accidentally cut, but damaged cable still causes failures and needs to be spliced or replaced.
Is it worth hiring a professional for garden lighting installation?
For a low voltage system with fewer than 20 fixtures, a competent DIYer with a weekend and a sketch plan can install it without professional help – the 12V cable is safe to handle, the connectors are designed for DIY use, and the transformer mounts to a standard outdoor outlet. The case for a professional grows with system complexity: when you have more than 30 fixtures across multiple zones, when conduit runs are needed under hard surfaces, or when you want to integrate the system with smart home controls. A lighting designer also brings something harder to replicate: experience placing spotlights on dozens of different trees, which translates directly into fewer repositioned fixtures after the first test night.
Does outdoor garden lighting attract insects?
All outdoor light sources attract insects to some degree, but the type of light matters. Traditional halogen and metal halide fixtures with significant UV output are far more attractive to insects than warm-white LED. Choosing 2700K LED fixtures reduces insect attraction compared to cool-white or blue-tinted sources – the American Medical Association has noted that blue-spectrum outdoor lighting has a disproportionate effect on insect behavior relative to warm-spectrum alternatives. Setting lights on a timer to switch off after midnight removes the overnight attraction effect that accounts for most insect and moth mortality around residential garden lighting.