Updated April 17, 2026
A solid garden plan starts with what’s already in your yard – the light, the drainage, the soil under your feet – long before any plant goes in the ground. Most beginners ask “what do I want to grow?” when the more useful question is “what can my site actually support?” That shift changes everything.
The decisions made in the planning phase determine whether a garden builds confidence or drains it, and almost all of those decisions happen before the first seed goes in. This guide works through the core planning steps in the order they actually matter: site conditions first, layout second, plant scope third.
Key Takeaways:
- Observe your site at 9 a.m., noon, and 3 p.m. on a clear day before committing to any bed location
- Test soil pH before buying amendments – most vegetables access nutrients best between 6.0 and 7.0
- Limit your first garden to 50-100 square feet so that skill builds without the season overwhelming you
- Avoid placing beds where water pools more than 24 hours after rain – waterlogged roots fail faster than drought stress does
- Choose plants based on what your site offers, not what you hope it will tolerate
Table of Contents
Site Reading for Home Gardens – Your Conditions Set the Ceiling
The yard you have isn’t always the yard you imagined. Shadows fall in places you didn’t expect. The corner that looks sunny in April gets blocked by a neighbor’s oak by June. The slope you dismissed as awkward turns out to be the driest, best-drained spot on the property. Before sketching anything, spend one clear day watching the yard move through light.
Walk through at 9 a.m., noon, and 3 p.m. and note where direct sun actually hits at each visit. Photograph it if that helps you track the pattern. The University of Vermont Extension describes this kind of observation as a “light inventory” – a simple step that most first-time gardeners skip and that prevents more first-season failures than any other single action.
Measure your available space with a tape and transfer it to paper at a 1:10 scale. Mark permanent features: trees, fences, walls, downspouts, HVAC units. Note which direction is south. In the Northern Hemisphere, south-facing walls reflect and retain heat – a placement detail worth knowing before you commit to a bed location, whether you’re extending a warm season or protecting crops from late frost.

One thing no map shows: where does water drain after a heavy rain? Walk the yard during or just after a storm if you can. Beds placed in low-lying areas – even areas that look fine in dry conditions – tend to develop waterlogged soil that suffocates roots. That’s a condition almost no vegetable tolerates for more than a few days.
Sunlight Hours – The Number That Overrides Every Other Decision
Six hours of direct, unobstructed sun is the threshold that separates most vegetable gardens from shade plantings. That figure – six hours of full sun on the soil surface – is supported by decades of university horticultural research and holds across almost every climate in the US. Get below it for sun-demanding crops, and no amount of fertilizer or careful watering compensates.
Tomatoes, peppers, cucumbers, and squash need at least six hours and perform best with eight. Leafy greens – lettuce, spinach, arugula – tolerate four to six hours and actually appreciate afternoon shade in hotter regions, where midday sun scorches tender leaves and pushes bolting. Root vegetables like carrots and beets fall between those extremes: they’ll produce in four to five hours but develop faster and sweeter with six.
| Plant Type | Minimum Direct Sun | Optimal Sun | Partial Shade Tolerated? |
|---|---|---|---|
| Full-sun vegetables (tomato, pepper, squash) | 6 hours | 8+ hours | No |
| Root crops (carrot, beet, radish) | 4-5 hours | 6-7 hours | Limited |
| Leafy greens (lettuce, spinach, kale) | 3-4 hours | 4-6 hours | Yes |
| Culinary herbs (basil, parsley, chives) | 4-6 hours | 6+ hours | Some |
| Flowers (zinnia, marigold, cosmos) | 5-6 hours | 6+ hours | Partial |
Measuring is more accurate than estimating. Check your proposed bed every hour from 8 a.m. to 6 p.m. on a sunny day and count the hours when sun actually hits the soil – the ground where roots will grow, not the sky above the bed. Shade from a fence two feet away behaves very differently from shade cast by a tree thirty feet overhead with a full canopy.
One detail rarely mentioned: reflected light from white or light-colored walls can add the functional equivalent of one to two hours of effective light to a nearby bed. Urban gardeners have used this to grow tomatoes in technically borderline locations. It works, but it needs to be factored into the site plan early – wall proximity and color are fixed features you work with, not discover after planting.
Soil Quality Before Planting – What Your Ground Is Already Telling You
Pick up a handful of your garden soil when it’s slightly moist – not soaking, not bone dry. Squeeze it firmly in your fist. When you open your hand, notice the shape: if it holds together and crumbles with light pressure from a finger, the soil has workable structure. If it stays in a tight, slick ball that won’t break, it’s heavy with clay. If it won’t form a shape at all and falls apart immediately, it’s sandy and drains too fast to hold nutrients through a dry week.
That squeeze test – documented by the USDA Natural Resources Conservation Service as a field texture assessment – gives you the soil’s basic character before any lab result comes back. Texture controls how water and air move through the profile. Both are more important to root health than fertilizer.
Testing pH Before You Amend
Most vegetables access nitrogen, phosphorus, and potassium most efficiently when soil pH sits between 6.0 and 7.0. Below 5.5, those nutrients become chemically locked even when they’re physically present. Above 7.5, similar lockout happens with iron and manganese. A basic pH test kit costs under $15 at any garden center and takes ten minutes. For a full nutrient profile with specific amendment recommendations, your state’s cooperative extension service typically runs complete soil tests for $15-30 – a better investment for a new bed than buying amendments based on a guess.

The USDA’s Web Soil Survey also lets you look up the general soil type for your property by address before you dig – useful for understanding drainage class and natural pH range at a regional level, even if it doesn’t replace a site-specific test.
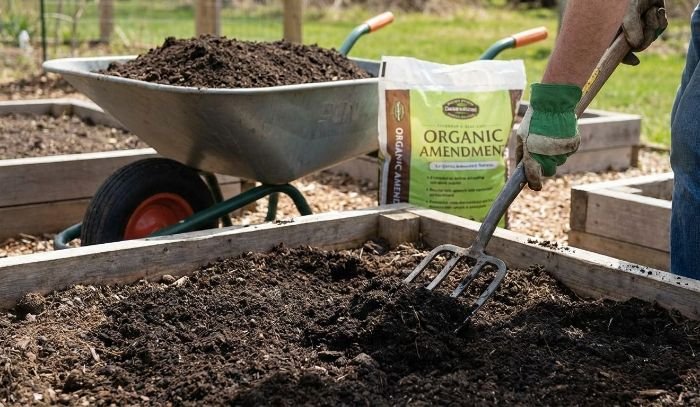
Pro Tip: When starting a new bed in compacted or depleted soil, layer 4 to 6 inches of finished compost across the surface before tilling or digging. Compost improves texture and fertility at the same time – it loosens clay, improves water retention in sand, and introduces microbial activity that continues releasing nutrients through the season.
What compost doesn’t do quickly: correct pH. If your soil tests below 5.5, you’ll need lime, and it takes six to eight weeks to shift pH by a meaningful amount. That timeline means fall amendment for a spring garden is far more effective than trying to correct it in March when you’re already behind. Plan the fix into the plan itself.
Drawing a Garden Layout – Why Paper Planning Prevents Expensive Mistakes
A sketch on paper costs nothing. A misplaced bed costs a season.
Before you define edges in the ground, draw the garden layout at scale. Graph paper at one square per foot works well for most home gardens. Transfer the measurements from your site walk. Mark sun exposure across the space – full sun, part shade, full shade – and note where your water source is and where foot traffic naturally flows. These fixed realities shape where beds can go before aesthetics enter the picture.
Spacing at Maturity, Not at Planting
The most common layout mistake is planning for the transplant size, not the mature size. A zucchini seedling looks like it needs about one square foot. At peak production it occupies three to four square feet and blocks air circulation for anything nearby. A caged determinate tomato needs 24-36 inches between plants; an indeterminate variety on a stake will push further. Crowded plants grow into each other, trap humidity, and become disease-prone through mid-summer – a cascade that starts with a planning assumption made in March.
| Plant | Common Mistake | Recommended Spacing |
|---|---|---|
| Zucchini | 1 plant per sq ft | 1 plant per 3-4 sq ft |
| Tomato (caged, determinate) | 12-18 inches apart | 24-36 inches apart |
| Lettuce (leaf type) | Dense broadcast sowing | 6-8 inches between plants |
| Basil | Pots too small, crowded | 12 inches between plants in-ground |
| Pole beans | Single row on one trellis | Two rows max, 12 inches apart, with trellis support |
Pathways Are Part of the Plan
Paths deserve space on paper before beds do. Garden planners consistently underestimate how much working room they need to kneel, crouch, and maneuver between beds. A 12-inch path sounds reasonable until it fills with plant overhang in July. Working paths should be 18-24 inches minimum between beds – wide enough to kneel comfortably without compacting the growing area.
Here’s a question worth sitting with before you finalize any layout: if reaching the center of a bed requires stepping into it, is that bed actually the right width? A 4-foot-wide bed, reachable from both sides without stepping in, stays loose and productive for years. A wider bed compacts gradually with every season as footing shifts.
The article on designing a garden layout covers functional zone planning for larger properties where multiple bed types need to coexist.
First Season Scope – The Planning Decision Most Beginners Underestimate
The most common planning failure has nothing to do with soil chemistry or sun exposure. It’s scale.
A 400-square-foot garden looks manageable in February when it’s a rectangle on paper. By July, with weeding, watering, harvesting, pest monitoring, and succession planting all demanding attention at the same time, it becomes something closer to an obligation. Extension researchers at Cornell University found that new gardeners who began with plots under 100 square feet reported measurably higher satisfaction and were far more likely to continue into a second season than those who started larger.

Fifty to 100 square feet is the right first-season range. That’s roughly a 10-by-8 in-ground plot or two 4-by-6 raised beds. Grow three to five types of plants you actually cook with. Track what works and what doesn’t. Expand the second year with that information already in hand.
Plants that reward first-season effort reliably:
- Lettuce and salad greens – harvestable in 30-40 days, tolerates partial shade, cuts and regrows
- Radishes – ready in 25-30 days, useful for marking slow-germinating rows and filling calendar gaps
- Bush beans – reliable producers, no staking, minimal pest pressure in most US regions
- Basil and parsley – high kitchen return, manageable size, forgiving of beginner watering rhythms
- Zucchini – produces heavily with minimal intervention once established, a confidence builder
The honest tradeoff: starting small means leaving some ambitions on the table. You might want the tomatoes, the melons, the sweet corn, the cutting flowers, and the herb garden all in year one. You can have some of that. Deciding what to prioritize and leaving the rest for next year is a more effective long-term strategy than attempting everything and finishing the season spent and discouraged. The gardens that grow into something genuinely rewarding are built incrementally – and planning through the full year becomes easier once the basics of site, soil, and scale are already sorted from season one.
Observation: I often notice that gardeners who keep even a brief notes file – what worked, what failed, what they’d change – improve faster between seasons than those who rely on memory alone. One season’s written observations become the next season’s plan.
Conclusion
A garden plan isn’t a document you finish and then set aside – it’s evidence that you’ve read your site honestly. Getting sunlight, soil, and scale right before the first plant goes in doesn’t guarantee a perfect season, but it shifts the odds clearly in your favor. If soil pH is off by a full point, plants will struggle regardless of how carefully you water. If the first garden runs to 400 square feet without the experience to match, August will feel like a second job.
Start with the site. Map it, measure it, test its soil, count its sun hours. Let those numbers define what’s possible. The garden built from that kind of reading – cautious, deliberate, scaled to match real conditions – rarely disappoints when the first harvest arrives.
FAQ
How do I start planning a garden if I’ve never gardened before?
Begin with a site observation before anything else. Spend one clear day watching your yard at three points – morning, midday, and mid-afternoon – and note where sunlight actually falls on the ground. That observation, combined with a simple soil test from a garden center kit, gives you the two pieces of information that shape every other decision. Most first-time gardeners get into trouble by skipping this step and choosing plants first. Starting with what your site can support, rather than what you want to grow, is what makes a first garden succeed.
How many hours of sunlight does a vegetable garden need?
Most fruiting vegetables – tomatoes, peppers, squash, cucumbers – require a minimum of six hours of direct sunlight on the soil each day, and perform noticeably better with eight. Leafy greens and herbs are more flexible, producing well with four to six hours and tolerating light afternoon shade. Root vegetables like carrots and beets fall in between. The key distinction is measuring sun on the actual ground surface, not the sky above the bed. A fence two feet away can shade the soil even when the space above it looks open.
Do I need to test my soil before starting a garden?
Testing soil pH before you plant is worth the $10-15 it costs, particularly for a new bed in an area that hasn’t been gardened before. Soil that tests outside the 6.0 to 7.0 range locks nutrients away from plant roots even when those nutrients are physically present in the soil. Nitrogen, phosphorus, and potassium all become harder to absorb below pH 5.5 or above 7.5 – so plants starve in chemically hostile soil regardless of what you add. A basic squeeze test for texture and a simple pH kit together tell you most of what you need for a first-season plan.
Can you plan a garden without special tools or graph paper?
Yes. A rough sketch on plain paper with measured dimensions serves the purpose – the goal is spatial accuracy, not artistic quality. What matters is that the sketch reflects real measurements: actual bed widths, pathway widths, distances from walls and trees. Free garden planning apps exist if sketching feels awkward, but a tape measure, a pencil, and any paper deliver the same information. The planning habit is what counts. Gardeners who put something on paper before they put anything in the ground make fewer expensive spacing and positioning mistakes.
What happens if I plant vegetables in an area with less sun than they need?
Fruiting crops planted in insufficient light tend to grow vegetatively – developing leaves and stems – without producing the fruit or flowers they’re cultivated for. A tomato plant in four hours of sun will look healthy through late spring and then stall at flowering, or produce small, slow-ripening fruit as light dims further in fall. Leafy greens and herbs adapt more gracefully to lower light, though growth slows and some herbs like basil lose aromatic intensity in shade. The mismatch usually isn’t fatal for the plant – it’s just a full season of diminished return for the gardener.
What’s the biggest mistake beginners make when planning a garden layout?
Planning for transplant size rather than mature size. A tomato seedling in a four-inch pot looks like it needs a square foot of space. At peak season, a caged determinate variety needs 24-36 inches of clearance from its neighbors, and an indeterminate type on a stake pushes further. When plants are placed too close at the layout stage, mid-summer brings crowding, reduced air circulation, and disease pressure that compounds through harvest. The fix is simple: use seed packet or transplant tag spacing recommendations at the planning stage, not visual intuition based on what the plant looks like in March.
How do I know if my soil drains well enough for a garden?
Dig a hole approximately 12 inches deep and 12 inches wide in your proposed bed location. Fill it with water and let it drain completely. Refill it and time how long the second fill takes to drain. Well-drained soil empties in one to three hours. Soil that takes six or more hours has a drainage problem that will stress most vegetables. If you can observe the area during or after heavy rain, waterlogging that persists beyond 24 hours is a clear indicator. Raised beds are the practical solution for chronically poor drainage – they allow you to build soil above the problem rather than fight through it.
When is the best time to start planning a garden?
The most useful planning happens in fall or winter – far enough from planting season to allow soil amendments like lime to work (six to eight weeks minimum) and early enough to order seeds before popular varieties sell out. In practice, February and March are when most first-time gardeners begin, and that timeline is workable if you test soil early and amend before the ground warms. Planning at the last possible moment – deciding in May what to plant in May – almost always results in rushing past the site observation and soil assessment steps that determine whether the season goes well.