


Pathways do more than connect spaces – they define circulation, guide views, and determine how a garden feels underfoot. Good design balances comfort, drainage, and visual cohesion. A workable hierarchy sets widths from 24 to 60 inches, grades control water at 1-5 percent, and curves follow a minimum 5-foot radius for carts and wheelbarrows. Material choice matters: gravel drains well on a compacted base with edging, pavers give stable footing with repairable joints, stone creates permanence but needs firm bedding, and boardwalks carry people across wet ground without excavation. Edging keeps lines crisp, while planting offsets and low, shielded lighting integrate paths into the broader landscape.
Key Takeaways:
- Size paths to match use – wide for main routes, narrow for service runs.
- Keep gentle grades so water drains without making walks feel steep.
- Build on compacted bases and use edging to hold shape.
- Select materials that balance durability, drainage, and style.
- Use planting offsets and shielded lighting to tie paths into the landscape.
Table of Contents
Layout and Circulation That Guide Movement
Pathways work when people move comfortably without thinking about steps, corners, or bottlenecks. Plan routes first, size them to real traffic, then set grades that drain water while feeling level underfoot. Small adjustments to width, slope, and curve radius change how a garden reads and how often people use it.
Path hierarchy and comfortable widths
Primary routes carry two‑way traffic from house to key destinations. Widths of 48-60 inches allow two adults to pass or a wheelbarrow to travel beside a walker. Secondary paths link beds, sheds, and side yards at 30-36 inches. Service runs that see short, solo trips can narrow to 24-30 inches. Add 6-12 inches of clearance where plants tend to sprawl. Widen near doors and gates so people can pause, turn, or open latches without stepping into planting.
Slopes and cross‑slope for safe walking
Feet read slope quickly. Longitudinal slopes between 1% and 5% feel natural and move water. Grades steeper than 5% begin to feel like ramps and call for rest pads. Insert a level landing every 30-40 feet on steeper segments. Cross‑slope near 1-2% sheds rain without making walkers lean. Transitions need smooth tapers; abrupt changes trip wheels and ankles. Where the route meets a driveway or patio, avoid low points that pool after storms.

Curves, turns, and sightlines
Curves should carry a purpose. A minimum inside radius of 5 feet lets a loaded wheelbarrow turn cleanly. Tight corners increase rutting in gravel and chip edges on stone. Open views toward a destination such as a bench, gate, or water feature. Hide utilities behind plant mass, not around blind bends. Where two paths meet, flare to 60-72 inches so people can pause without blocking passage.
Entrances, nodes, and dwell points
Entrances set expectations. Use a slight flare, a change in texture, or a short threshold of contrasting stone to signal a primary route. Nodes act as small plazas where paths meet; size them wider than the approach by at least 12 inches so groups can gather. Place seating, containers, or a low light at nodes to slow the pace and encourage lingering.
Clearances, edges, and vertical space
Overhead clearance of 7 feet keeps branches off faces and hats. Keep plants offset 6-12 inches from the edge to reduce snagging and improve airflow along the route. Edges should read as a single line when viewed from eye level. A crisp boundary helps people judge width and keeps gravel or mulch from wandering into beds.
Quick layout rules that are easy to apply
| Design element | Rule of thumb | Why it works |
|---|---|---|
| Primary path width | 48-60 in | Two‑way passing and wheelbarrows |
| Secondary path width | 30-36 in | Comfortable single‑file traffic |
| Service path width | 24-30 in | Short trips with tools or bins |
| Longitudinal slope | 1-5% | Walkable grade that drains |
| Cross‑slope | 1-2% | Sheds water without tilt |
| Inside curve radius | ≥ 5 ft | Smooth cart turns, less rutting |
| Node/Intersection width | +12-24 in over approach | Space to pause without blockage |
| Plant offset from edge | 6-12 in | Reduces overhang and cleanup |
| Overhead clearance | ≥ 7 ft | Safe passage under branches |
Routes that respect bodies and water patterns feel effortless to use. With circulation set, the next step is choosing materials and base assemblies that hold shape through seasons and foot traffic.
Materials and Base Construction That Last
Pathways hold their shape when the base matches the material and traffic. Build from the ground up: stable subgrade, correct base thickness, proper setting bed, and firm edge restraint. Choices on permeability and freeze–thaw performance come next. A clear spec prevents rutting, heave, and wandering gravel.
Base layers by material – depths and compaction that work
Start on a subgrade that is smooth and slightly crowned or sloped. Remove organic soil and soft spots. In clay soils, add a non‑woven geotextile as a separation layer so fines do not pump into the base.
- For gravel or decomposed granite, compact 3-4 inches of crushed stone (¾‑inch minus or similar) in two lifts. Aim for a firm surface that does not shove under a boot heel.
- For concrete pavers, use 4-6 inches of compacted crushed stone. Add a 1‑inch bedding layer of coarse sand and screed it level.
- For dry‑set natural stone, match the paver spec, then replace the sand bed with a 1-2 inch layer of stone dust or fine gravel that locks large slabs.
Compact with a plate compactor after each lift and again after the surface material is placed, where allowed.
Gravel and decomposed granite – permeable, budget‑smart assemblies
Gravel reads informal and drains well when contained. Use clean ⅜-½ inch aggregate for the surface. Keep particles consistent so the top does not sort into ruts. Decomposed granite binds tighter than loose gravel and resists rolling underfoot, especially with an organic stabilizer. Both need edging to prevent creep. Expect seasonal top‑ups and a quick rake after storms to pull fines back into place. In shady, damp sites, choose angular stone to maintain traction.
Concrete pavers and natural stone – stable footing with clean joints
Interlocking concrete pavers offer a flat, repairable surface. After compacting the base, screed a true 1-inch bedding layer, set units, cut edges cleanly, and lock joints with polymeric sand in freeze-thaw climates. For permeable installations, swap the dense base for an open‑graded aggregate and replace bedding sand with small clean stone. Natural stone sets the tone of a garden and benefits from larger formats on an even bed. Keep joints consistent, use tight edge restraint, and check that each slab bears fully on the bedding so corners do not rock.
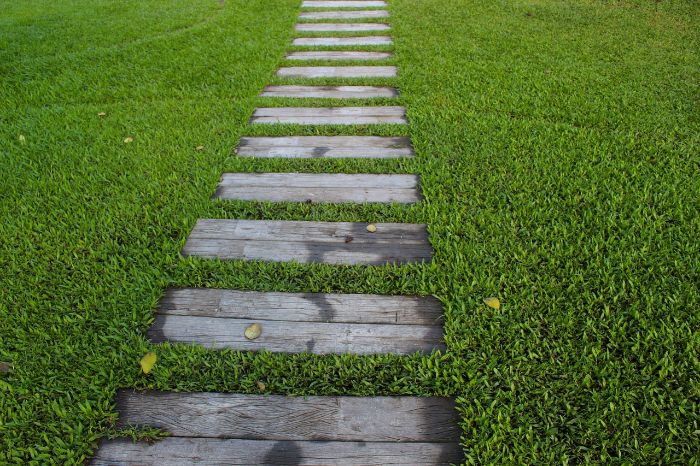
Wood and composite boardwalks – span wet ground without mud
Where soil stays wet or tree roots dominate, a short boardwalk can move people without excavation. Set ground-contact posts or helical anchors, then frame with treated lumber or galvanized steel. Space joists according to the decking used and leave ⅛-¼ inch gaps between boards for drainage. Use coated or stainless fasteners to avoid streaking. A low rail or curb helps guide wheels on narrow runs.
Edge restraint that keeps lines crisp
Edges stop base and surface layers from migrating. Steel or aluminum edging works well beside gravel and decomposed granite. Concrete curbs or paver spike-in edging suit pavers and stone. Set edges level with finished surface so maintenance tools do not catch. Where paths meet lawn, a soldier course of brick or a flush paver band makes trimming clean and prevents turf from invading.
Material and base guide
| Path surface | Base depth (compacted) | Setting bed | Edge restraint | Upkeep pattern |
|---|---|---|---|---|
| Gravel | 3-4 in crushed stone | None above base; lay surface aggregate | Steel or aluminum edging | Rake after storms; top‑up annually |
| Decomposed granite | 3-4 in crushed stone | 2 in DG, consider stabilizer | Steel or aluminum edging | Light regrading; add DG as needed |
| Concrete pavers (standard) | 4-6 in crushed stone | 1 in coarse sand | Paver edging or concrete curb | Sweep polymeric sand; reset any rockers |
| Concrete pavers (permeable) | 8-12 in open‑graded stone (site dependent) | Small clean stone | Paver edging | Vacuum or blow joints to keep voids open |
| Natural stone (dry set) | 4-6 in crushed stone | 1-2 in stone dust or fine gravel | Low curb or paver edging | Re-seat any rocking slabs |
| Wood/composite boardwalk | Posts/joists per span, no granular base | Deck boards with ⅛-¼ in gaps | Rim boards with curb where needed | Inspect fasteners; clean algae in shade |
A path built on a well‑graded subgrade with the right base holds up through seasons and foot traffic. With materials and assemblies defined, the next step is integrating drainage and ground preparation so water moves away rather than across the walking surface.
Prepare Ground and Integrate Drainage
Pathways last when the ground sheds water and the subgrade stays stable. Shape the soil first, manage incoming runoff, then choose a base that matches permeability goals. Small grading moves and the right separation layer prevent pumping fines, frost heave, and ruts that appear after the first storm.
Subgrade shaping and moisture control
Shape the subgrade with a consistent fall in the walking direction. Aim for a 1-5% longitudinal slope and a 1-2% cross‑slope so water leaves the surface. Remove organic soil to a uniform depth and proof‑roll the area. The soil should be firm enough that a boot heel leaves a shallow print without squeezing water. If clay smears or glistens, pause and let it dry; compaction in a wet state creates a hardpan that traps water under the path.
In clay or mixed fill, a slight crown across the path can help. In narrow side yards, run the cross‑slope away from the house and toward a swale or gravel strip that carries water to daylight.
Separation and stabilization layers
A non‑woven geotextile between subgrade and base stops fines from migrating into aggregate. Place it flat, overlap seams by at least 12 inches, and pin as needed. In weak or saturated soils, add a biaxial geogrid over the geotextile before placing base stone. The grid spreads loads and reduces total base depth for the same stiffness. Use open‑graded aggregate above geotextile when a permeable build is desired.
Manage water before it reaches the path
Control the sources that overwhelm a good base. Extend downspouts 10 feet or more and route them to a swale, dry well, or approved drain. Correct flat or reverse grades near foundations with a 2-3% fall away from structures. Where a slope directs sheet flow across the intended route, cut a shallow interceptor swale uphill and discharge away from beds. In tight courtyards, collect water in a narrow trench drain at the low edge and connect to a clean outlet.
I walk the site during a steady rain when possible. Real flow patterns reveal where to open a notch, add a swale, or lift the route on a shallow berm.
Permeable versus dense assemblies
Permeable paths allow rainfall to soak through the surface and store briefly in the base before percolation. Use an open‑graded base of clean stone, a setting layer of smaller clean stone, and pavers or stone with open joints. The assembly needs an overflow path for extreme events. Dense paths shed water off the surface and rely on cross‑slope, gutters, or adjacent swales. Permeable builds reduce runoff near beds and are valuable beside vegetable gardens or trees that dislike saturated crowns. Dense builds make sense under heavy leaf drop or where joint maintenance is difficult.
Interfaces and thresholds that avoid puddles
Transitions fail when edges trap water. Where a path meets lawn, keep path elevation slightly above turf and notch the lawn edge so runoff can leave. At patios and door thresholds, maintain a gap or drain channel so splashback does not wet sills. At driveway crossings, avoid a low point at the junction; insert a trench drain or raise the path slightly and ramp the driveway surface to meet it. Where the path runs beside planting beds, include a shallow gravel shoulder that accepts drip from foliage and prevents fines from washing onto the surface.
Quick drainage guide for common path scenarios
| Scenario | Subgrade move | Base choice | Extra detail |
|---|---|---|---|
| Clay yard that stays wet | 1-2% crown or cross‑slope to a swale | Geotextile + 4-6 in crushed stone | Consider geogrid if soil pumps under foot |
| Narrow side yard near a wall | 2-3% fall away from structure | Dense base with edging | Add shallow trench drain at low edge if runoff concentrates |
| Path below a downspout | Redirect downspout 10+ ft | Permeable base if near beds | Provide overflow route to daylight or dry well |
| Path crossing a slope | Interceptor swale upslope | Dense base with strong edging | Break slope with level landings on long runs |
| Under trees with surface roots | Minimal excavation, keep root flare dry | Boardwalk or shallow gravel over geotextile | Use screws or helical anchors to avoid root cuts |
Water that moves predictably around and through the path protects the base and keeps footing stable.
Design Mistakes That Hurt Drainage and Usability
Most failed paths trace back to a short list of preventable errors. Correct grading, adequate base, and disciplined edge control stop puddles, rutting, and crowding before they start. Small geometry tweaks and better water routing usually deliver the biggest gains for the least effort.
Flat or negative grade with concentrated runoff
A level path beside a wall or a slight tilt toward a structure collects water faster than soil can accept it. Downspouts that discharge near borders, tight pathways, and hard patio edges channel flow into one zone. Hold a 2-3% fall away from buildings, maintain a 1-2% cross‑slope, and send downspouts 10 feet or more toward a swale or dry well. Where a slope sends sheet flow across the route, cut a shallow interceptor swale uphill. A quick check with a 2-4 foot level across several points reveals no fall or reverse slope.
Thin or uneven base that settles
Too little base, or base compacted poorly, lets stone rock and pavers sink. Expect ripples after a wet winter and joint gaps that collect weeds. Remove surface material, proof‑roll the subgrade, place a non‑woven geotextile on clay or fill, then rebuild with crushed stone in compacted lifts. For gravel paths use roughly 3-4 inches of base; for pavers or dry‑set stone use 4-6 inches with a true 1‑inch setting layer. Compact after each lift and once more after setting units, where allowed.
No edge restraint on loose materials
Gravel without edging spreads into beds and narrows usable width. Lines lose clarity and maintenance time rises. Install steel or aluminum edging pinned at regular intervals and set flush with the finished surface. Along lawn, a brick soldier course or flush paver band creates a crisp mowing edge and blocks turf invasion.
Over‑tight curves and bottlenecks
Sharp bends rut quickly and force carts to grind the inside edge. A minimum inside radius of 5 feet lets a loaded wheelbarrow turn cleanly. Narrow runs near gates and hose bibs create traffic jams. Flare approaches to 60-72 inches at doors and intersections so people can pause without blocking passage.
Surface choices that ignore site conditions
Smooth pavers turn slick under shade and constant splash. Choose textured units or bush‑hammered stone where moss forms easily. Permeable joints near heavy leaf drop clog without routine care; a dense surface with a defined runoff path performs better there. Under trees with surface roots, avoid deep excavation that harms feeder roots and span with a short boardwalk instead.
Ignoring thresholds and interfaces
Low points at patio transitions or door sills trap water. Maintain a slight step or integrate a narrow trench drain at the low edge. Where a path meets turf, keep path elevation slightly higher and notch the lawn to give runoff a clear exit. At driveway crossings, avoid a dip at the junction; either add a drain or ramp one surface to meet the other without creating a basin.
Lighting that blinds or leaves dark gaps
Glare makes walks feel unsafe even when grades are correct. Use shielded fixtures 12-18 inches high, spaced roughly 4-6 feet apart at 2700-3000K for calm, readable light. Aim beams across the surface, not into eyes. Add low markers at steps and changes of direction to light garden paths effectively for both safety and exploration.
Quick problem map
| Mistake | Field signal | Reliable fix |
|---|---|---|
| Reverse or flat grade | Water pooling along borders; scoured mulch after rain | Set 2-3% fall away from structures; add interceptor swale; reroute downspouts 10+ ft |
| Underbuilt base | Rocking slabs, wheel ruts, weeds in joints | Rebuild base to correct depth; compact in lifts; add geotextile on clay |
| No edging on gravel | Creep into beds; shrinking walkway | Steel/aluminum edging; soldier course along lawn |
| Tight curves and pinch points | Inside-edge rutting; stalled carts | ≥5 ft inside radius; flare to 60-72 in at doors and nodes |
| Slippery or clog‑prone surface | Slick film in shade; joints filled with fines | Use textured units; choose dense surface where leaves collect; set a clear runoff path |
| Failed thresholds | Puddles at doors, patios, and driveways | Add trench drain or slight step; keep path elevation above turf with an exit notch |
| Harsh lighting | Glare, dark patches between fixtures | Shielded 12-18 in fixtures, 4-6 ft spacing, 2700-3000K, aim across path |
Avoiding these errors protects drainage and comfort without inflating budgets.
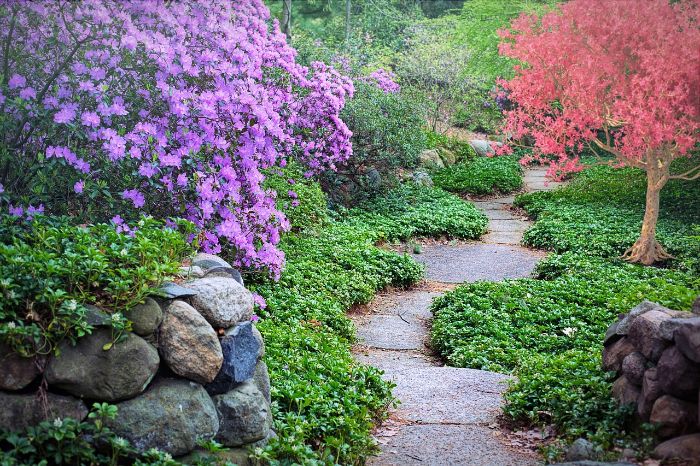
Planting, Edging, and Lighting That Unify the Garden
Paths feel integrated when plants, boundaries, and light work together. Plant height frames views without crowding walkers. Edging keeps loose materials contained and protects line quality. Night lighting guides movement with calm, low‑glare illumination. Small, measurable choices in each area create a landscape that reads cleanly by day and safely by night.

Plant placement that respects movement and views
Low growth near the edge preserves width and keeps water on the path from splashing foliage. Offset herbaceous plants 6-12 inches from the hard line so leaves do not snag clothing or push gravel into beds. Reserve tall structure for the outside of curves and behind seating nodes. Fragrance plants belong where people pause, not at narrow pinch points. Avoid thorns and stiff, woody stems along primary routes. Roots that heave paving predictably come from species with aggressive surface systems; place them behind a root barrier or shift them farther from the edge. I often pilot tricky areas with one season of annuals to confirm spacing before committing to shrubs.
Edging that holds form and reduces maintenance
Edges carry a visual load. A crisp boundary helps people judge width and stops gravel creep. Choose a restraint that matches the surface and maintenance plan. Set edging level with the finished grade so brooms and mowers glide cleanly.
Edging guide
| Edging type | Best use | Key install notes | Maintenance profile |
|---|---|---|---|
| Powder-coated steel or aluminum | Gravel, decomposed granite, lawn interfaces | Pin every 24-36 in; keep top flush with surface | Occasional reset after frost; repaint if scratched |
| Brick soldier course (on edge) | Along lawn next to pavers or stone | Bed on compacted base; tight joints | Easy trimming; re‑seat any rockers |
| Cast‑in‑place concrete curb | High‑traffic or vehicle edges | Set expansion joints; control joints every 6-8 ft | Minimal care; inspect for cracking |
| Natural stone border | Formal gardens or where mass is desired | Full bearing on base; consistent joint width | Check stability after freezes |
| Timber or composite | Informal beds, boardwalk transitions | Spike to stakes; isolate from soil where possible | Monitor decay; replace boards over time |
Finishing details that tie elements together
Small touches complete the composition. Match mulch tone to stone temperature so edges read as one plane. Repeat a material band at nodes and entrances to link spaces. A single row of brick works well for this purpose and reads clearly as a threshold. Keep planting soil slightly below the path edge to prevent fines from washing over the surface in storms. Where irrigation spray crosses a path, swap to dripline at the bed edge to reduce slick spots and mineral streaks on pavers.
Thoughtful planting offsets, reliable edge restraint, and measured light turn a path into a backbone for the whole garden.
FAQs
What is the best material for a garden pathway?
Match material to traffic, climate, and upkeep. Interlocking pavers give stable footing and individual units can be replaced if one settles. Gravel or decomposed granite costs less and drains well when contained by steel or aluminum edging. Natural stone delivers strong visual weight and needs a flat, fully supported bed to prevent rocking. Wood or composite decking spans wet ground where excavation would damage roots. In shade, choose textured surfaces because smooth pavers can turn slick.
What is the cheapest way to make a garden path that still lasts?
A compacted base with a gravel or decomposed granite surface is the most budget-efficient approach. Use local angular aggregate, compact the base in thin lifts until a boot heel does not dent it, and contain the edges with steel or aluminum so the surface does not creep into beds. Keep curves gentle to reduce rework and avoid pea gravel on slopes because round stones roll underfoot and demand more maintenance.
How do you prepare the ground for a walkway?
Set the layout first, then grade the subgrade to fall 1-5 percent in the walking direction with a 1-2 percent cross-slope so water leaves the surface. Remove organic soil and soft spots to a uniform depth and proof-roll until the ground feels firm. In clay or mixed fill, install a non-woven geotextile before placing base stone. Shape transitions at patios, steps, and driveways to avoid low points that hold water after rain.
What rock size works best for a pathway?
Use angular crushed stone for stability. For base layers, a ¾-inch minus mix compacts densely and spreads loads. For the surface of informal paths, ⅜–½ inch angular aggregate or decomposed granite gives better traction than pea gravel. Reserve rounded pea gravel for flat, low-traffic areas because it rolls and ruts on grades.
How do you edge a garden path for clean lines and low maintenance?
Choose edging that matches the surface and mowing needs. Steel or aluminum edging pins securely and holds gravel or decomposed granite in place while sitting flush with the finished grade. Along lawn, a soldier course of brick or a flush paver band creates a crisp mowing edge and blocks turf encroachment. Concrete curbs control high-traffic or vehicle edges. Set all restraints straight and level so brooms and mower wheels do not catch.
How do you lay pavers for a garden path correctly?
After compacting the base, screed a uniform 1-inch bedding layer, set pavers in the chosen pattern, and cut edges cleanly to fit. Maintain tight joints, install edge restraint, and sweep polymeric sand to lock the surface. Check that the path holds a 1-5 percent longitudinal slope and about a 1-2 percent cross-slope so water moves off the surface rather than into joints.

