Lighting a garden path is as much about safety as it is about creating an atmosphere that draws people forward. Well-placed fixtures reveal each step clearly, prevent glare, and give the walkway a rhythm that feels natural at night. When brightness, spacing, and fixture type are chosen with care, a path becomes more than a route – it becomes part of the garden’s design and character.
Key Takeaways
- Why most DIY path lights fail at night and how to set brightness levels that actually keep steps visible.
- The fixture placement trick that avoids both “runway effect” and dark gaps on curves.
- How to choose between path lights, bollards, and downlighting so the walkway looks designed, not cluttered.
- The power setups that keep output stable in winter and prevent dimming at the far end of a run.
- A simple test you can do with two temporary lights to catch glare and shadow problems before trenching cable.
Table of Contents
Principles for Safe, Inviting Pathway Lighting
Lighting for garden paths serves two jobs – protect every step and invite movement through space, but it works best when paired with safe pathway design that keeps the walkway durable and easy to navigate.
Focus on the ground plane, on edges that guide feet, and on decision points such as junctions and steps. Favor warm, low-glare light that makes materials readable without flattening texture. I start with a night walk of the route to mark hazards, view lines, and competing light sources from the house or street.
Define the goal – wayfinding before decoration
Wayfinding comes first. Light the surface where shoes land, the borders that keep feet centered, and the places where direction changes. Features that sit away from the walkway can wait for accent lighting. Avoid uplighting toward faces near the path, since eyes adapt slowly in low light and forward glare reduces safety. When a route passes close to plants with glossy leaves or wet stone, angle light to avoid reflected hotspots that mask depth.
Control glare and protect night vision
Glare control drives comfort. Choose fixtures with a clear cutoff so the light source stays hidden from normal eye level. Shielded or louvered tops help, as do heads that tilt slightly away from the walking line. Keep mounting heights low to reduce direct view of the emitter. Place fixtures outside primary sightlines and orient beams across the path rather than straight along it. Good glare control preserves contrast, which lets ankles read grade changes and small obstacles.
Create a readable rhythm, not a runway
Paths feel natural when light arrives in a rhythm that guides the stride. Stagger fixtures from side to side so the eye tracks forward without seeing a rigid row. Tighten spacing near curves and at intersections to reinforce decisions. Wider spacing works on straight runs with light stone or gravel that reflects more. Light both sides only on wide walks or where planting blocks one edge. Avoid continuous strips that suggest an airport taxiway and tire the eye.
Layer by role – edge, step, and overhead
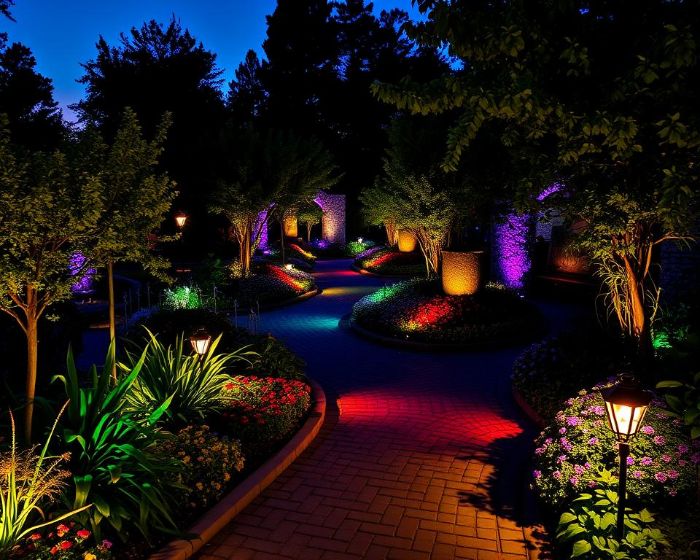
Match fixture type to function. Small path lights define borders and keep feet centered. Bollards suit wide approaches or areas with tall grasses that hide small heads. Step or recessed riser lights mark elevation changes, landings, and narrow terraces where glare risk is high. Downlights mounted in trees or on structures create broad pools that feel like moonlight and can tie segments together without clutter at ground level. Motion at gates or utility zones adds convenience while keeping energy use low.
Plan power and controls early
Power choice sets reliability. Low-voltage systems offer stable output and flexible placement along long runs. Solar heads work where panels see full sun for most of the day, yet drop off in shade or winter, so reserve them for short segments in clear exposure. Add photocells for dusk-to-dawn operation, timers for curfew hours, and motion sensors at entries or bins that need short bursts. Leave slack in conduit or cable routes for future plant growth and fixture repositioning.
A path reads well when every decision point is lit, glare stays out of the eyes, and light falls in a rhythm that supports a steady stride. With principles set, choose brightness, color temperature, and spacing values that match surface materials and route width.
Brightness, Color, and Spacing Standards
Clear targets prevent glare and remove uncertainty. Set ground-level light that guides each step, use warm color that calms the eye, and keep fixtures far enough apart to avoid a runway look. I plan around three numbers first – lumens per fixture, color temperature, and starting spacing.
Lumens per fixture – readable ground without glare
Path lights rarely need high output:
- Narrow residential walks read well at 100-200 lumens per fixture.
- Wide or shaded routes often need 200-300 lumens.
- Steps and landings benefit from 150-250 lumens aimed at the tread, not at the eye.
Very high outputs such as 4000 lumens belong to flood or area lighting and create harsh glare near a walkway. Surface reflectance matters – pale stone reflects more light and allows lower output, while dark mulch absorbs light and demands the upper end of the range. The choice of pathway materials directly influences how much brightness a fixture must deliver.
Color temperature and color rendering
Warm light supports depth perception and comfort after dark. Target 2700-3000K for path fixtures. Cooler tones near 4000K can look stark and reduce plant color richness. Choose LED sources with 80+ CRI so foliage and masonry remain accurate in tone. If a garden hosts pollinators or sits near a habitat area, consider amber options that reduce blue content and limit skyglow.

Spacing and mounting height
Start with 5-8 ft between fixtures. Tighten spacing near curves, intersections, and grade changes. Open straight runs on light stone can stretch to 8-10 ft, while dense planting or dark surfaces pull spacing closer to 4-6 ft. Mount small path lights at 12-18 in above grade so heads stay below eye level. Mount bollards between 24-42 in on wide approaches. Place step or riser lights 6-12 in above the tread with louvers that cut direct view.
One side or both sides
Light on one side is enough for most 3-4 ft walks, provided heads face across the surface. Light both sides when the path measures 5 ft or more, when tall planting blocks one edge, or when heavy foot traffic moves in two directions. Stagger positions to avoid parallel rows. Cross-aim beams so pools overlap at the centerline without creating a bright seam.
Beam control and optics
Shielding keeps eyes comfortable. Choose heads with defined cutoffs or louvers. A wide beam around 90-120 degrees works for general edging on straight runs. Elliptical optics help on narrow paths because light stretches across the width without spilling far ahead. Aim beams slightly across the path rather than along it to reduce forward glare and to reveal texture in gravel, brick, or flagstone.
Quick reference – targets by condition
| Path condition | Lumens per fixture | Spacing (ft) | Mounting height |
|---|---|---|---|
| Narrow walk, light surface | 100-150 | 7-10 | 12-16 in |
| Narrow walk, dark surface | 150-200 | 5-7 | 12-16 in |
| Wide walk 5–6 ft | 200-300 | 6-8 per side (staggered) | 18-24 in or bollard 24-42 in |
| Dense planting or shade | 200-300 | 4-6 | 16-24 in |
| Steps and landings | 150-250 | at each riser/landing | 6-12 in above tread |
Set outputs, color, and spacing with a short field test before final installation. A mock-up at night with two temporary fixtures reveals glare, shadows, and gaps far better than daytime planning.
Fixture Types and Roles Along the Path
Choose fixtures by job, not by catalog category. Path lights draw a clean edge for footsteps, step lights mark every change in level, and downlights create broad, calming pools that connect segments without clutter at ground level. Solar heads can help in full-sun zones, while low-voltage lines carry reliable power through shaded runs. I prioritize glare control first, then output, then finish and durability.
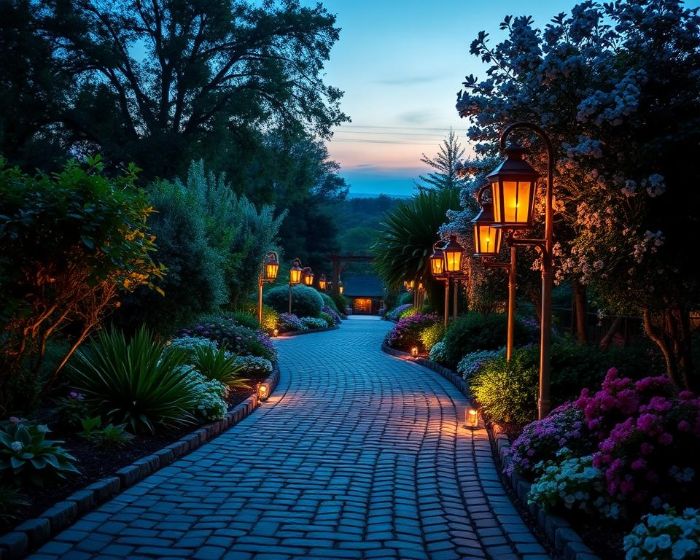
Path lights and bollards – edge control and approach cues
Small path lights work like breadcrumbs for a narrow walk. Mount heads at 12-18 inches above grade so lenses sit below eye level. Aim across the paving rather than along it to reveal texture in gravel or stone. Keep the light source hidden with a shield or louver to protect night vision. Materials matter outdoors; cast brass and marine-grade aluminum handle weather better than thin sheet metal, and powder coating resists chips from tools or grit.
Bollards suit wider approaches and drive areas. Heights range from 24 to 42 inches, which helps when tall grasses or seasonal foliage would hide a small head. Choose downward optics or louvered sides that throw light onto paving without glowing into eyes. Anchor firmly in concrete sleeves or base plates to prevent lean over time. Use bollards sparingly on garden paths so the scene reads as a walk, not a parking apron.
Step and recessed lights – risers, treads, and landings
Grade changes drive fall risk, so mark every riser or landing with a low, even wash. Louvered faceplates keep light on the tread and out of the eye. Mount 6-12 inches above the step surface and center the beam on the first third of the tread. Seal junction boxes and gaskets to an IP65 or better rating for wind-driven rain. Brick or stone stairs benefit from shallow recessed housings that sit flush and resist kicks. I specify a light at the first and last riser automatically, then add fixtures on intermediates as needed to maintain a consistent reading of depth.
Cable routing deserves a plan before masonry work begins. Run low-voltage wiring in conduit with slack for movement and future service. Avoid piercing stair stringers repeatedly; plan single penetrations to a rear chase and keep connectors accessible behind a removable riser panel or nearby planting bed.
Downlighting and alternatives to solar heads
Overhead mounting produces wide, natural pools that guide a steady stride. Place fixtures 12-20 feet up in trees or on structures and aim through branches for a soft “moonlight” effect. Shield the lamp to hide the source and cut forward glare. Space heads so pools overlap on the path centerline without leaving bright seams. Use corrosion-resistant housings and tree mounts with stand-off spacers that allow bark growth without damage.
A brief note on solar: some path fixtures use integrated panels instead of wiring. Their performance depends heavily on daily sun exposure and is best considered in the power planning stage rather than fixture choice.
A path reads cleanly when each fixture plays a defined role. With roles set, layout and installation choices come next, including stagger patterns, curve handling, and wire routes that survive weather and growth.
Pathway Lighting Layout and Installation Methods
Effective pathway lighting design shapes safety, comfort, and how the walk reads at night. Start with the route, mark decision points, and stage a quick field test after dark before any trenching. A short mock-up reveals glare, dark gaps, and awkward sightlines far better than daytime sketches. I mark hazards, curve apexes, and entry points with painter’s tape or flags, then adjust positions until footprints land in even pools.

Route marking and night mock-up
Walk the path at dusk, when eyes adapt to changing light levels. Place temporary stakes where direction changes, where surfaces shift, and where grade drops. Tape two test fixtures to garden spikes and move them along likely positions. Aim across the paving to reveal texture and check for reflections on wet stone or glossy foliage. Tighten gaps near bends and intersections so strides feel confident. Note streetlight spill, porch glare, and window glow that could fight for attention; shift heads out of direct sightlines to preserve contrast.
Layout patterns for different paths
Pattern choice sets rhythm. Staggered placement suits most residential walks because alternating sides guides forward motion without rigid symmetry. Symmetrical pairs work near formal entries or broad approaches. Overhead downlighting ties segments together where clutter at ground level would distract. Use the quick guide below to pick a pattern that matches width, planting density, and desired mood.
| Pattern | Best use case | Placement notes | Watch-outs |
|---|---|---|---|
| Staggered single side | 3-4 ft walks with open planting | Heads alternate left/right every 5-8 ft; aim across centerline | Bright seam if beams meet on center; adjust angles slightly |
| Staggered both sides | 5-6 ft walks or two-way foot traffic | Offset pairs 6-8 ft apart per side; tighten near curves | Parallel “runway” feel if spacing is too tight |
| Symmetrical pairs | Formal entries or straight axes | Pairs at 6-10 ft intervals; keep heights matched | High glare risk if sources are visible at eye level |
| Overhead downlighting | Tree-lined segments or cluttered edges | Mount 12-20 ft up; overlap pools at centerline | Harsh hotspots without shields; avoid direct view of source |
Curves need closer spacing on the inside edge because stride shortens and outer edge can fall dark. At Y-junctions, place a fixture just before the split to signal choice, then one beyond to pull movement forward. For steps, light first and last riser, then fill intermediates to maintain a consistent read of depth.
Wiring plans that hold output over distance
Power planning protects brightness and color stability. Low-voltage cable runs lose voltage over distance; longer chains with many fixtures can starve the last heads. A hub-and-spoke plan keeps runs short by branching from a central junction near the transformer. A T-tap can work for two balanced branches. Long daisy chains should be a last resort. As a rule of thumb, keep any single run under the wattage that creates more than a small drop at the farthest head; measure with a multimeter during testing and aim for driver input within manufacturer limits across the run.
Select cable gauge to match distance and load. Heavier wire such as 12-gauge carries power farther with less drop than 14-gauge. Bury cable a few inches below grade where tools will not snag it, or use conduit under high-traffic areas. Leave expansion slack around trees and along edges where roots and freeze-thaw cycles can shift soil. Keep connections above standing water and use gel-filled or heat-shrink connectors rated for outdoor use to resist corrosion.
⚠️ Safety note on electrical work
Working with outdoor electrical systems carries real risk. Incorrect wiring can lead to short circuits, fire hazards, or personal injury. Low-voltage systems reduce the danger but do not eliminate it. If you are not experienced with outdoor electrical installations, it is safer to hire a certified technician who can size transformers correctly, manage grounding, and guarantee code compliance.
Power Sources, Controls, and Maintenance for Reliable Pathways
Predictable light levels come from a solid power plan, controls that match real use, and simple upkeep. Aim for steady output through the night, minimal glare at late hours, and low service burden across seasons. I size and place gear to protect voltage, then set control logic that fits how people move after dark.

Low-voltage power for consistent output
Low-voltage systems (12V) deliver stable light along long runs and work well in shade. Use a magnetic or quality electronic transformer with total connected wattage kept near 70-80% of nameplate capacity to leave headroom. Mount the transformer off soil on a wall or post with ventilation, under a cover that sheds rain. Feed from a GFCI-protected circuit and add surge protection on the line side to guard against storms. Place the transformer near the midpoint of the layout when practical to reduce voltage drop at far heads. Follow local electrical code; in the U.S., reference NEC Article 411 for low-voltage landscape lighting.
Where solar fits, where it struggles
Solar heads earn a place only where panels receive strong sun for much of the day. Expect shorter runtimes in winter and under canopy. Monocrystalline panels charge more efficiently than polycrystalline panels. Favor models with replaceable batteries rather than sealed packs, and look for LiFePO₄ chemistry for longer cycle life. Remote-panel designs help when the path lies in shade but a nearby fence or shed sees sun. Use solar for short spurs and markers, while reserving main routes for low-voltage power.
Control strategies that match behavior
Controls shape energy use and comfort.
- Photocells trigger at dusk without manual input.
- Plug-in or integrated timers set curfew hours, for example dusk to 23:00, with a late-night dim or off period.
- Astronomic timers calculate sunrise and sunset by location and remove seasonal adjustments.
- Motion sensors work at gates, bins, and side entries where short, bright bursts help navigation.
- Smart controllers tie into Wi-Fi or Zigbee systems for app control and scenes, similar to smart lighting solutions for the modern home that manage interior spaces. Extend outdoor coverage with a weatherproof access point rather than relying on marginal signal.
Hybrid logic often wins – photocell for dusk start, timer for curfew, motion for after-hours.
Control options at a glance
| Control | Best use | Strengths | Caveats |
|---|---|---|---|
| Photocell | Daily dusk start | No scheduling, zero touch | Triggers early during storms |
| Plug-in timer | Fixed curfew | Simple, inexpensive | Manual seasonal changes unless astronomic |
| Astronomic timer | Precise dusk/dawn by location | No seasonal tweaking | Needs correct latitude and time |
| Motion sensor | Gates, steps, side yards | Bright light only when needed | False triggers from wildlife if aimed poorly |
| Smart controller | Scenes, remote checks | App control, voice routines | Requires reliable outdoor network |
Weatherproofing and component protection
Outdoor gear lives longer with proper sealing and cable management. Choose fixtures rated IP65 or higher and in-ground elements rated IP67. Create drip loops before entries into housings so rain cannot travel along cable jackets. Keep junctions above standing water and use gel-filled or heat-shrink connectors rated for direct burial. Apply dielectric grease on set screws and blade contacts to slow corrosion. Provide slack near trees and edging to accommodate growth and frost heave.
Maintenance that keeps light levels stable
Minor upkeep preserves safety and atmosphere. Wipe lenses quarterly to remove dust, pollen, and sprinkler residue that flatten contrast. Trim foliage that blocks optics or traps heat around heads. Re-aim downlights after spring growth. Re-level stakes and bollards after freeze-thaw cycles or heavy rains. Inspect gaskets, replace cracked lenses, and test photocells by covering them at dusk. For solar units, replace aging batteries on a two-to-three-year cycle and clear debris from panels monthly in leaf season.
Quick diagnostics for dim or uneven runs
Dim last fixtures often signal voltage drop. Measure at the first and last head with a multimeter and rebalance runs or upgrade cable gauge if values fall outside driver limits. Flicker can come from loose connections or an electronic transformer that does not play well with certain LED drivers; swap to a magnetic unit if needed. Short nightly runtimes on solar usually point to shade, so relocate panels or convert that segment to low-voltage power.
A reliable power plan plus sensible controls keeps paths readable every night and avoids nuisance service calls.
Final Thoughts
Lighting a garden path is less about decoration and more about shaping safe, confident movement through outdoor space. The right combination of brightness, spacing, and fixture choice gives visitors clear footing without harsh glare. Power planning, reliable controls, and routine maintenance keep that clarity consistent year after year. When each decision is made with attention to both safety and atmosphere, the path works as a guide after dark and as an invitation to explore. A well-lit walkway becomes part of the garden’s character, balancing function and design in a way that supports everyday use and long-term enjoyment.
FAQ
How to keep pathway lights straight during DIY installation?
Use a string line stretched along the path edge to set a consistent reference. Mark each fixture point with stakes before digging. Check alignment at night with two temporary lights to confirm the line reads cleanly under real conditions. Always measure from the finished surface, not loose soil, to keep spacing accurate after settling.
How bright is 4000 lumens in an outdoor setting?
Four thousand lumens equals the output of a strong floodlight and is far above what a pathway requires. At that level, glare dominates and detail on the ground disappears. For walkways, 100-300 lumens per fixture is usually sufficient. Reserve 4000 lumens for wide-area security or landscape flood applications.
What type of lighting is best suited for walkways?
Path lights with shielded heads provide localized pools that define edges. Bollards work on wide approaches where taller fixtures are needed. Step or recessed riser lights handle elevation changes. Downlights mounted in trees or structures create broad coverage without clutter at ground level. Choice depends on width, planting density, and desired atmosphere.
Where should pathway lights be installed for maximum effect?
Place fixtures just off the walking line, aimed across the paving to reveal texture. Tighten spacing near curves, intersections, and grade changes. Avoid mounting directly on the path surface, where glare rises into the eye. At junctions, light just before and just beyond the split to guide movement forward.
How do you light up a dark walkway with limited ambient light?
Use warm white sources around 2700-3000K to preserve contrast without harshness. Space fixtures closer than in urban settings since no streetlight spill fills the gaps. Downlighting from trees or poles can tie long runs together, while low-level path heads handle edges. Always test at night before final placement to confirm shadows and pools read correctly.
What is a bulkhead light and can it be used for pathways?
A bulkhead light is a wall- or surface-mounted fixture with a sealed, rugged housing designed to resist weather and impact. They work well for short walkway segments near walls, steps, or entry points where pole-mounted heads are impractical. Choose models with louvered or frosted covers to reduce glare at eye level.
What alternatives exist to solar outdoor lights for pathways?
Low-voltage wired systems remain the most reliable option, especially under shade or in regions with long winters. They deliver stable output, allow precise control with timers or photocells, and handle long runs without dropouts. A hybrid plan can use low-voltage wiring for main routes and solar markers only for short, sunny spurs.