Pot drainage keeps container moisture balanced so roots drink across the whole profile and growth doesn’t stall. When outlets run clear and the mix holds its shape, water moves through, air returns, and the telltale dry crust on top fades.
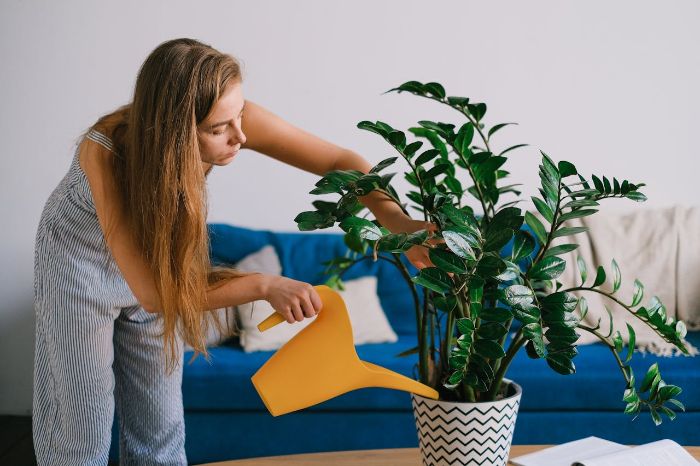
Watch for two signals after watering – a brief release from the outlet and a lighter feel in the pot soon after. The surprising move that saves many planters is simple too – skip stone layers and use mesh so the exit stays open. Pair that with low risers under saucers and a structured blend that rewets without fuss. If a container dries hard, rewet in calm passes with a short pause, then let the base breathe. Do this and leaf tone stays firm through heat and wind while salts wash away before they bite.
Key Takeaways
- Shape outlets for flow that never pools at the base
- Raise containers on low feet to keep roots breathing
- Blend airy structure so dried mixes accept water again
- Avoid stone layers that push saturation higher in pots
- Do a quick outlet check after each watering
Table of Contents
Why Pot Drainage Prevents Dry Tops and Thirsty Roots
Pot drainage moves water through the whole profile instead of letting it bypass dry zones near the surface. With a clear exit path, fresh water travels downward, wets the mix evenly, and leaves air for roots to function.
Drainage Paths and the Perched Layer
Water moves from larger pores to smaller ones until gravity wins. In containers, a “perched” layer forms near the bottom where fine particles hold water against gravity. If the outlet is obstructed, that layer stays saturated while the upper mix dries and acts like an underwatered pot. When the outlet is free, each irrigation briefly fills pores, then excess exits, leaving moisture spread through the profile rather than locked at the base.
Pro tip – tip the pot a few degrees after watering and watch for a short release; it signals the outlet is open and the profile is draining.
Hydrophobic and Compacted Media
Dried peat or compacted particles repel water and create channels. Water then slides down the sides, leaving the center dry. Break up compaction when repotting and include structure in the mix so pores reopen after drying. For a pot that has gone bone dry, start rewetting gently so capillary action reboots instead of carving fast paths down the wall.
Failure signals – water beads on contact, dry core after watering, and rapid sidewall runoff while the center stays dusty.
Do Drainage Holes Prevent Overwatering?
Yes. A free outlet lets excess water leave quickly, which protects roots from oxygen loss and allows the next watering to rewet the full depth. Holes alone are not a cure for poor media or blocked exits, but paired with a structured mix they keep moisture distribution stable across the pot.
- Even moisture through the root zone after each watering
- Oxygen maintained between irrigations for active root growth
- Salts and fines flushed before they concentrate near roots
- Less surface crusting that leads to false “dry pot” symptoms
Good drainage sets the stage for everything that follows – containers stay breathable, and each irrigation does useful work instead of skating past dry pockets.
Containers and Fittings That Keep Water Moving
Pick containers that let water exit cleanly, then keep those exits clear.
I treat the pot base like a drain field – open outlets, minimal obstructions, and hardware that does not trap water back against roots.
Hole Size, Count, and Placement
The outlet does the heavy lifting. Aim for 1-3 main holes totaling roughly a quarter of the base area on small pots, and step up to multiple outlets on wide planters. As a field rule – if the pot is wider than 12 in, add one extra hole for every additional 3-4 in of diameter. Holes work best when they sit slightly inboard from the rim of the base so water doesn’t cling under the lip.
Keep individual openings in the 1/4-3/8 in range on rigid containers. Smaller holes clog with fines; oversize holes lose mix unless you add a mesh circle. For lightweight plastics that flex, three or more smaller outlets resist deformation better than one large cutout.
Pro tip – lay a fine stainless mesh over the inside of each hole to hold soil, then brush it clear once a month.
Saucers, Risers, and Liners
Saucers protect floors and patios, but they can trap return water. Use a low riser or pot feet to give 1/4-1/2 in of clearance under the base so the outlet breathes. For liners and decorative cachepots, leave a visible gap between the grow pot and the container wall; a tight sleeve stalls airflow and slows drying on cool days.
Failure signals here are simple – water sits visible under the pot, algae forms in the saucer, or roots press into the outlet. Raise the pot, empty the saucer after each irrigation, and trim stray roots that block the opening.
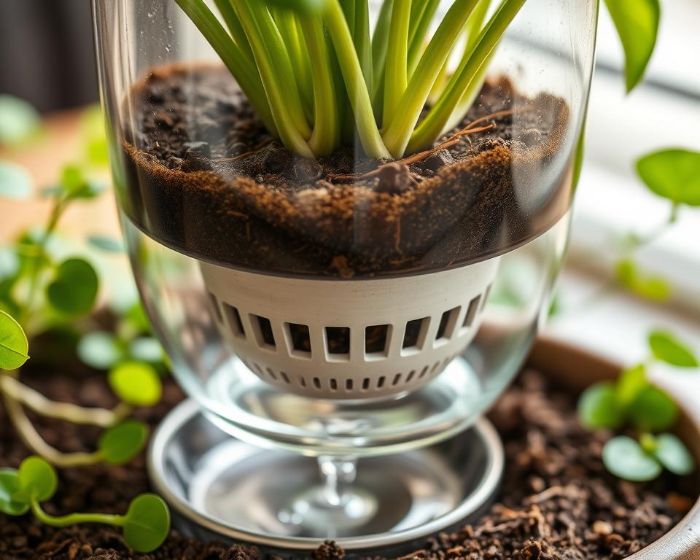
What To Put At The Bottom? (PAA)
Skip drainage stones for pots. A coarse layer creates a sharper perched zone above the layer and moves saturation higher in the container. If you need to keep mix from escaping, use a flat mesh or a shard that covers the hole without building thickness. For very light mixes, a thin fiber disc over the outlet prevents loss while keeping the pathway open.
| Material | Porosity | Heat effect | Weight | Hole pattern | Notes |
|---|---|---|---|---|---|
| Terracotta | High | Warms fast, cools fast | Heavy | Single large or cluster | Breathable walls speed drying in cool seasons |
| Plastic | Low | Holds temperature longer | Light | Multiple small | Flexes under load; favor several outlets |
| Fabric grow bag | Very high | Cools quickly | Light | Full-surface seepage | Requires a tray with airflow under the base |
| Glazed ceramic | Very low | Stays cool | Heavy | Single large | Drill slowly with tile bit if adding holes |
Fabric and terracotta breathe through the sidewall, so they tolerate smaller outlets than glazed ceramic of the same size. On slick ceramics, prioritize multiple holes or a riser, since sidewall passage is minimal.
Quick checks for open exits:
- Water disappears from the saucer within 5-10 minutes.
- No algae film under the base after a week.
- Mesh screens brush clean without packed fines.
Well-chosen containers and simple fittings keep the exit path open, so each watering wets the profile and moves out cleanly without leaving a soggy base.
Build a Mix That Drains Without Dry Spikes
A good container mix moves water through while holding enough moisture for roots to drink later. Aim for open structure with stable pore space so the profile rewets evenly after each irrigation. A well draining potting soil does that without collapsing or turning water-repellent when it dries.
Base Mix Structure
Start with a fibrous base that resists collapse and keeps air spaces open. For most container plants, a workable range is 50-60 percent peat or coco plus 20-30 percent fine bark for structure. That pairing gives you capillary reach through the profile and durable channels so water does not race down the wall and leave a dry core.
If the container sits in full sun or wind, nudge bark toward the high end of its range to keep pores from pinching as the mix ages. For shade patios, lean slightly higher on the fine fiber so the profile does not dry too fast.
Pro tip: pre-wet dry peat or coco in a tub for 15-30 minutes before blending so particles accept water on the first irrigation.
Amendments That Open The Mix
Inerts that hold their shape keep pathways open after many waterings. Perlite or pumice at 15-30 percent by volume is the usual backbone for airflow. Perlite is lighter and easy to source; pumice is heavier and stays put in tall planters. For deep containers taller than 14 in, I prefer pumice so the lower profile does not compact under its own weight.
If you repot heavy drinkers like tomatoes or basil, push the upper end of the perlite or pumice range. For delicate indoor plants, stay mid-range so you retain enough moisture between cycles.
Watch for failure signals – mix that feels spongy yet dries unevenly, or roots circling only at the margin. Correct by adding 5-10 percent more structural inert at the next reblend.
Retention Without Clogging
Moisture holders belong in small doses so they do not smear into a seal. Composted bark fines or coco chips at 10-20 percent give slow release without choking flow paths. A little vermicompost (5 percent or less) helps microbial life and cation exchange without turning the profile heavy. Skip fine sand in containers unless you need weight for top-heavy pots; sand tightens pores and reduces flow in most blends.
Maintenance matters. Refresh the upper third of the mix each 12-18 months, and fully reblend at repot time so particle sizes stay varied. If drought left the container bone dry, rewet gradually on the next cycle so the profile accepts water through the depth before you return to normal rhythm.
| Amendment | Effect | Typical ratio | Caveats |
|---|---|---|---|
| Perlite | Airflow, lighter weight | 15-30% | Floats in small pots; add last |
| Pumice | Airflow, heavier, stable | 10-25% | Heavier to move; great for tall planters |
| Fine bark | Structure, slow moisture | 20-30% | Too coarse can shed water early |
| Coco chips | Hold moisture, add texture | 10-20% | Rinse to reduce salts before use |
| Vermicompost | Nutrient buffering | 0-5% | High rates tighten the mix |
| Peat or coco fiber | Base matrix, wicking | 50-60% | Pre-wet to avoid dry repellent spots |
Well-structured media does the quiet work – water passes through, roots breathe, and the profile rewets end-to-end without sudden dry patches. Keep the particle mix varied and you keep the flow paths alive through the season.
Watering Routine That Works With Good Drainage
A short, repeatable routine keeps container moisture in the target zone without stressing roots. Work with the container’s flow: wet the profile, let excess exit, and return only when the plant has used a clear share of what you supplied.
Rewetting a Dry Container
When a container dries hard, restart flow gently. Begin with a slow pour across the surface to dampen the top inch, pause 2-3 minutes, then apply a second pass to reach mid-depth. If the mix still resists, set the pot in a shallow tray for 5-10 minutes so water climbs from below, then lift it out to drain fully. This staged approach reactivates capillaries without carving channels down the wall.
Failure signals during rewetting are easy to spot: beading on contact, pale dry pockets after your second pass, or water racing to the edges. Correct by extending the initial pause, then using the brief tray soak to even out uptake before returning to normal top watering.
Routine Moisture Checks
Use simple, repeatable cues to decide when to water again. Heft the pot – learn the “freshly watered” feel, then water again when the container is roughly one-third lighter. Check foliage texture instead of tips alone; many plants lose leaf tension hours before color shifts. Glance at the surface tone and small cracks in the mix; a darker tone with no cracking suggests there is still usable moisture below.
If you manage many containers, tag thirsty species and sun-blasted spots for more frequent checks. I log one quick round morning and evening on hot weeks; small containers and fabric sides generally move faster than glazed ceramic of the same size.
Seasonal Tweaks
Heat, wind, and exposure change how fast a pot dries. In hot, breezy stretches, split one large watering into two smaller passes spaced 10-15 minutes apart to reduce bypassing and improve depth. On cool, humid days, extend the interval between waterings and trim any saucer time to the minimum so the outlet stays clear. For late summer when roots pack the container, plan a midseason repot or a partial root prune that restores pore space and keeps the routine predictable.
Pro tip – after a heatwave, give one maintenance flush to wash salts, then return to your normal cadence; accumulated salts can mimic dryness symptoms by stressing fine roots.
Field-ready routine:
- Heft the pot daily in hot weather; water when it feels notably lighter.
- Rewet in two passes with a short pause; add a quick tray soak only if resistance persists.
- Empty saucers promptly and keep the base lifted for airflow.
- After stress events, do one gentle flush, then resume the usual interval.
A routine that respects container flow means each watering does useful work and roots stay supplied without swings. Keep the checks quick and consistent, and the plants will tell you when to adjust.
Safe Workarounds for Plant Pots Without Holes
Sometimes drilling is off the table. In that case, create a hidden exit path and keep roots above any collected water. The goal is simple: a breathable gap under the grow pot and a clear place for water to settle away from roots.
Double-Pot and Cachepot Method
Nest a standard nursery pot inside a decorative container and let the inner pot do the draining. Aim for 0.5-1.0 in of clearance at the bottom so any excess has space to collect. Use pot feet or a plastic grid to hold the inner pot off the base; a flat spacer works better than pebbles because it keeps the whole bottom level and open.
If the outer vessel is tall and narrow, leave a small vertical gap around the sides as well. That side gap helps air exchange and reduces the stale, swampy smell that shows up when water sits for days.
Maintenance cadence – tip the cachepot weekly and dump any collected water; wipe algae rings so you can see new accumulation at a glance.
Capillary Risers and Media Lifts
When the inner pot is not an option, hold the root zone above the lowest point inside the container. Set a rigid disc or crossbars 0.5-0.75 in off the base, then place a capillary pad or felt strip that hangs to the bottom cavity. The pad pulls moisture upward slowly while the rigid lift prevents the mix from sagging into the wet zone.
Failure signals are straightforward – roots growing through the lift, sour odor after a cool spell, or water sloshing when you move the container. Correct by raising the lift height by another quarter inch and trimming strays that block the lowest area.
How To Improve Drainage In Pots Without Holes? (PAA)
Create a controlled reservoir below the root zone and give it a way to breathe. Use an inner pot with factory outlets, or build a lift plus a capillary pad so water collects below and wicks back slowly. Keep a visible water line marker inside the outer container; if liquid regularly reaches the lift, raise the platform or water with smaller volumes per session.
Pro tip: a thin mesh over the lift keeps mix from dropping through while staying flat enough to avoid a perched layer.
Quick setup checklist:
- Target 0.5-1.0 in of clearance below the root zone.
- Use flat spacers or a grid, not loose stones.
- Add a capillary pad only if you need slow return moisture.
- Dump the reservoir weekly and clean algae rings.
- Raise the platform if roots touch standing water.
These builds protect roots when drilling is impossible by separating water storage from the active root zone. Keep the gap clear and the reservoir small, and containers without outlets can still run clean and predictable.
Practical Wrap-Up
Run containers like a small system – verify the exit path, keep pore space alive, and set a maintenance cadence that prevents dry pockets from forming in the first place. A short audit routine beats emergency fixes. Use pot drainage as your control variable and let watering follow what the container can move.
Adopt a tight schedule. Weekly in warm months, tip each planter 10-20 degrees after watering and watch the outlet for a brief release; no drip and a heavy feel points to an obstruction. Monthly, lift the pot onto spacers for a day to air the base, then brush screens and scrape fines from outlet edges. Each season, rotate containers a quarter turn to balance wind and sun exposure, and refresh the top layer with new mix so particle size stays varied. If roots mat at the bottom or you smell sour notes after cool, wet spells, raise the base by another notch and shorten any saucer contact time.
- Tip test after watering to confirm clear outlets
- Brush mesh and outlet edges monthly
- Lift pots on spacers during humid stretches
- Refresh top layer seasonally to keep pores open
- Raise the base if odor or root mats appear
FAQ
How many drainage holes should a 12-inch container have to prevent underwatering issues?
Plan for three to five outlets spaced near the low points of the base, each about 1/4-3/8 in wide. That layout clears water evenly so fresh irrigation wets through instead of skimming past dry zones.
Can I safely add holes to glazed ceramic or metal planters?
Yes. Tape the mark, start with a small pilot, and drill slowly with the correct bit type (masonry for ceramic with light water cooling, step bit for thin metal). Support the base to prevent flex, and stop the moment dust turns to powdery slurry on ceramics.
What is a quick field test to confirm pot drainage is working without instruments?
Water steadily until the surface darkens evenly, then stop. If a shallow surface sheen clears in 20-40 seconds and the container no longer feels heavy within 30-60 minutes, outlets are moving water and the profile is rewetting rather than channeling.
Do I need saucers under pots with drainage holes indoors, and how do I use them without creating problems?
Use a saucer only with a low riser so the base lifts 1/4-1/2 in. Empty any standing water the same day and wipe the ring line; a clean ring lets you see new accumulation fast and prevents roots from pressing into the outlet.
My perlite keeps floating after watering. How do I keep a well draining potting soil from shifting?
Pre-wet perlite before blending so particles take on water and settle, then cap the surface with a thin layer of fine bark. The pre-wet plus light cap reduces float and keeps pore space stable through the season.
How often should I service meshes and outlets to maintain flow?
Brush screens and outlet edges monthly in warm months and at each repot. If algae or fines build sooner, shorten the interval to two weeks until the container’s rhythm stabilizes.
What clearance should I target in a cachepot setup so water never reaches roots?
Leave 0.5-1.0 in under the inner nursery pot and keep at least 4-6 in of active mix above that gap. If you regularly find liquid touching the inner base, raise the platform by another 1/4 in or reduce each watering volume.