Updated March 26, 2026
Arugula growth stages move faster than almost any other salad green you will grow, and the flavor shifts at each one. Seed to first harvest in as few as 21 days, seed to bolt in as few as 40 – that compressed timeline means the difference between a mildly peppery leaf and a sharp, almost medicinal bite can come down to a single warm afternoon. Tracking these stages is less about following a calendar and more about reading physical signals. The shape of the leaf edge tells you where the plant is in its lifecycle. The texture tells you how much heat stress it has absorbed. The center of the rosette tells you how much time you have left before the flavor window closes.
Key Takeaways:
- Harvest arugula when 4-6 true leaves have fully formed, before the central stem begins to elongate
- Notice leaf shape changes – leaves narrowing to arrow-pointed tips signal bolt is days away
- Cut stems 1-2 inches above soil for productive regrowth; expect 2-3 good cuts per planting
- Choose bolt-resistant Sylvetta varieties when spring days lengthen past 13 hours of light
- Stop nitrogen fertilizer after the seedling stage to avoid flavor-diluted, overly lush leaves
Table of Contents
Arugula Growth Stages – Full Timeline at a Glance
Arugula passes through six distinct phases from the moment a seed contacts moist soil to the day flowers open on a bolted stem. The transitions between stages are not always obvious on any given day – plants move at the pace of temperature and light, not the calendar. The table below gives you the structural overview. The sections that follow translate each stage into what you will actually see in the garden – and what each phase means for the flavor in those leaves.
| Stage | Days from Seed | What You See | Leaf Flavor | Your Move |
|---|---|---|---|---|
| Germination | 3-7 | Seed coat splits, seedling hook emerges | None | Keep soil moist, 60-65°F |
| Cotyledon | 7-14 | Two small, oval, flat seed leaves appear | Faint, grassy | Leave alone or harvest as microgreens |
| First true leaves | 14-21 | Lobed, distinctly arugula-shaped leaves emerge from center | Mild peppery | Thin to 4-6 inches apart |
| Vegetative peak | 21-40 | 4-6 full leaves, dark green, wavy edges, rough surface texture | Signature peppery | Main harvest window – act now |
| Pre-bolt | 40-50 | Leaves narrow to arrow shapes, center stem rises | Sharp, intense | Final leaf harvest before the bolt |
| Bolt and seed | 50-70+ | Stem reaches 24-36 inches, white four-petaled flowers open | Mostly bitter | Harvest flowers, collect or scatter seed |
Those day ranges assume consistent temperatures between 55-65°F. A warm week in the low 70s can compress the vegetative stage by a third. A cool stretch extends it. The table tells you what to expect. The plant in front of you tells you where you are. Arugula moves through these phases faster than most vegetable growth timelines you will work with, which is exactly why visual stage identification matters here more than scheduling.
Germination and Seedling Stage – A Fast Start With Specific Needs
Arugula seeds germinate in soil temperatures ranging from 40°F at the low end to around 80°F at the upper limit, with the fastest and most reliable rates between 60-65°F. According to Cornell Cooperative Extension, most germination occurs within 3-7 days under those conditions. In practice, a spring bed that has warmed to 60°F by midday will germinate arugula faster than a summer bed sitting at 75°F, because lower temperature with consistency outperforms higher temperature with fluctuation. Soil above 80°F produces erratic, poor germination – if you are sowing in late summer for a fall crop, water the bed the evening before to drop the top inch of soil temperature before the seeds go in.
The seed is small – commercial variety data puts standard arugula at roughly 18,000 seeds per ounce. Plant at no more than a quarter inch deep and press the soil lightly after sowing so the seed maintains contact with moisture without being buried. Arugula does not need darkness to germinate, but it needs that consistent seed-to-soil contact throughout the process.
What germinating arugula looks like
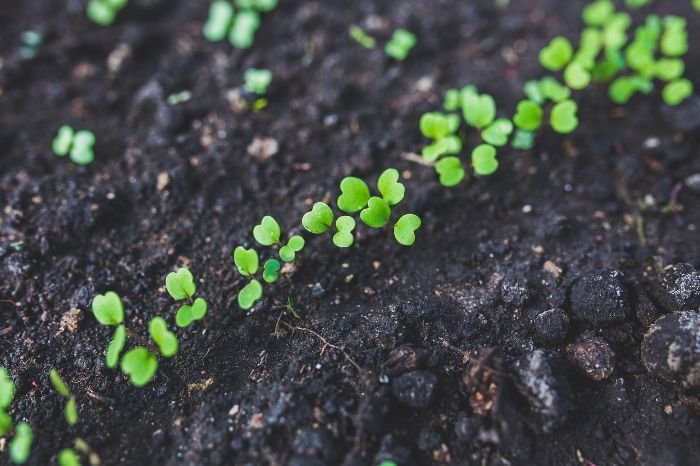
The seed coat splits along one edge and a pale root tip emerges first. Within 24-48 hours, the seedling hook – a curved arch of the embryonic stem – pushes upward through the soil. It resembles a thin green wire bent at a right angle. That arch straightens within another day, and the two cotyledons unfold. At this point the seedling is visible above soil and the germination stage is complete.
I often notice that arugula sown right after a light rain – when soil is moist through the profile but not saturated – germinates faster and more evenly than seed watered in by hand afterward. Natural moisture distribution seems to create better seed-to-soil contact without the surface sealing that heavy irrigation can cause.
If nothing appears past day 10, two causes account for most failures: inconsistent moisture and surface crust. Seeds that have cracked open abort quickly once moisture disappears below the surface. A heavy rain after sowing can seal the soil top into a thin crust the seedling hook cannot push through. Loosen it lightly with a finger before giving up on the bed.
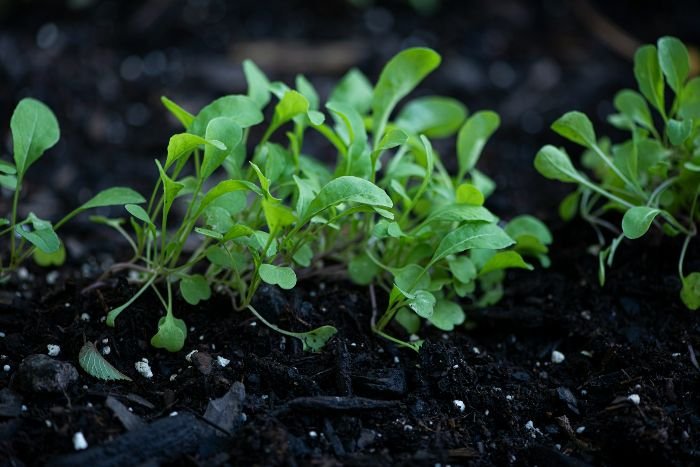
Cotyledon to true leaves – where flavor enters
The cotyledons are smooth, round, and nearly tasteless – faint grass and nothing else. Their job is energy capture to fuel the next transition. True leaves emerge from the center of the cotyledon pair at day 14-21. The first one is already recognizably arugula: narrow at the base, with the beginning of the lobed edge profile that defines the plant. That lobed edge is where the flavor lives.
Arugula’s characteristic heat comes from glucosinolates – sulfur-containing compounds concentrated in the leaf tissue. They accumulate as the plant matures and intensify further under stress. The first true leaves carry a mild, clean peppery note. Two true leaves in, you start to recognize the bite. By 4-6 leaves, the flavor is fully developed. Good soil preparation for spring vegetable beds – loose, slightly acidic (pH 6.0-7.0), with adequate drainage – supports the seedling through this phase without the stress that prematurely intensifies those glucosinolates before you are ready to harvest.
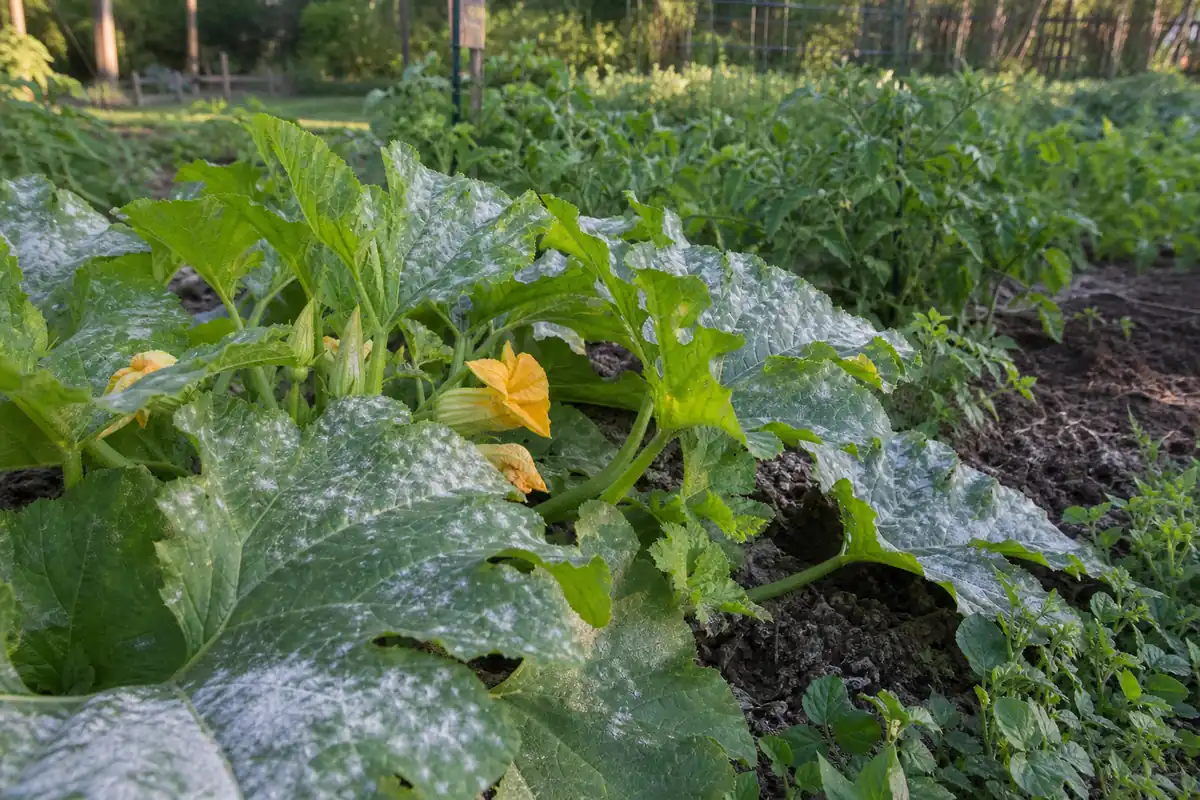
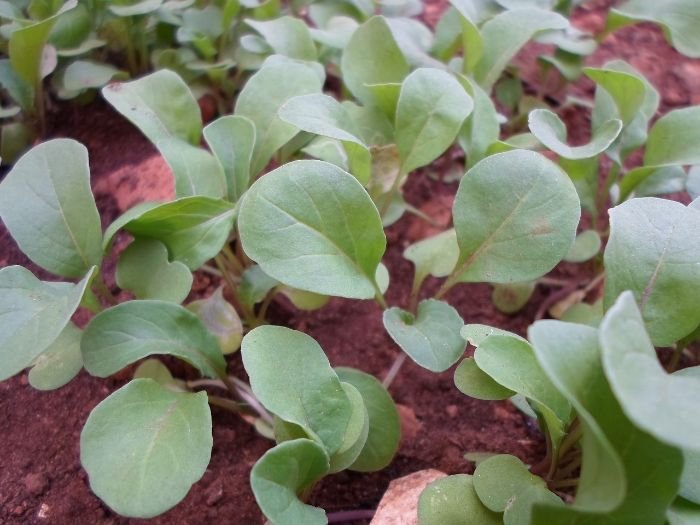
Vegetative Peak – Where Character and Flavor Build
By 4-6 true leaves, arugula has reached its ideal harvest state. The leaves are 2-4 inches long, dark green, with wavy or ruffled edges and a slightly rough surface on the upper side – almost sandpapery if you run a fingertip across it. Rubbing a leaf between your fingers releases a sharp, nutty-peppery scent that signals peak glucosinolate development. This is the main harvest window – day 21 to day 40 depending on temperature and variety – and it moves faster than most gardeners expect.
The same compressed window before flavor turns harsh occurs in lettuce growth stages, though the mechanism differs. Lettuce bitterness builds from lactucin under heat. Arugula sharpness climbs from glucosinolate intensification under both heat and water stress. Both plants give you roughly two weeks of peak flavor before chemistry pushes past the point of pleasantness.
Reading the peak harvest moment
Morning harvest carries the highest concentration of flavor compounds. Leaves picked at midday in warm weather taste noticeably flatter than those taken at 7am from the same plant. Beyond timing, the visual cue for peak vegetative stage is the leaf surface: wavy, slightly ruffled edges with visible texture. Leaves that are still smooth and flat are not quite there. Leaves starting to look narrow or arrow-shaped at the tips have begun the pre-bolt transition – take them now rather than waiting another day.
Thinning during vegetative growth
When seedlings reach 2 inches tall with one or two true leaves showing, thin to 4-6 inches apart. Crowded arugula bolts earlier under competition stress. The thinnings are edible – small, tender, and mildly peppery. Pull them cleanly rather than cutting to avoid disturbing neighboring roots.
Pro Tip: When daytime temperatures consistently hit 70°F and your arugula is still in the vegetative stage, install a 30% shade cloth over the bed. It reduces the heat load that drives glucosinolate intensification and can extend the harvest window by 1-2 weeks. Remove it at night to maintain air circulation.
Pre-Bolt Signals – The Stage Most Gardeners Miss
Most growers notice the bolt after it has happened – the stem is already several inches tall, the leaves have toughened, the flavor has crossed into bitterness. The pre-bolt window is the 3-5 days before any of that becomes obvious, and it is the last point at which leaves still carry their sharpest edible flavor rather than sliding past it.
Pre-bolt leaves look visibly different from peak vegetative leaves. The lobed edges narrow and become more pointed, taking on an elongated arrow shape rather than the rounded, ruffled profile of the vegetative stage. The leaf surface becomes slightly rougher. The central growing point of the rosette – the tight cluster of new growth at the center – feels elevated when you press it lightly with a fingertip. The stem has already begun rising inside the plant before any visible sign appears above the leaf canopy. That elevated center is the clearest signal of all.
The two triggers that cause bolting
Arugula bolts in response to two independent signals that often arrive together in late spring: soil temperature above 75°F and a photoperiod longer than 12-13 hours. In early spring, cool soil temperatures can hold off bolting even as days lengthen noticeably. In early summer, both signals arrive simultaneously – which explains why arugula planted in June can go from seed to bolt in under three weeks. A gardener who plants on the same date every year and notices dramatically different harvest windows from one season to the next is almost always seeing the effect of these two triggers arriving at different times relative to planting date.
Variety timing – choosing for your season
Standard Roquette and Astro varieties (Eruca vesicaria subsp. sativa) respond quickly to both heat and day-length triggers. Sylvetta – also sold as wild arugula (Diplotaxis tenuifolia) – is a different species with a perennial growth habit that bolts far more slowly. Extension trials in warm-climate states have documented Sylvetta maintaining productive leaf yield several weeks beyond the point at which standard Eruca varieties have fully bolted under identical conditions. The growth is slower at the start – first harvest typically comes at 40-50 days rather than 21-40 – but the season-length advantage is substantial if your spring is short and summer arrives fast. Sylvetta’s flavor is also different: more nutty and complex, less immediately sharp.
After the First Cut – Arugula’s Regeneration Cycle
A well-timed harvest cut extends a planting well beyond its first yield. Arugula regenerates predictably after cutting, and treating that regrowth as its own productive stage – with a slightly different flavor profile and clear quality limits – produces better results than treating it as simply more of the same.
Cut with scissors 1-2 inches above the soil surface, removing all leaves above that point. Cutting too low – at or near soil level – risks nicking the crown and slowing or preventing regrowth. Cutting too high leaves old stubs that can trap moisture and invite fungal issues in damp weather. At 1-2 inches, the crown stays intact and the cut surface is minimal.
New leaves emerge from the cut center within 5-7 days under good conditions. The first regrowth flush reaches full harvest size in 10-14 days. Those leaves carry a slightly more intense peppery flavor than the original harvest – the cutting stress mildly increases glucosinolate concentration in the regrowth. Whether that difference is noticeable on the plate depends on the individual palate, but experienced growers often prefer the second flush for exactly this reason.
How many cuts are realistic
Most arugula plants produce two to three quality cuts before regrowth diminishes and bitterness takes over. The third flush typically shows smaller leaves and sharper, less pleasant heat. Pushing toward a fourth cut rarely produces anything worth harvesting. At that point, pull the planting and direct-sow again if your season allows.
Is it worth reducing watering slightly in the 2-3 days before each cut to concentrate flavor through mild moisture stress? Commercial microgreen growers have documented that brief pre-harvest moisture restriction elevates glucosinolate levels in Brassica leaves. For home garden arugula, the margin between productive stress and damage is narrow – push too far and you get crisp, excessively bitter leaves rather than concentrated, complex ones. The difference is hard to judge without experience in that specific bed. Most gardeners see better results from consistent watering and precise harvest timing than from deliberate stress management.
Bolting and Seed Stage – End the Season on Your Terms
When arugula commits to bolting, the central stem extends rapidly. Bonnie Plants documents bolt stems reaching 24-36 inches tall – considerably taller than most gardeners expect from a plant that spent its vegetative stage as a compact rosette. That height appears within 1-2 weeks of bolt initiation. The leaves remaining on the bolt stem are smaller, more fibrous, and bitter enough that most are not worth harvesting raw.
The exception is the flowers. Arugula’s four-petaled white blooms carry a milder, slightly sweet version of the leaf flavor. They work well scattered over salads or used as a garnish. The plant requires insect visitors for optimal seed production; a bolted arugula in flower will attract pollinators to your vegetable bed as an incidental benefit.
Seed collection and the self-seeding strategy
Each flower produces a narrow seed pod (silique) that ripens green and dries to pale tan. For collection: wait until pods have turned dry and papery before cutting the stems, then hang them upside down over a paper bag indoors. Seeds release as pods continue to dry. Seed Savers Exchange notes arugula seed viability at up to 6 years when stored cool and dry – among the better shelf-life figures for common vegetables.
For self-seeding: let two or three bolted plants complete their cycle and drop seed naturally. Arugula volunteers reliably the following spring in most US climates when soil temperature returns to the right range. Mark the area and avoid disturbing that soil section until seedlings emerge. Spring-planted arugula that bolts in summer will often produce volunteers the following March or April without any further effort.
Arugula Stage Identification – Reading the Plant in Front of You
The soil shows two small, smooth, oval leaves with no lobing and no visible stem height between them. That is the cotyledon stage – your plant is 7-14 days old and still running on stored seed energy. Either harvest the whole planting flat to the soil now if you want microgreens, or leave it entirely alone for 7-10 more days until the first true leaves appear from the center.
You see 3-4 leaves with distinct lobed edges, dark green and slightly rough to the touch, and each plant spans 3-4 inches across. This is the entry into the vegetative peak. Start taking outer leaves individually with scissors rather than cutting the whole plant – this extends the window while the center continues developing. The inner leaves will be ready within another week.
The leaves look right, but the center of the rosette feels elevated compared to the surrounding leaves when you press it gently with a fingertip. This is the pre-bolt window – 3-5 days before the stem becomes visible above the canopy. Take a full cut now at 1-2 inches above soil, even if the overall plant looks small and productive. Waiting another day is the most common timing mistake with arugula.
A stem has risen and small white flowers have opened at the top. The vegetative harvest window has closed. Cut any remaining lower-stem leaves that are still usable, pick flowers if you want them for a salad, and decide now whether to let the plant set seed or pull and replant while your season still allows it.
Conclusion
Arugula rewards observation over scheduling. The gardener who checks the leaf shape and center rosette position every two or three days will consistently harvest better-tasting leaves than one counting from a sowing date on the calendar.
Two decisions carry more weight than any other in this lifecycle: harvest timing and variety choice at planting. Get the pre-bolt window right once – those 3-5 days when glucosinolates are fully developed but bitterness has not yet set in – and you understand what the plant communicates at every other stage. Choose the right variety for your season length and the timeline becomes predictable. Sylvetta gives you weeks; a standard variety gives you days. Either way, the signal comes from the same place: the shape of the leaf edge on an ordinary morning in the garden.
FAQ
How long does arugula take to grow from seed to first harvest?
Standard arugula varieties reach first harvest in 21-40 days from direct sowing, depending on temperature and variety. The fastest timeline occurs in consistently cool conditions between 55-65°F – some Astro variety plantings are harvestable in as few as 21-25 days. Slower conditions stretch this toward 40 days. The most reliable cue is not a day count but the plant itself: wait for 4-6 well-formed true leaves with wavy edges and a rough leaf surface, regardless of how many days have passed since sowing.
What do arugula seedlings look like, and how do I tell them from weeds?
At the cotyledon stage, arugula seedlings show two small, smooth, oval leaves on a thin pale-green stem – at this point they can resemble many other Brassica seedlings. The distinguishing marker arrives with the first true leaf: arugula’s lobed, slightly pointed leaf edge is distinctive among common seedlings. Rub the first true leaf between your fingers. The faint peppery-green scent is arugula. No common garden weed produces that specific smell at seedling size.
Can you eat arugula after it has bolted?
The flowers are fully edible and carry a milder, slightly sweet version of the leaf flavor – most gardeners find them pleasant scattered over a salad or used as a garnish. The stem leaves after bolt are technically edible but typically too bitter and fibrous to enjoy raw. Some use them blended into pesto with lemon juice and Parmesan to balance the sharpness. Leaves at the very base of the stem, still green and attached, sometimes hold acceptable flavor for a day or two after bolt initiation, particularly in cool morning conditions.
What happens if I let arugula bolt – will it return next year?
Standard arugula (Eruca vesicaria) is an annual and will not regenerate from the same root. It is, however, a reliable self-seeder – seeds drop naturally and germinate the following spring when soil temperature returns to 55-65°F. Sylvetta or wild arugula (Diplotaxis tenuifolia) is a perennial-type species and can regenerate from its root crown over multiple seasons, particularly in USDA hardiness zones 6 and warmer. In climates with hard winters, even Sylvetta may not overwinter reliably from roots, but self-seeding will still occur.
Why are my arugula leaves so bitter?
The most common cause is harvesting past the vegetative peak – once leaves enter the pre-bolt phase, glucosinolate levels continue climbing and a compound called sinigrin increases harsh bitterness beyond what most people enjoy. Heat is the second major factor: arugula grown in temperatures above 70°F produces noticeably sharper leaves even during the vegetative stage. A third cause is overcrowding – plants under competition stress push toward reproduction faster and produce sharper leaves sooner. Thin early, harvest in the morning, and target the window when leaves are wavy-edged and rough but not yet arrow-tipped.
How many times can you harvest arugula from one planting?
Two to three full cuts is typical, with the second flush often producing the most flavorful leaves – the mild stress of the first harvest slightly elevates glucosinolate concentration in the regrowth. The third flush typically shows smaller leaves and sharper bitterness. After the third cut, pulling and resowing produces better results than waiting for a fourth flush. Cutting at 1-2 inches above soil – rather than lower – is the variable that most affects how many productive regrowth cycles you get, since lower cuts risk damaging the crown that drives regrowth.
What is the difference between Sylvetta and standard arugula growth timing?
Sylvetta (Diplotaxis tenuifolia) is a different species from standard garden arugula (Eruca vesicaria) and behaves differently through the season. Sylvetta grows more slowly early – first harvest typically comes at 40-50 days rather than 21-40 – but bolts far more slowly in warm conditions. In side-by-side plantings, Sylvetta can produce harvestable leaves for several weeks after standard arugula has fully bolted. The flavor is also different: more nutty and complex, less immediately peppery. For short spring seasons in warmer US climates, the slower start is worth the longer productive window.
When is the best time of day to harvest arugula?
Early morning, before the heat of the day, produces the best flavor. Glucosinolate concentrations in Brassica leaves are highest in the cooler morning hours and decline as temperatures rise and the plant increases transpiration. Leaves harvested at midday in warm weather taste noticeably flatter than those cut at the same growth stage in the morning. Harvest into a container, refrigerate immediately if not using right away, and avoid washing until just before serving – wet leaves stored in the fridge degrade in texture and flavor faster than dry ones.