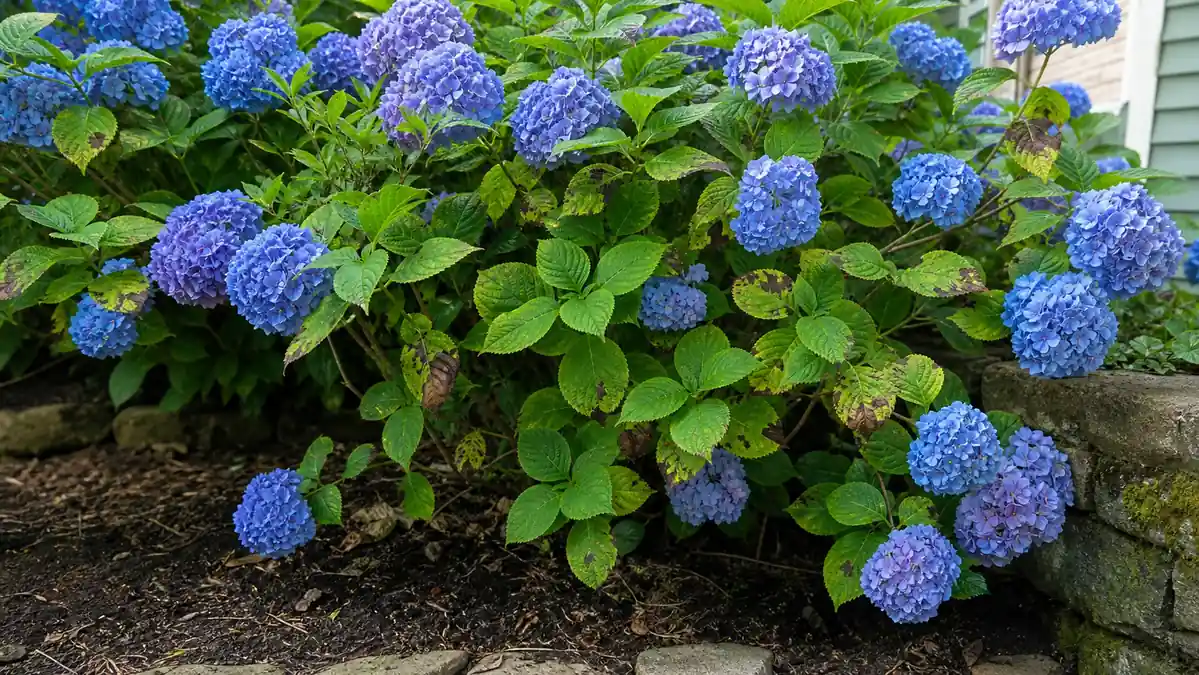
Brown spot on hydrangea leaves needs a visual read before any fungicide, pruning, or watering change makes sense. The same shrub can show small purple-brown fungal spots, dry tan scorch along the edges, pest feeding marks, and old weather damage during one humid summer. The useful clue is not only the color. Look at the spot shape, border, center, leaf position, and whether new leaves are still clean.
Hydrangeas can keep blooming with some spotted foliage, so the goal is controlled diagnosis, not panic pruning. A few marked lower leaves after wet weather usually call for cleanup and better watering habits. Fast spread through the canopy, dark lesions on stems, or crispy exposed leaves point to a different fix. Match the pattern first, then choose removal, sanitation, water correction, or a fungicide only when the disease pressure justifies it.
Brown Spot on Hydrangea Leaves: Quick Visual Comparison
Small round spots low on the plant
Likely Cercospora or another fungal leaf spot. Remove badly marked leaves and keep future water off the foliage.
Larger dark lesions with tan centers
Think anthracnose or heavier fungal pressure, especially after warm rain. Prune out badly infected tissue and clean fallen leaves.
Crispy brown edges on exposed leaves
Scorch, drought, fertilizer salt, or root stress is more likely than fungus. Correct moisture and afternoon sun exposure first.
Small pale or brown feeding marks
Inspect tender growth for four-lined plant bug damage. Insect feeding can mimic dark spots on hydrangea leaves.
Key Takeaways
- Spot shape matters more than spot color.
- Lower-leaf spotting after wet weather often points to fungal leaf spot.
- Crispy margins and bleached patches usually need water or sun correction.
- Remove fallen and badly infected leaves before reaching for fungicide.
- Judge recovery by clean new growth, not by old marked leaves.
Table of Contents
Cercospora Leaf Spot
Cercospora leaf spot often starts where hydrangea foliage stays damp longest: lower leaves, shaded inner growth, and leaves close to mulch or soil splash. The marks usually appear as small round to irregular spots with brown, purple-brown, or gray centers. On some leaves the edge looks darker than the middle, as if the plant drew a thin ring around the dead tissue.
The pattern matters because many home gardeners see brown marks and reach for a spray before they change the conditions that helped the fungus spread. Hydrangea leaves that stay wet for hours after overhead watering, dense canopy shade, or repeated summer storms create the infection window. Spores move with splash, handling, and fallen infected leaves, so cleanup has more value than treating one visible spot.
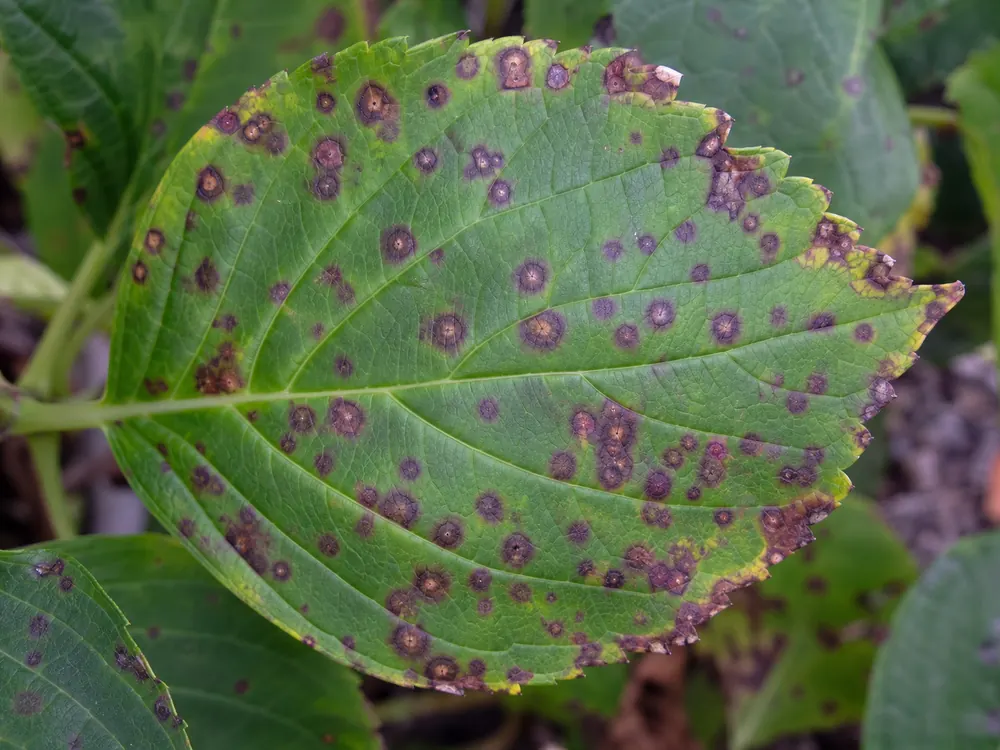
Hydrangea fungal leaf spots can come from several pathogens, and a Cercospora leaf spot resource describes spotting that can build during warm, humid weather. That range explains why color alone is weak evidence. A brown spot with a purple edge, a gray center, or a yellow halo may all belong in the same fungal lane when the marks start low and multiply after wet weather.
Most established hydrangeas tolerate a moderate amount of Cercospora spotting. The leaves look rough, yet the shrub can still flower and build next year’s buds if enough green canopy remains. Heavy infection late in summer can weaken the plant by reducing working leaf area, and repeated yearly defoliation deserves stronger sanitation and spacing changes.
Remove the worst leaves only when they are heavily spotted, yellowing, or dropping. Keep leaves that remain mostly green and firm because they still feed the shrub. Bag fallen infected leaves, thin crossing stems if the canopy traps moisture, and water at the soil line. The next clean flush of leaves tells you more than old spots, since damaged tissue will not turn green again.
| Leaf clue | Likely cause | First action | What confirms it |
|---|---|---|---|
| Small round spots on lower leaves | Cercospora leaf spot | Remove badly marked leaves and clean fallen debris | New spots increase after rain or overhead watering |
| Dark border with tan or gray center | Fungal leaf spot | Reduce leaf wetness and improve airflow | Spots stay in leaf tissue, not mainly at the edge |
| Yellowing around older spots | Leaf tissue shutting down | Remove leaves that are mostly yellow or dropping | Healthy new leaves stay clean after sanitation |
| Crisp brown leaf edge | Scorch, drought, or salts | Check soil moisture and afternoon exposure | Damage sits on margins or exposed leaf faces |
Anthracnose and Other Fungal Spots
Anthracnose usually looks more severe than scattered Cercospora marks. Lesions may be larger, darker, sunken, or irregular, and they can appear on leaves, stems, and flower parts when weather stays warm and humid. If the plant has dark blotches on more than foliage, treat the problem as a broader disease cleanup task.
The dividing line is spread and tissue depth. Small dry specks on old lower leaves suggest ordinary leaf spot pressure. Larger dark patches that expand across veins, merge into dead areas, or show on young growth deserve quicker removal. Cut out badly affected stems with clean pruners, then disinfect the blades before moving to healthy shrubs.
Hydrangea leaf spot management depends heavily on sanitation because infected leaves can keep the disease cycle close to the plant. A hydrangea fungal leaf spot resource ties disease pressure to wet foliage, infected debris, and dense growth. The practical fix is direct: keep water off leaves, remove infected litter, and create enough space for leaves to dry after rain.
Fungicide protects clean tissue during high-pressure weather, especially on a shrub with a repeated history of severe leaf spot. It will not erase brown marks already present. If spots cover much of the plant by late summer, start sanitation now and plan any fungicide protection earlier next season when new leaves are still clean.
Do not compost badly infected hydrangea leaves in a casual backyard pile that never heats evenly. Bag them or dispose of them away from the shrub. A thin layer of fresh mulch can also reduce soil splash after cleanup, as long as the mulch stays off the crown and stems. The aim is to break splashback and debris contact without burying the base.
Fungal spots often look worse near the bottom of a hydrangea than near the top. That vertical pattern is a clue. Spores, splash, shade, and slow drying all concentrate near the mulch line first.Sun Scorch, Drought, and Fertilizer Injury
Scorch has a different shape from most fungal spotting. It often starts as tan, papery, or brown tissue along leaf edges, between veins, or on the side of the plant that receives hard afternoon sun. The damage may look sudden after a hot, windy day because leaf water loss outran root uptake.
Hydrangeas have large leaves with a high water demand. When roots sit in dry soil, compacted soil, a hot container, or a recently disturbed planting hole, the leaf edge is often the first tissue to fail. The surface turns dry and thin. Fungal spots usually feel more set into the leaf blade; scorch feels crisp, papery, and continuous along the margin.
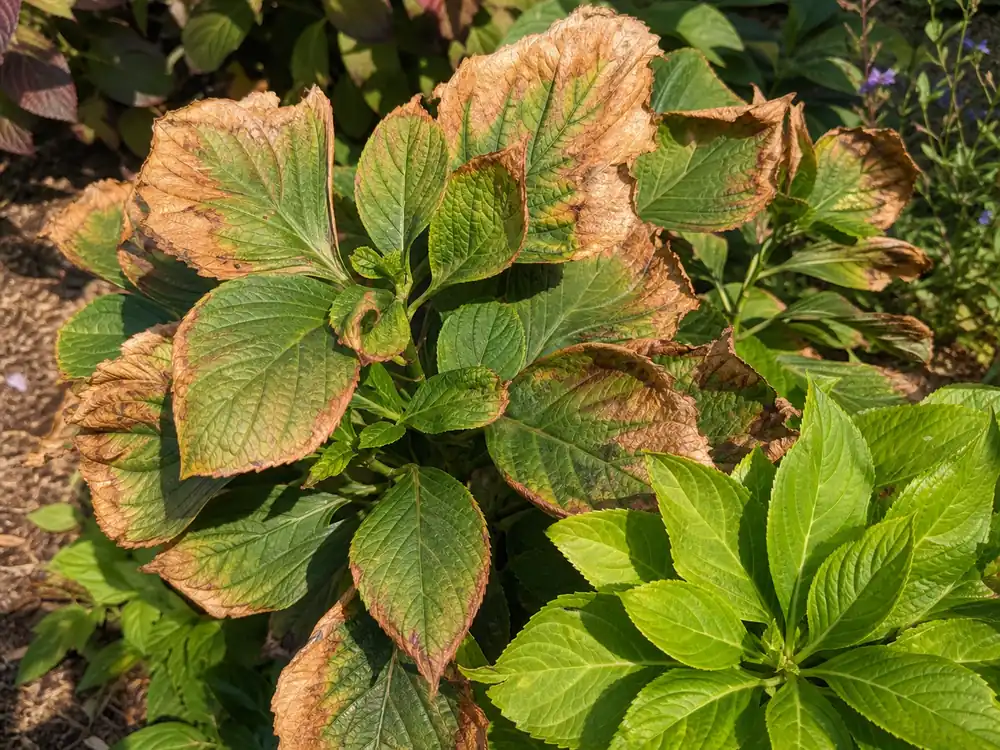
Scorch can be mistaken for disease when older leaves also have a few brown spots. Separate the two patterns on the same shrub. Round spots with dark borders belong in the disease check. Long dry edges, bleached patches, and crispy tips belong in the water, root, and exposure check. The broader leaves with brown tips pattern helps when the injury sits on margins more than inside the leaf blade.
Fertilizer injury can create scorch-like edges because salts pull water away from tender roots or damage fine root hairs. This is most common in containers, recently planted shrubs, or dry soil that receives a strong liquid feed. If leaf edges browned soon after fertilizing, flush the root zone only if drainage is good, then wait for fresh growth before feeding again at a lower rate.
Afternoon sun changes the advice. Bigleaf hydrangeas often prefer morning sun and afternoon shade in hot regions. Panicle hydrangeas tolerate more sun, especially with even moisture. Site fit also varies by cultivar and climate, so choosing the right shrub for exposure matters before leaf spots and scorch become yearly problems. For plant selection, the site’s hydrangea variety comparison is the cleaner place to separate bloom type, pruning group, and site tolerance.
Water deeply enough to wet the root zone, then let the surface breathe. Daily light sprinkling keeps leaves damp and roots shallow, which can feed both scorch and fungal pressure. Mulch helps moderate soil temperature, though a packed mound against stems can hold damp debris against the crown. Keep mulch 2 to 3 inches deep and pulled back from woody stems.
Four-Lined Plant Bug and Other Pest Damage
Four-lined plant bug damage can look like disease at first glance because feeding spots turn dark or tan on the leaf surface. The injury often appears on tender new growth in spring or early summer. Spots may be small, round, slightly sunken, or arranged where the insect fed repeatedly as the leaf expanded.
The timing is a major clue. Fungal leaf spots often intensify after wet summer weather and start low in the canopy. Four-lined plant bug injury usually appears earlier on newer growth, then stops getting worse once the insect life stage has passed. The marks remain, so an old feeding scar can look alarming long after the insect is gone.
Four-lined plant bug feeding creates small collapsed spots on many ornamental plants, and a four-lined plant bug fact sheet describes spotting caused by piercing-sucking feeding on tender plant tissue. If the pattern fits, inspect the undersides and nearby stems rather than treating the shrub for fungus immediately.
Look for small active insects, shed skins, stippling, distorted tender leaves, or damage clustered near the newest growth. If you find no insects and the damage is no longer spreading, removal of ugly leaves may be enough. If feeding is active, use a targeted approach that matches the pest and plant stage. Broad spraying after the pest has moved on only adds stress to the garden.
Other pests can create yellow speckling, pale stippling, or distorted leaves. Spider mites often leave fine stippling and webbing in dry heat. Aphids leave sticky residue and curled soft growth. Those symptoms overlap with broad plant stress, so check leaf undersides before connecting every brown mark to disease. If the dominant symptom shifts from spots to curling, the general plant leaves curling diagnosis can help separate pests from water and heat stress.
What to Remove and Whether to Use Fungicide
Removal should protect the shrub’s future growth without stripping away too much leaf area. Cut off leaves that are mostly brown, mostly yellow, covered with spreading spots, touching soil, or already falling. Keep leaves that are still mostly green, especially on a young or recently planted hydrangea. The plant still needs those leaves to make sugars and support buds.
Use clean pruners for spotted stems and hand-pick individual leaves when the damage is light. Work when foliage is dry, then clean tools before moving to another shrub. Remove fallen hydrangea leaves from beneath the plant, since the debris keeps moisture and disease material close to the lower canopy.
Use fungicide only when the disease is active, recurring, and severe enough to justify protection of clean tissue. It is usually a poor match for scattered old spots on a healthy shrub late in the season. A tree and shrub leaf scorch resource separates environmental browning from infectious spotting, which matters before any spray decision. Scorch, drought, root injury, and fertilizer burn need cultural correction, not a leaf-spot spray.
| Situation | Remove leaves? | Fungicide? | Better first move |
|---|---|---|---|
| Few lower leaves with spots | Only the worst leaves | Usually no | Clean debris and water at soil level |
| Spots spread after humid rain | Yes, remove infected fallen leaves too | Possible for clean new tissue | Improve airflow and reduce leaf wetness |
| Crispy tan leaf edges | Only dead leaf tissue if ugly | No | Correct deep moisture, shade, or salts |
| Dark marks on new growth in spring | Only if leaves are badly scarred | No for insect scars | Inspect for four-lined plant bug activity |
Do not judge a treatment by whether existing spots disappear. Dead leaf tissue stays dead. A better recovery signal is slower spread, cleaner new leaves, and less premature yellowing. If the plant keeps producing new spots after sanitation and water correction, disease pressure is still active or the site keeps leaves wet too long.
Brown spotting can also appear with broader yellowing when damaged tissue starts to shut down. If yellowing spreads beyond the spotted leaves or the whole plant loses color, broaden the check to roots, soil moisture, and nutrient access. The site’s plant leaves turning yellow diagnosis covers that wider color change without treating every yellow leaf as a hydrangea disease.
Watering and Sanitation That Prevent Recurrence
Hydrangea leaf spot prevention starts with leaf drying time. Water the soil, not the canopy. Morning watering is better than evening watering because leaves that get wet have daylight and airflow to dry. A soaker hose or drip line under the mulch keeps the lower leaves drier than a sprinkler.
Spacing matters inside the shrub as well as between shrubs. Dense stems trap humid air around older leaves. After flowering and at the correct pruning time for your hydrangea type, remove dead wood, weak crossing stems, and crowded interior growth. Avoid heavy midseason pruning that removes the plant’s working canopy or future flower buds.
Mulch reduces splashback when it is used correctly. Keep an even organic layer over the root zone and pull it back from the stems. Replace matted, leaf-filled mulch under a shrub with a repeated disease history, especially after a wet season. The lower canopy should sit above clean mulch, not above old infected leaves.
Site stress also decides how often spots return. A hydrangea planted in hard afternoon sun, dry root competition, or compacted soil may show scorch and disease at the same time because the leaves are stressed and slow to recover. A hydrangea in deep shade may dry too slowly after rain. Morning sun, afternoon protection in hot regions, and consistent soil moisture give the plant a stronger defense line.
Use the whole pattern before naming the cause. Round spots with borders point toward fungal disease. Crispy margins point toward scorch or root stress. Spring spots on tender growth may come from insect feeding. Mixed symptoms need mixed corrections: sanitation for infected debris, deeper watering for dry roots, less overhead irrigation for wet foliage, and pest inspection when new growth carries the marks.
If you are comparing hydrangea symptoms with similar damage on other plants, the broader brown spots on plant leaves diagnosis can help separate leaf spots, scorch, pests, and chemical injury across the garden. Hydrangeas add one practical filter: their large leaves show water stress loudly, so edge browning and internal spotting should be read as separate clues before any treatment.
Conclusion
Brown spot on hydrangea leaves becomes easier to handle when the pattern leads the treatment. Small lower-leaf spots after wet weather point toward fungal leaf spot and sanitation. Crispy brown edges point toward moisture, sun, roots, or fertilizer salts. Dark marks on tender new leaves can point toward insect feeding.
Start with the least disruptive fix: remove fallen and badly infected leaves, keep irrigation off foliage, check deep soil moisture, and inspect new growth. Spray only when clean tissue still needs protection during active disease pressure. A hydrangea is improving when new leaves open clean and the old damage stops spreading.