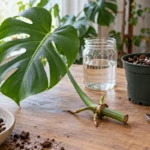


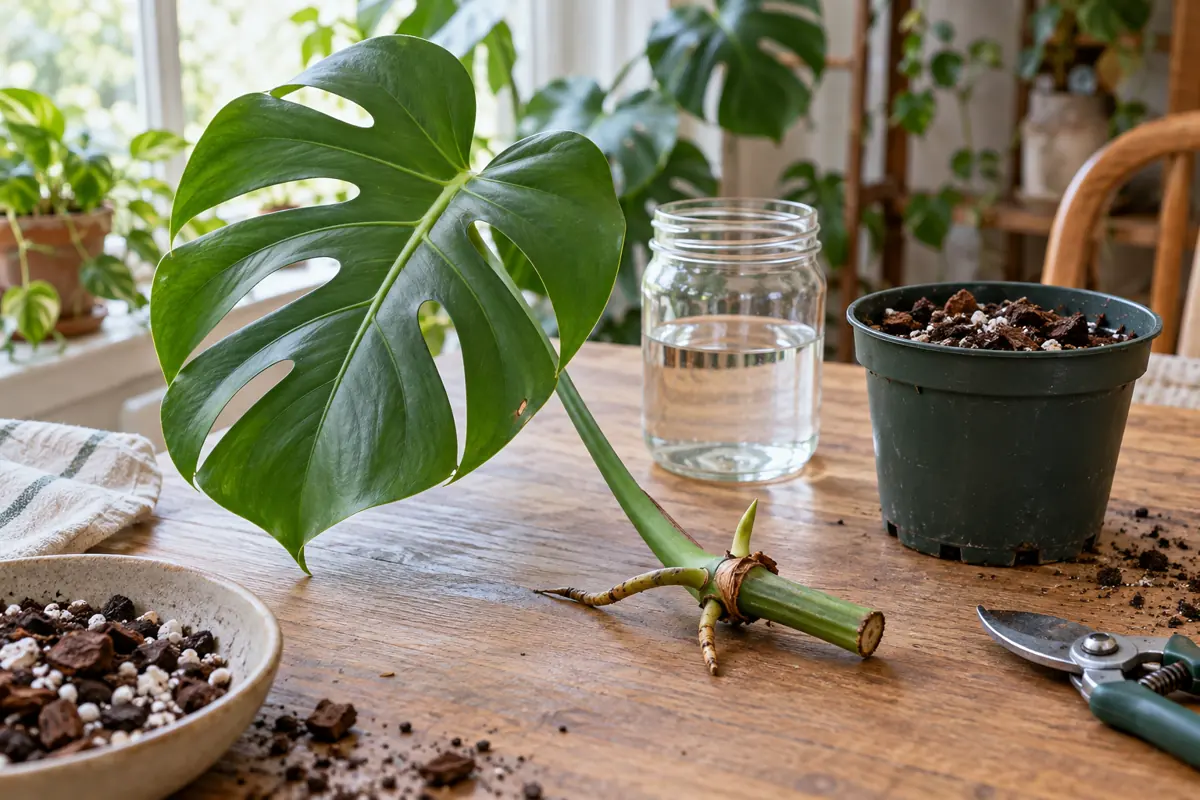
Before choosing how to propagate Monstera, find a healthy node with an intact growth bud on the main vine. That junction determines whether the cutting can develop a new leafy plant. A glossy leaf in a jar looks promising, especially when a long brown aerial root hangs beside it. Neither appearance proves that the piece contains the growth point it needs.
Trace the leaf stalk back to the thicker stem before picking up your pruners. Once the right piece is identified, water and a moist, airy rooting medium are both workable choices. The care changes when roots begin forming, and again when a water-rooted cutting moves into a pot. Keep those stages separate: firm roots, a sound stem and an emerging shoot tell you more than a fixed deadline on the calendar.
Check your cutting before you start
Main stem, healthy node and growth bud: proceed with water or a draining rooting medium. Keep the leafy parts above the water or mix.
Leaf and leaf stalk only: obtain a true stem cutting. A petiole without a bud-bearing node will not make a new Monstera vine.
Firm roots, no leaf: allow more time for the bud. A soft, collapsing node needs inspection; restart if no viable node remains.
Key Takeaways
- Trace each leaf stalk back to the main vine.
- Preserve the growth bud when cutting below its node.
- Inspect water clarity and root firmness throughout the week.
- Avoid burying leaves or leaving pots standing in water.
- Separate new root development from the arrival of leaves.
Table of Contents
How to Propagate Monstera From a Viable Node
A Monstera node sits on the main climbing stem where a leaf attaches. The petiole is the narrower stalk running from that attachment to the leaf blade. Follow it with your eyes until you reach the thicker vine, then find the small growth eye near the junction. That axillary bud supplies the future shoot.
The stem continues beyond the junction toward other nodes. The stretches between them are internodes. An aerial root is a separate structure growing outward from the vine; its tan, cordlike surface feels firmer and rougher than the smooth green leaf stalk. Keeping an aerial root attached is useful. It does not replace a missing growth bud.
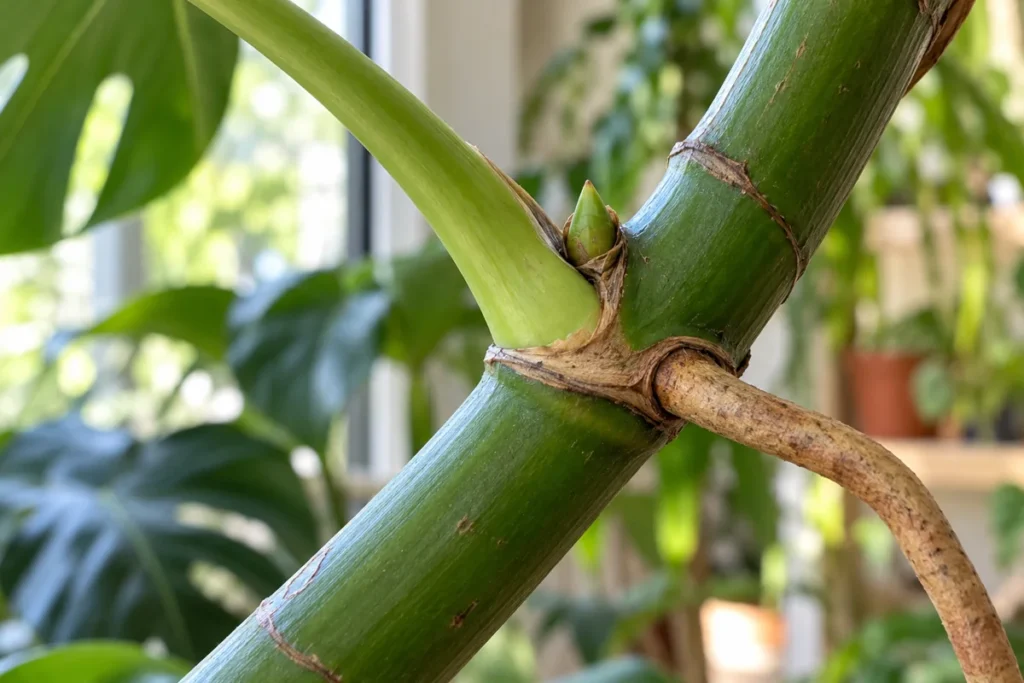
A stem cutting with a node and axillary bud is the requirement in University of Minnesota Extension’s Monstera procedure. A detached leaf with only its petiole will not produce a new leafy vine. Rooting hormone cannot supply the missing growth point.
Small buds are sometimes partly hidden by old leaf sheaths. If a short piece of thick stem remains attached to a fallen leaf, inspect both sides before deciding it is useless. Do not peel or carve into the junction to find an eye. When the anatomy remains uncertain, take clear close-up pictures and ask a local Extension service or experienced grower to identify the node before sacrificing more of the parent.
Take a Healthy Cutting Without Damaging the Bud
Choose a firm, actively growing stem from a hydrated parent. Leaves should hold their normal shape, without a spreading pest problem or soft tissue at their bases. A severely declining plant needs a salvage assessment first; putting diseased material into a clean jar does not remove the underlying problem.
Clear the bench, prepare the jar or pot, and support the leaf before cutting. Remove dirt and sap from sharp pruners. A wipe or dip with 70% rubbing alcohol is the household sanitation method described by Iowa State University Extension; follow the product precautions and keep alcohol away from flames. Cleaning reduces disease transfer without making the blade sterile against every pathogen.
Make the cut through the main stem below the selected node. The Monstera-specific Minnesota procedure places it about 1 to 2 inches below the node, along the internode. Leave the node and its bud on the piece you intend to root. If another junction is so close that the cut would damage it, choose a different section. Keep the growth eye intact.
A leafy tip is easier to orient than a bare section of vine. Keep a manageable amount of healthy foliage: leaves contribute photosynthesis and lose water through transpiration before new roots can replace it. An enormous top cutting needs more support and moisture control than a modest piece. There is no required leaf count that suits every stem.
Wear gloves and collect the scraps as you work. Sap contact causes irritation in susceptible people, a risk identified in North Carolina State University Extension’s plant profile. Keep the cuttings and discarded leaves away from chewing pets. The ASPCA lists Monstera deliciosa as toxic to cats and dogs because of insoluble calcium oxalates; suspected ingestion warrants veterinary advice.
Choose Water or a Rooting Medium You Can Manage
Water makes new roots visible. A solid medium supports the stem and lets roots develop with air spaces around them. Both routes need a living node, suitable moisture and a stable position; neither comes with a verified success percentage that makes it the automatic winner.
| Rooting route | Useful when | Care to provide | Main tradeoff |
|---|---|---|---|
| Plain water | You want to see roots without lifting the cutting. | Keep developing roots immersed; refresh water and inspect the stem. | Roots must adjust when moved into potting mix. |
| Perlite or an airy rooting blend | You can monitor moisture in a small draining pot. | Premoisten, drain and keep moisture available without saturation. | Root development is harder to see without gentle inspection. |
Set up a water-rooting jar
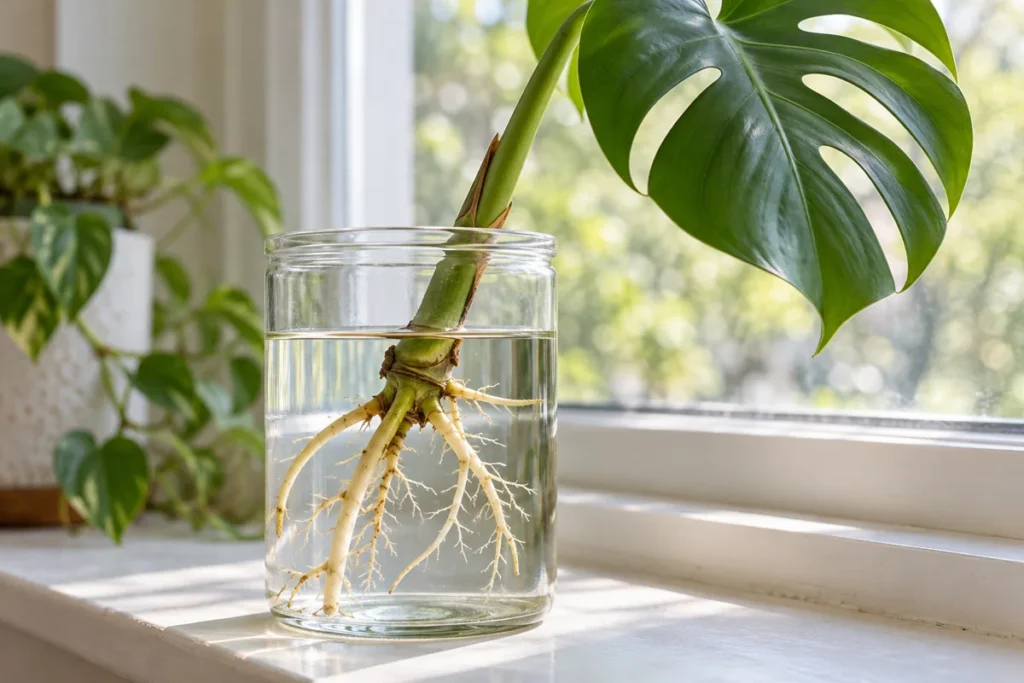
Use a clean vessel with a mouth wide enough to remove the developing roots without dragging them through a narrow neck. Stand the cutting in plain water so the node’s rooting area and any attached aerial root contact the water, with the leaf blade and stalk above it. Secure a top-heavy cutting so the leaf cannot pull the jar over.
The waterline depends on the cutting’s shape. Do not push an entire leaf base underwater just to fit a short stem into a deep jar. A small pot of rooting medium is a better option when the stem cannot sit securely with its leafy growth exposed.
Refresh the water promptly when it becomes cloudy. For routine care, Iowa State’s water-rooting instructions for houseplant stem cuttings suggest changing it once or twice a week. Inspect the level between changes so emerging roots do not dry in air. A cloudy jar needs attention sooner than the next scheduled change.
Root directly in an airy medium
Choose a clean nursery pot with open drainage holes. Premoisten perlite or an appropriate light rooting blend, fill the pot and make a planting hole before inserting the cutting. Position the node’s rooting area in contact with the moist medium and support the lower stem. Keep leaves and the growing shoot exposed. Gently settle the material around it and add a support if the leaf pulls it sideways.
Squeeze a small sample before filling: it should register damp and loose. Drain excess moisture if it compresses into a dripping paste. Empty any water collecting in a decorative outer container. Air-filled pore space allows root respiration; adding more moisture to an already saturated pot reduces that space.
Rooting hormone is optional. If you use it, follow the exact product label for the plant and method. Pour a little powder into a separate container to protect the original bottle from contamination. Extra powder or an improvised mixture in the jar is not a substitute for sound stem tissue.
Keep Leaves Hydrated While Roots Develop
A fresh cutting loses water through its leaves when it has little capacity to replace it. Put it in a bright position with indirect light, away from hot sun on the glass. The leaves need light for photosynthesis; a dark shelf slows the process. Direct heat increases water loss before the root system is ready.
Feel the difference between the room and the windowsill after sunset. A comfortable room can still have a cold, damp surface beside the glass. Move the container onto an interior stand if the rooting area becomes chilled. Warmth at the actual cutting matters more than the thermostat on the opposite wall.
Spring and summer generally make indoor propagation easier because the parent is growing strongly and natural light lasts longer. Cuttings are possible at other times when indoor conditions are suitable. University of Wisconsin-Madison’s horticultural guidance includes year-round propagation in its Monstera guidance; that does not imply equal speed beside a dim winter window.
For a cutting in dry air, a loose clear enclosure supported off the leaves reduces transpiration. Leave ventilation and keep it out of direct sun. Persistent wet foliage, stagnant air or excessive warmth calls for more ventilation, not a tighter seal. A water-rooting jar does not automatically need a bag.
Inspect moisture inside the pot; a pale surface alone gives incomplete information. Perlite dries differently from a dense potting blend. Once the cutting is established, indoor watering by moisture and pot weight ties care to the actual conditions in the room.
Move Rooted Cuttings Into a Pot Gently
New roots and a new leaf are separate milestones. A firm cutting with visible root development has made progress even if the bud has not opened. Repeatedly taking it apart to look for a shoot adds disturbance without answering whether the roots are functioning.
Judge the roots by condition and development. Young healthy roots are pale and firm; a brown surface on an older aerial root is a different feature from soft, deteriorating new roots. Support a substrate-rooted cutting from below with a small spatula when inspection is needed. Lift the surrounding medium gently and keep tension off the petiole.
There is no universal required number of roots or a reason to wait for a jar-filling tangle. A tiny nub beneath a large heavy leaf is also a poor basis for assuming the cutting is established. Look for sound developing roots and a viable stem before transferring, then choose a pot suited to that root system.
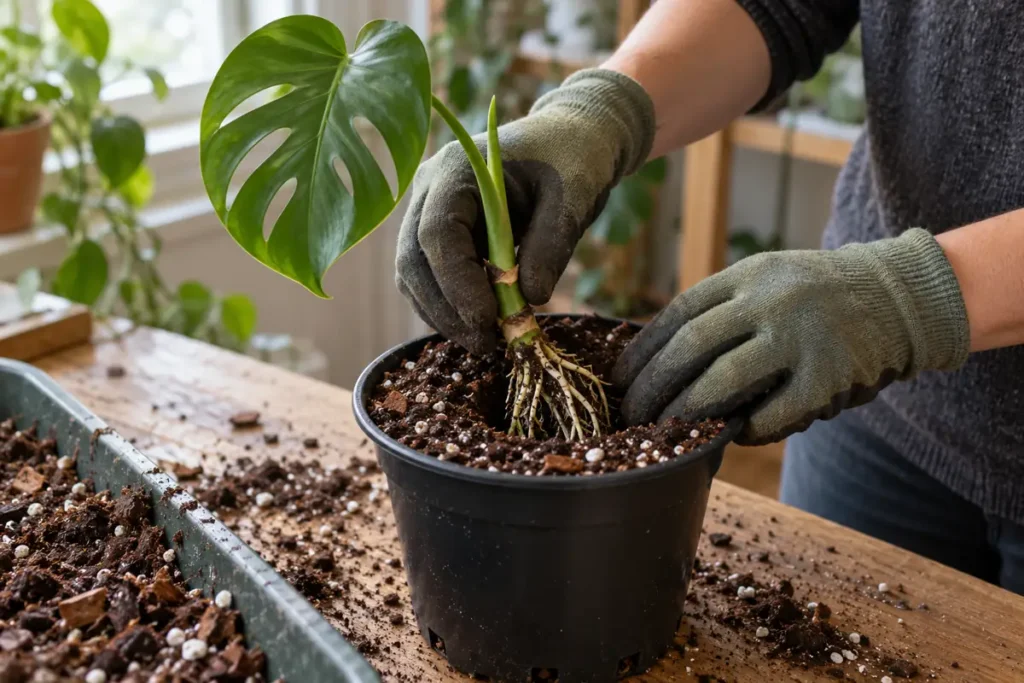
Premoisten a draining potting mix and make a cavity large enough for the roots. Lower them gently, fill around them without packing hard, and support the main stem. Keep the leaf stalk and developing shoot above the surface. Water the pot, let excess drain, and empty the saucer.
Water-grown roots face a change in their surroundings after potting. Temporary wilt or leaf deterioration is possible during adaptation, as Iowa State’s guidance describes. Keep moisture available initially with drainage; then allow a gradual upper-layer dry-down as establishment progresses. A heavy, constantly wet pot needs less added water, even when a leaf droops.
Resume ordinary Monstera care for light, watering and support after the plant is established. Fertilizer does not correct broken roots, poor drainage or a missing bud. Avoid moving the new plant into a much larger pot simply because the original leaf is large.
Troubleshoot Slow Roots, Yellow Leaves and Soft Stems
Before changing the setup, ask one question: what has changed in the stem, roots or moisture since the last inspection? Leaf color alone leaves too many possibilities. Firm tissue with gradual root growth calls for patience; spreading softness calls for an inspection and a decision about remaining viable material.
| Visible change | Inspect first | First action |
|---|---|---|
| Cloudy water; stem still firm | Root texture and buildup inside the jar | Clean the vessel, replace water and monitor for deterioration. |
| Roots developing; no new leaf | Bud integrity, warmth and light | Keep suitable conditions; assess roots and shoots separately. |
| Yellowing or wilt after potting | Moisture below the surface, drainage and stem firmness | Correct dry or saturated conditions before adding fertilizer. |
| Soft brown roots or a collapsing node | Whether any separate healthy bud-bearing stem remains | Isolate and reassess. Restart if no viable node remains. |
Rooting time varies with the cutting and its surroundings. Minnesota’s species-specific guidance gives roughly 2 to 4 weeks for roots under suitable conditions. Iowa State’s general houseplant guidance gives 3 to 6 weeks. Minnesota also allows up to 2 to 3 months for new leaves from propagated nodes. Treat those as different reference points, not deadlines or a combined guarantee.
With no roots after the expected interval, recheck the node, light, temperature and moisture. Correct a cold window or stagnant medium before repeatedly changing methods. A leaf stalk without a viable node will not become a vine through longer waiting.
For yellowing that persists beyond establishment, use the leaf pattern and growing conditions together. A pot that stays wet also warrants checking for fungus gnat larvae in the medium if small flies appear. Their presence is a separate observation, not proof that the node has rotted.
Discard soft deteriorating material when no healthy growth point remains. If a separate firm node survives, taking a fresh cutting from sound tissue is a conditional salvage attempt. Clean the tools and container before restarting; a household additive cannot restore a destroyed bud.
Conclusion
Record the cutting date and keep a quick picture of the original node. At later inspections, compare the same tissues. Record whether the roots and node are firm and whether new growth has appeared. A stable setup makes changes in roots, moisture and bud development easier to interpret.
Once the roots are established, give the stem gentle support before a large leaf pulls it sideways. Leave room around the emerging shoot. The next useful sign is firm new growth unfolding above a pot that drains cleanly.
Frequently Asked Questions
Will a leafless Monstera stem section grow?
A leafless piece of stem needs a living node and bud to produce a new shoot. Stem-section propagation is an established alternative for mature vines, described by University of Wisconsin-Madison. Bare stem between nodes does not meet that requirement. For a first attempt, a healthy leafy cutting is easier to identify and monitor.
Does a variegated cutting need a different method?
The node requirement stays the same for variegated Monstera deliciosa. Reduced chlorophyll in pale tissue changes the plant’s ability to capture light, and growth is slower in highly variegated material. Preserve healthy green tissue and avoid promising that the next leaf will repeat a particular pattern.
What happens to the parent after a stem is removed?
A healthy parent with remaining viable nodes has growth points from which further shoots can develop. Its response depends on the retained tissue and growing conditions; pruning does not guarantee a particular number of branches. Leave it in suitable conditions and follow the actual new growth before deciding to cut again.