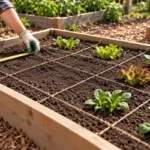


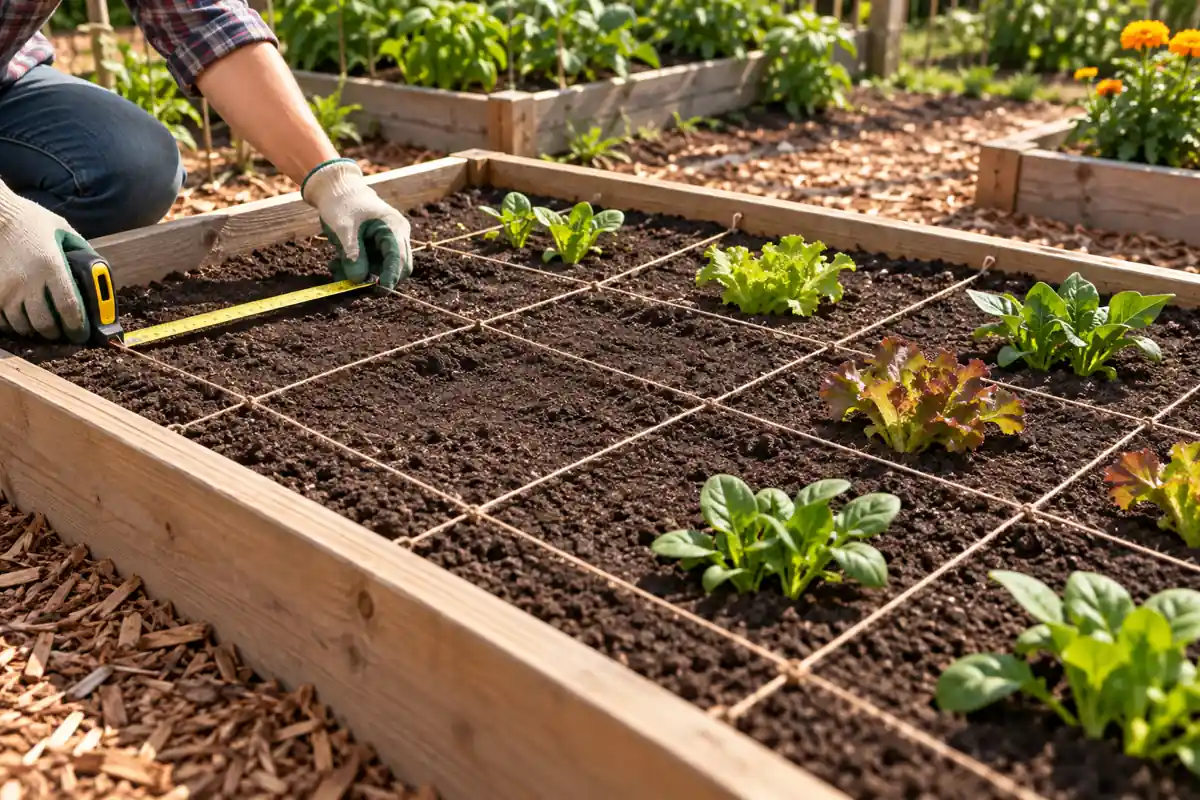
Square foot gardening divides a planting bed into 12-inch squares so you can measure plant spacing, record crops and replant small areas after harvest. A true 4-by-4-foot inside planting area contains sixteen squares. The lines organize the bed; they do not keep roots, leaves or vines inside their assigned space.
Measure the soil area before marking the grid, then choose crops for their mature size and intended harvest. Four small lettuce plants cut young are a different plan from four full-sized heads. A trellised tomato needs room beyond the spot where its stem enters the soil. Those decisions matter more than filling every square. Start with a reachable bed, usable paths, suitable rooting depth and water that reaches the whole planting area. The grid can then help you see what fits and what needs to change through the season.
Measure first, then let crop size override the grid
- One square: measure 12 inches in both directions inside the planting area.
- Small crops: one, four, nine or sixteen centers give 12-, 6-, 4- or 3-inch spacing in a continuous matching pattern.
- Harvest stage: four young leaf lettuces are not four mature full-sized heads.
- Large plants: reserve neighboring space for tomatoes, broccoli and spreading vines.
- Before planting: verify local season, actual rooting soil, irrigation and access from the paths.
Key Takeaways
- Measure inside soil dimensions before marking twelve-inch grid squares.
- Place plant centers evenly and thin seedlings to final spacing.
- Match lettuce density to variety and intended harvest size.
- Reserve neighboring squares for large crops and trellis access.
- Replant cleared squares only when the next crop suits conditions.
Table of Contents
Square Foot Gardening Starts With the Inside Planting Area
The square-grid method is associated with Mel Bartholomew and the Square Foot Gardening Foundation. Its recognizable feature is a visible grid across a small growing bed. You can use measured crop spacing without reproducing a complete branded planting chart or buying a particular grid kit.
Check clear soil length and width between the inside edges. A box measuring 48 inches outside can have less usable soil inside. For example, a 45-by-45-inch interior divided into four equal bands produces 11.25-inch cells, not sixteen square feet. Keep the actual measurements when deciding how many plants fit.
- Measure the clear planting surface. For a true 48-by-48-inch interior, mark 12, 24 and 36 inches from the same inside reference edge.
- Repeat on the opposite edges. Stretch visible twine or place suitable thin slats between corresponding marks in both directions.
- Check the individual cells. Each should measure 12 inches across and along. Correct shifted lines before planting.
- Keep access and irrigation usable. Secure loose ends and adjust removable sections where stems or watering equipment need space.
A 36-by-36-inch interior gives nine squares. Rectangular beds also work when the gardener can reach them. You do not need a four-foot square to make a measured planting plan.
Test your reach before filling the middle
A four-foot-wide bed usually assumes access from both long sides. With a fence blocking one side, the far edge can be four feet away. Use a narrower bed or change its position so you can sow, thin and harvest without stepping on the soil.
Allow paths for the person and equipment using them. UF/IFAS square-foot guidance suggests three-foot aisles; some general raised-bed guidance uses narrower footpaths. Test the actual wheelbarrow, kneeling position or mobility needs rather than choosing the smallest published width. A bed’s soil area is not its total footprint with paths.
For frame placement and access, keep raised-bed design separate from the grid calculation. First-time growers also need a feasible small vegetable-garden starting plan before committing every cell to a crop.
Plant Centers Determine Spacing, Not the Number of Seeds
Divide a 12-inch square into equal smaller areas and place each plant in the center of its area. Four plants use a two-by-two pattern, nine use three-by-three and sixteen use four-by-four. Adjacent cells with the same pattern continue the same spacing across the grid line.
For four plants, centers fall at 3 and 9 inches along both axes. Nine positions use 2, 6 and 10 inches on each axis. Sixteen use 1.5, 4.5, 7.5 and 10.5 inches. A single center falls 6 inches from each side. Putting plants on the corners instead can crowd the plants in neighboring cells.
These are final plant positions, not a promise that the same number of seeds will germinate. Follow the seed packet for sowing and thin to the intended centers after emergence. Closely spaced seedlings left around every mark will compete even when the dots were correctly measured.
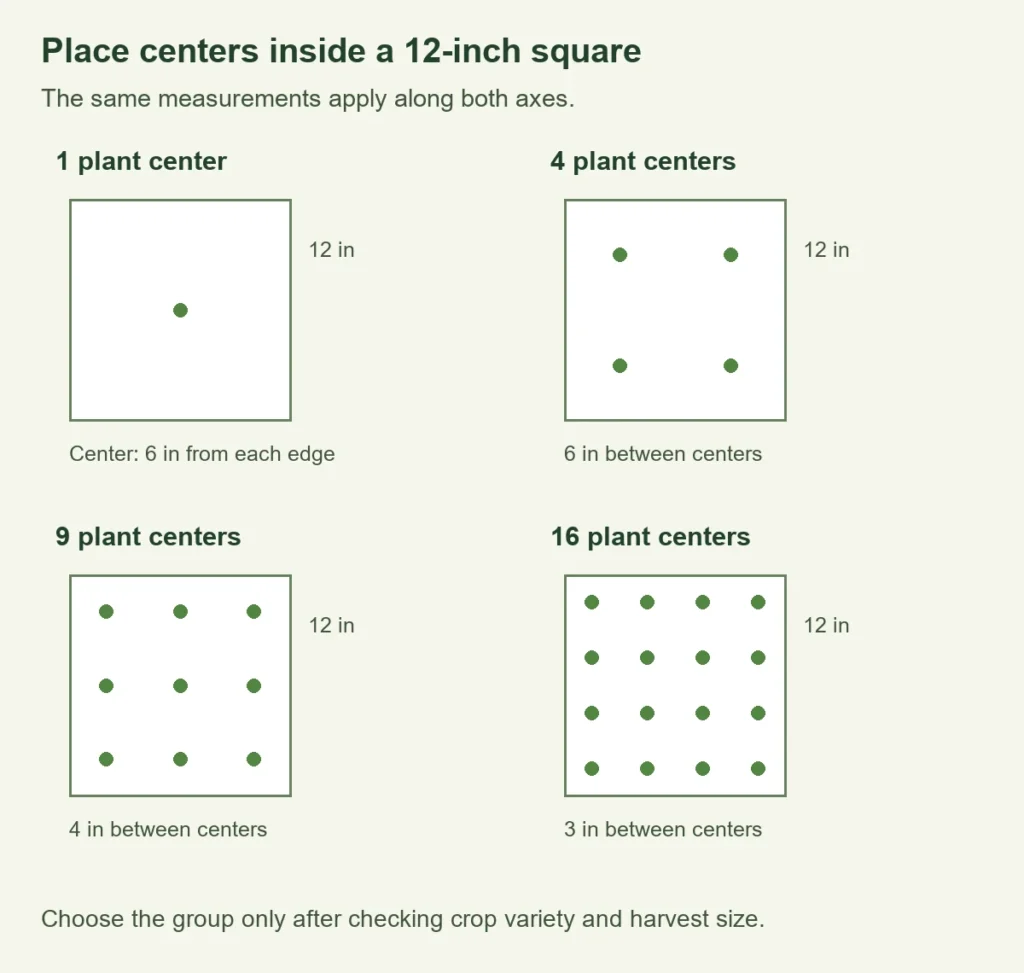
Match the pattern to crop-specific block spacing. Colorado State’s guidance distinguishes small roots, bunching onions and larger mature crops. Start wider when the variety, soil performance or irrigation is uncertain.
| Crop and harvest goal | Example final plants per square | Spacing and limit |
|---|---|---|
| Carrots or radishes of a suitable small-root variety | 16 | 3-inch centers; choose wider spacing when the variety or intended root size requires it. |
| Small to medium beets or turnips | 9 | 4-inch centers; larger roots can need 6 inches and four positions. |
| Bunching onions for green harvest | 16 | 3-inch centers; do not apply this count to large storage bulbs. |
| Spinach leaves | 4 | 6-inch centers in this example; adjust for variety and harvest. |
| Lettuce harvested young as baby leaves | 4 | 6-inch centers for early cutting, not full-sized heads. |
| Full-sized head lettuce | 1 | About 10-12 inches in crop guidance; allow more when the variety needs it. |
Lettuce counts change with the harvest
Full-sized leaf and head lettuces need a different allocation from baby leaves. Minnesota’s lettuce spacing by harvest stage separates baby leaves, miniature heads and full-sized plants. Label that stage on the map. If four young plants are left to grow into large heads, the original early-cutting plan no longer applies.
A Measured Layout Works Only in the Crop’s Growing Season
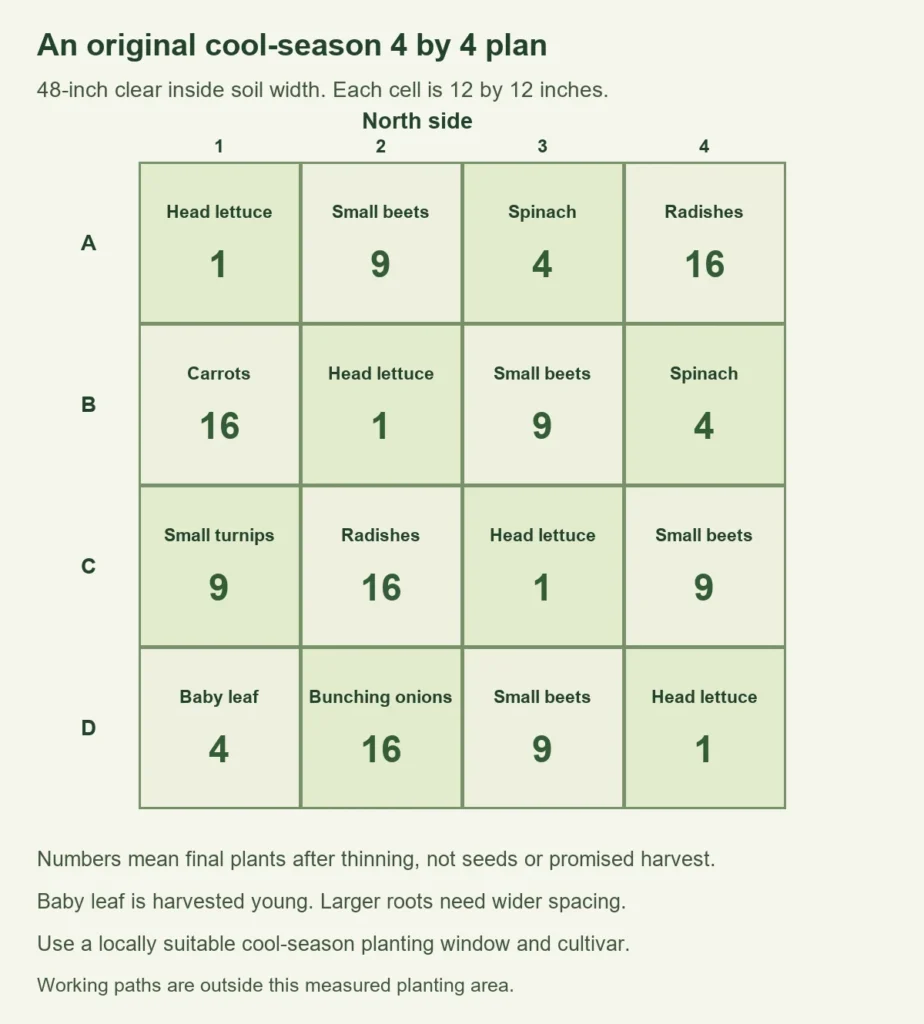
The following original plan uses cool-season crops in a true 48-by-48-inch interior. Each count is a target after thinning. It assumes suitable varieties, local planting weather, good growing soil and access around the bed. It is not a companion-planting prescription or a prediction of harvest weight.
| Row | Column 1 | Column 2 | Column 3 | Column 4 |
|---|---|---|---|---|
| A – north | 1 head lettuce | 9 small beets | 4 spinach | 16 radishes |
| B | 16 carrots | 1 head lettuce | 9 small beets | 4 spinach |
| C | 9 small turnips | 16 radishes | 1 head lettuce | 9 small beets |
| D – south | 4 baby-leaf lettuces | 16 bunching onions | 9 small beets | 1 head lettuce |
Use the map to check where you will reach for thinning and harvesting. Mark sowing dates on a copy, then record when an area clears. Several cells can hold the same crop; there is no need to find sixteen different vegetables just to make the pattern colorful.
Check sun and shade at the actual site. Tall structures and mature plants can shade neighboring cells or beds. A north-edge trellis often helps keep shorter plants in sun where the garden has clear southern exposure. A wall, tree or different access arrangement can change that choice.
Keep this cool-season plan separate from a later tomato plan. In warm conditions, lettuce can bolt even at correct spacing. Replace it with a locally suitable crop or wait for another planting window. Empty soil does not create the temperature or daylight a crop needs.
Large Plants Need Space Beyond Their Stem’s Grid Square
A large crop can have one marked planting point and still use several squares. Roots and canopy cross the lines. Broad square-foot grouping advice and crop-specific mature spacing are answering different questions, so check the plant tag and growing method before assigning one large plant to every cell.
For a vigorous trellised tomato, reserve a larger neighborhood. A two-by-two group of squares is a useful starting reservation; Colorado State gives at least 24 inches between trellised tomato centers. That reservation is not a root barrier or a guaranteed canopy diameter. Some varieties need more room and a different support arrangement.
One seasonal option is to clear A1, A2, B1 and B2 in the example plan before a warm-season tomato needs them. Place one plant with suitable access to its support and keep the rest of that area available for growth. Adjust removable grid sections around the stem. Do not keep all the mature early crops there and assume the tomato will share indefinitely.
Broccoli and larger peppers can also extend past one square. Spreading squash, pumpkins and unsupported cucumbers may occupy much more of the bed or path. A cucumber count intended for trained climbing vines cannot be carried over to every sprawling variety. Reserve the actual canopy and harvest access or select a smaller crop.
Corn presents another limit: wind pollination needs an appropriate block of plants. A token corn plant in one corner is not a dependable ear-production plan. Choose a separate suitable block or another crop for the small mixed bed.
Frame Height Does Not Establish the Available Rooting Depth
Look below the growing mix before choosing crops. Roots in an open-bottom bed over healthy, workable native soil can continue below a shallow frame. A bed on concrete or another restrictive base must supply the needed rooting space and drainage within its construction.
A classic six-inch-high square-foot box therefore cannot establish that six inches of medium will suit every crop on a patio. Deeper-rooted crops need appropriate soil below the visible surface. Oregon State’s soil guidance, for example, recognizes the benefit of deeper improved soil for root crops. Match the actual root zone to the intended crop and site.
The Foundation’s branded Mel’s Mix is one growing-medium approach; a suitable raised-bed soil mixture is another. Judge stability, drainage, nutrient status and rooting depth. A perfect grid over an unsuitable medium will not correct poor growth.
Calculate volume separately from planting area. A true 4-by-4-foot interior filled six inches deep contains 16 square feet multiplied by half a foot: 8 cubic feet. This is a volume example, not a universal recommended crop depth. Measure the chosen depth and the actual inside dimensions for your bed.
Water all cells evenly and check the soil beneath the surface. Leaves can hide dry patches at the center or divert water toward the edges. Use a trowel to inspect carefully near the roots; damp surface soil alone does not show that the root zone was wetted. Correct persistent saturation and drainage problems before adding more water.
Plant and Replant Squares According to Season and Mature Growth
Choose the local cool- or warm-season window, then mark the final centers for the selected variety. Sow at the packet’s depth and rate, water appropriately and record the date. Thin early so extra seedlings do not turn every planned position into a crowded clump.
For delicate lettuce seedlings, clipping unwanted extras can avoid tugging at neighboring roots. Check the actual final spacing after thinning. A map showing sixteen carrots is only useful if the growing plants have room between them.
After harvest, assess the next crop’s season and time to maturity before replanting. Minnesota Extension’s succession examples use early greens ahead of later tomatoes or peppers. The first crop must clear before the later crop needs its light and growing space. A cold or excessively hot window can mean waiting.
Record amendment applications as well as crops. Repeated compost additions should answer a soil or growing-medium need, not become an automatic scoop for every empty cell. Recheck fertility, root condition and irrigation when growth declines. Keep temporary labels readable and move the grid where it would constrict a stem.
Crowding, Shade and Watering Failures Need Different Corrections
Look at the mature bed from the paths. Leaves touching across a grid line are not automatically a problem. Persistent interlocked wet foliage, blocked access and neighboring crops stretched toward light suggest the plan needs more space or different heights.
| What you notice | Check | Change |
|---|---|---|
| Four lettuce plants crowd each other | Baby-leaf plan versus mature head size | Harvest young as planned or reduce to appropriate mature spacing. |
| A tomato covers neighboring cells | Variety, support and reserved canopy room | Clear competing space and improve access; use a different layout if needed. |
| Center cells remain dry | Actual root moisture and watering coverage | Adjust water distribution without stepping on the growing soil. |
| Roots stay small despite correct centers | Rooting depth, compaction, crop age and moisture | Correct the physical restriction before assuming a fertilizer shortage. |
| Harvesting requires walking inside | Reach, fence position and path clearance | Change access or bed width; do not rely on the grid to prevent compaction. |
Save what worked in the map and change the affected cells next season. Fewer well-spaced plants can be a more useful experiment than squeezing in every published maximum. Record actual growth and harvest without treating one bed as proof of a universal yield advantage.
Conclusion
Measure the inside soil, mark true twelve-inch cells and choose plant centers for the intended harvest size. Reserve extra space before planting large crops. Keep paths, roots and watering workable, then reuse a square only when the next crop fits the season. The grid should make those decisions visible and easier to adjust.