


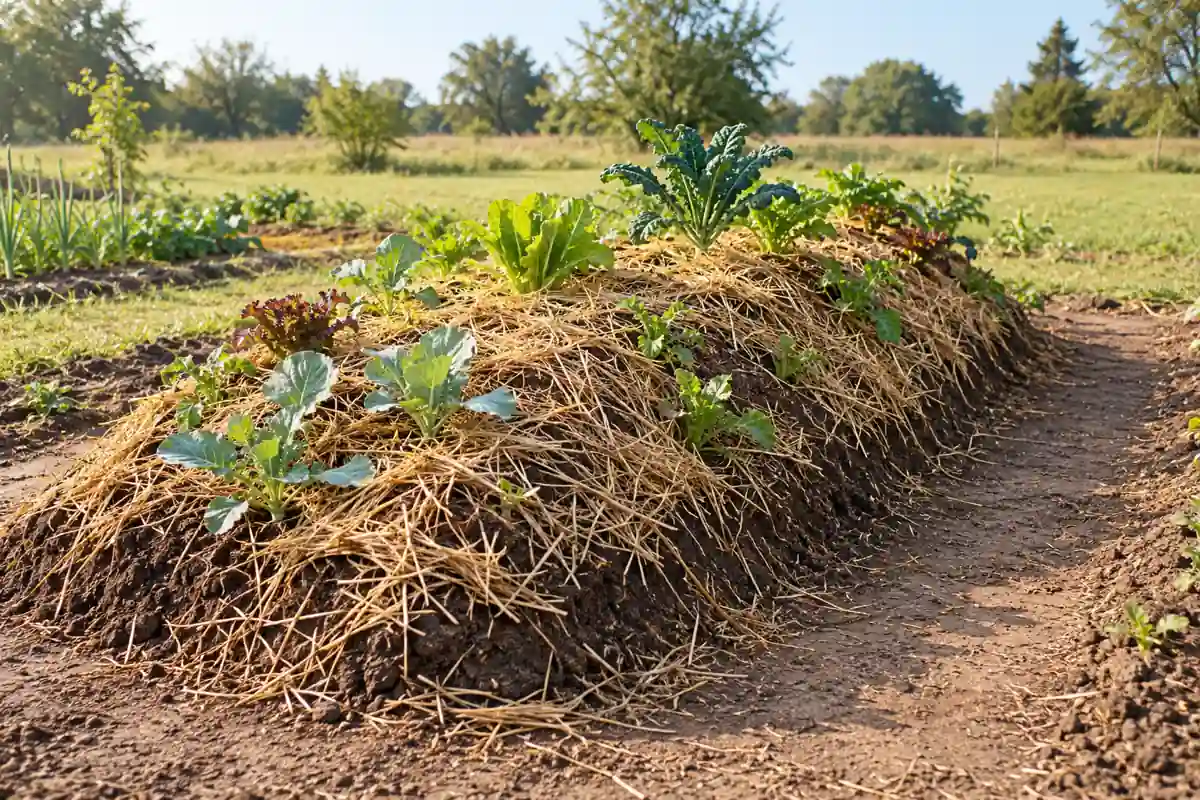
Hugelkultur is a growing mound built around logs and smaller woody material, with soil covering the top and sloping sides. The wood gradually decomposes beneath the planting surface. That creates a changing bed, so the soil your crops actually root in deserves as much planning as the buried branches.
Start with the site. A sunny open patch with safe drainage, access to water and a supply of known untreated wood can suit the method. A narrow strip beside the house, saturated ground or a mature tree’s root zone calls for another approach. The mound must fit the garden after its sides and access paths are included. Plan to water seedlings, inspect the planting surface after heavy rain and repair settling. Buried wood does not remove those jobs, and a neatly shaped mound is not proof of improved harvests.
Check these five things before collecting logs
- Room: Can gently sloped sides and working paths fit without blocking access?
- Water: Does runoff leave safely, with no ponding or diversion toward buildings?
- Roots and utilities: Can construction avoid existing tree roots and buried services?
- Materials: Do you have known untreated wood and enough suitable planting soil?
- Care: Can you irrigate young plants and repair soil that sinks or washes away?
If a critical check fails, use a level planting bed or suitable surface mulch at a safer site.
Key Takeaways
- Choose the site before deciding the mound’s height and shape.
- Keep known untreated logs beneath a continuous rooting surface.
- Fill large gaps without compacting the planting soil hard.
- Water young roots even when buried wood holds moisture.
- Inspect settling and erosion before adding soil or fertilizer.
Table of Contents
Hugelkultur Creates a Wood Core Beneath an Earthen Growing Surface
Large logs form the low center. Smaller branches and suitable organic material occupy spaces around them, and planting soil covers the outside. Seen from the path, the completed bed is an earthen mound. Exposed logs and a few handfuls of soil between sticks do not give seedlings a continuous growing surface.
A framed box containing a lower woody layer is a related adaptation. Its walls hold a different shape and its filling decisions belong with framed raised-bed planning. For a freestanding mound, the sloping soil itself must remain in place.
The method can reuse suitable woody material already on the property. Whether that saves money depends on the soil, hauling and labor it requires. Compare the whole project with a level bed before accepting a load of free logs. A mound that needs imported planting soil and repeated repairs may be more work than the available space warrants.
Drainage and Existing Roots Decide Where the Mound Can Go
Observe the site after rain. Mark the direction water arrives from and where it leaves. A low point that remains saturated needs drainage assessment; a trench full of water is not automatically useful storage for vegetable roots. An above-ground design avoids a pit, though it still changes the flow around its base.
Make the same sun, path and irrigation checks used in whole-garden layout. Most fruiting vegetables need ample direct sun. Texas A&M AgriLife’s home-garden guidance also favors well-drained soil and nearby water. A log core cannot compensate for deep shade or an inaccessible hose connection.
Keep the project separate from foundation drainage and inspection areas. Soil or mulch contacting building wood, persistent dampness and disturbed perimeter treatments are recognized building termite risk factors in Mississippi State’s guidance. That is a reason for careful placement, not evidence that every garden mound causes an infestation. Use local advice for the property; a universal distance in feet would ignore its drainage and construction.
Leave tree roots and buried services undisturbed
A tree’s roots can occupy apparently empty lawn. Do not excavate through them or heap a new soil grade over them to fit a mound. Changes in grade and drainage can stress established plants, a concern in University of Maryland’s tree-decay guidance. Move the project where it will not require that damage.
Arrange utility location through the appropriate local call-before-you-dig service before excavation. Choose the actual footprint only after the marked corridors and other site restrictions are known. If safe drainage, roots or services leave too little room, a smaller level bed is a reasonable outcome.
[cta]
Known Wood and Gentle Sides Reduce Avoidable Construction Problems
Use identifiable, untreated logs and branches from a known source. Reject painted lumber, railroad ties and scrap with uncertain treatment or contamination. Surface weathering does not establish what an old board contains. Keep suspect material out of a food-growing mound.
Wood species and condition change decomposition. Oklahoma State’s examples include several hardwoods; it cautions about black walnut, slow-decaying cedar and freshly cut willow that can sprout. Choose a known suitable alternative when those uncertainties matter. Slow decay is not the same claim as universal plant poisoning.
Soil burial is also not a controlled hot-compost treatment. Do not assume it sanitizes diseased wood or destroys every weed propagule. Screen incoming material and use finished, appropriate compost in the planting zone. Raw manure and kitchen waste introduce separate food-safety and animal-attraction considerations; they are not required ingredients for every home mound.
Sketch a broad, low profile that you can reach from the paths. A tall narrow pile exposes steep slopes where fine soil and seeds are harder to retain. Mark the outside of the finished soil cover, not merely the footprint of the logs. Leave room to move a wheelbarrow without stepping onto the planting surface.
Build Stable Layers and Keep the Rooting Soil Continuous
The construction sequence below uses the large-to-small material arrangement in Oklahoma State’s wood-filled mound method. It is a construction example, with the planting surface assessed separately for the chosen crops.
- Mark safe access and the finished outline. Resolve utilities, roots and runoff first. Prepare the intended area and remove growth that would remain a weed problem.
- Place the largest logs low and securely. Keep them stable rather than balancing pieces across unsupported spaces. Above-ground construction is an option where a trench is unnecessary or unsuitable.
- Add progressively smaller branches. Work material into the large spaces around the core. Loose bridges over empty cavities invite later sinking.
- Fill the remaining gaps. Use suitable leaves and compostable plant material, with appropriate soil or finished compost where needed. Moisten during assembly and settle the lower material without turning it into a waterlogged heap.
- Form gentle sides and cover the wood. Add a continuous, workable growing layer across the top and slopes. Keep large woody pieces out of the fine seedbed.
- Water and inspect the surface. Repair hollows or exposed wood before sowing. Protect bare soil with suitable mulch or cover planting, keeping plant crowns clear.
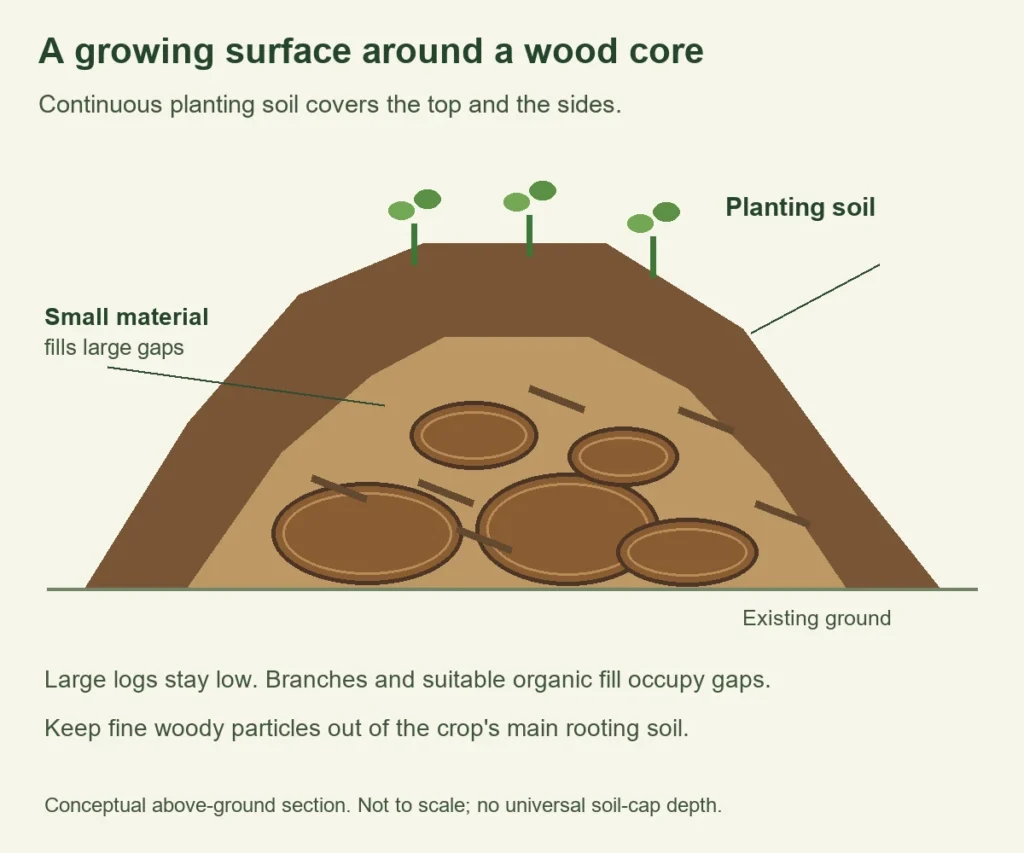
Do not use a thin soil coating as the crop’s whole root zone
Choose the planting depth for the crop and the material beneath it. A useful check is to open a small inspection point: can the transplant sit at its proper depth in suitable soil, without its root ball resting in a hollow or directly on exposed timber? For direct sowing, check the rooting layer as well as the fine surface that touches the seed.
The Oklahoma source gives inconsistent cover depths in its instructions and figure caption. Neither should be turned into a universal thin-cap recipe. Provide enough actual growing medium for the intended crop, and use a conventional bed if that soil volume cannot be supplied. The height of the mound does not equal the depth of plantable soil.
Planting Success Depends on Moisture Where the Young Roots Are
Plant when the surface is stable enough for the crop and local weather permits. Building ahead gives loose material time to settle. Immediate planting still requires a suitable root zone, irrigation and follow-up checks; the calendar alone does not establish readiness.
For a transplant, water the root ball and surrounding soil, then inspect that same zone after watering. For fine seeds, maintain the moisture and seed-to-soil contact their germination requires. A damp log below dry planting soil is of little immediate help to a seed near the surface.
Check more than the crest. The sunny side, sheltered side and bottom can receive different amounts of sun and runoff. If water runs off a slope before wetting the planting soil, adjust the application and repair the surface. Do not keep increasing the volume without seeing where it goes.
Keep surface mulch appropriate to the planting, with a clear space around stems. A coarse protective cover can help retain the soil, but tiny seedlings must not be buried beneath it. Crop spacing still follows mature plant size; use paths and trellises that remain stable as the mound settles.
Water retention in decomposing wood is a possible benefit, not an irrigation schedule. Rainfall, exposure and contact between soil layers change the result. Continue checking actual roots before deciding that established plants need less water. No fixed percentage saving follows from placing logs underground.
[cta]
Wood Particle Size and Location Change Nitrogen Availability
Microorganisms use nitrogen as they break down carbon-rich material. Fine sawdust mixed through planting soil creates a different exposure from coarse wood kept below a separate growing layer. Particle size and soil mixing both affect nitrogen tie-up around woody material, a distinction in Oregon State’s guidance. Avoid blending fresh fine woody material throughout the crop’s rooting soil.
Fertilizer rates for mixed woody soil amendments cannot simply be scaled to the weight or number of buried logs. Utah State’s raised-bed guidance treats those mixed amendments and recommends soil testing. Keep that distinction when deciding how to feed crops in a wood-core mound.
If new growth turns pale, inspect moisture, roots and planting depth before assuming nitrogen deficiency. A dry root ball, saturated pocket or lost soil contact needs a physical correction. Record which plants and parts of the mound are affected, then use a soil test suited to the nutrient question and crop-specific advice.
Adding large amounts of manure-rich compost can create another problem. Excess salts and nutrient imbalances can limit uptake, as University of Minnesota documents in over-amended beds. More compost is not automatically the right response to yellow leaves. Keep a record of the material already added and correct the identified shortage or excess.
Settling and Erosion Need Different Repairs
Take a photo of the finished profile and inspect it after heavy rain and through the growing season. Look for soil collecting at the foot, exposed wood, hollows and displaced root balls. Gradual settling is expected as organic material changes. A sudden cavity needs closer inspection before anyone works on that part of the mound.
| What changed | Inspect first | Next action |
|---|---|---|
| Soil and seeds washed down a side | Slope, runoff route and bare surface | Restore a stable gentler surface and cover before sowing again. |
| A hollow exposes woody material | Unfilled void, erosion or localized collapse | Keep off the unstable area; repair support and continuous growing soil. |
| Plants wilt despite a moist lower core | Actual root-ball and nearby soil moisture | Water a dry root zone; correct drainage if it is saturated. |
| Young crops remain pale or stunted | Water, root contact and soil nutrient results | Correct the diagnosed cause before adding fertilizer. |
| Damp wood or new soil obstructs a foundation | Building contact, inspection access and runoff | Relocate the garden work and obtain local building or termite advice. |
Add clean suitable soil where settling has reduced the growing layer, taking care not to bury established crowns. A shrinking mound is not a reason to apply compost to every plant at the same rate. Reassess shape, access and roots each season.
If repeated erosion, water access or poor placement keeps causing failures, use a simpler level bed at a suitable site. Woody material can also serve as appropriate surface mulch or habitat in a separate location. Keeping a mound is optional; maintaining healthy roots and safe drainage is the continuing job.
Conclusion
Mark the site, water route and paths before gathering material. Build only where known wood, stable sides and an adequate growing layer fit. After planting, inspect the roots’ moisture and the soil cover rather than judging the mound by its height. Repair the specific cause of sinking, erosion or poor growth before adding another layer.